Getting Started with ASP.NET Web Forms ReportViewer
16 Aug 202213 minutes to read
This section explains briefly about how to create a ReportViewer in your web application with ASP.NET.
Create your first ReportViewer in ASP.NET
This section explains how to configure a ReportViewer component in web application. As ReportViewer uses WebApi to process the report file, you can also learn how to create WebApi Service to process the report for ReportViewer. In the following example, the ReportViewer component displays the Sales Dashboard Report.
Open Visual Studio and create a new project by clicking New Project. Select the Web category, select the ASP.NET Empty Web Application template, and then click OK. The following screenshot displays the Project Creation Wizard.

Project Creation Wizard
Create ASPX Page
To create a new Web Forms in the application
-
Right-Click on the project and select Add

New Item Wizard
-
Click New Item and select Web Form from the listed templates

Adding Web Forms
-
Name the page as Default.aspx and click OK.
Add References, Scripts, Styles and Control in ASPX Page
Add References
-
In the Solution Explorer, right-click the References folder and then click Add Reference
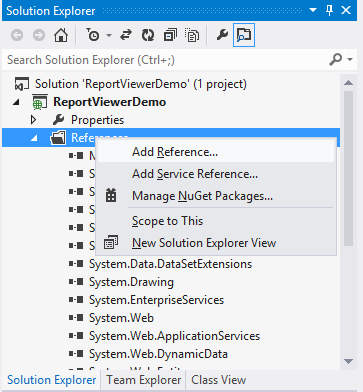
Adding Reference
-
Add the following assemblies
- System.Web.Routing
- System.Web.Http
- System.Web.WebHost
- System.Net.Http
- System.Net.Http.WebRequest
- System.Net.Http.Formatting
- Syncfusion.EJ
- Syncfusion.EJ.Web
- Syncfusion.Linq.Base
- Syncfusion.EJ.ReportViewer
- Syncfusion.Pdf.Base
- Syncfusion.XlsIO.Base
- Syncfusion.DocIO.Base
- Syncfusion.Shared.Wpf
- Syncfusion.Chart.Wpf
- Syncfusion.Gauge.Wpf
- Syncfusion.SfMaps.Wpf
NOTE
Refer the above assemblies from the installed location, C:\Program Files (x86)\Syncfusion\Essential Studio\ASP.NET\28.1.33\Assemblies
Refer System.Web.Http, System.Web.WebHost, System.Net.Http.WebRequest and System.Net.Http.Formatting assemblies from ASP.NET WebApi NuGet package.
-
Click OK
Add Scripts and Styles
Add the script files and CSS files in the <title> tag of the default.html page.
NOTE
Use the following code example while adding scripts and styles.
<head>
<link href="https://cdn.syncfusion.com/28.1.33/js/web/flat-azure/ej.web.all.min.css"  rel="stylesheet" />
<script src="https://code.jquery.com/jquery-1.10.2.min.js" type="text/javascript"></script>
<script src="https://cdnjs.cloudflare.com/ajax/libs/jquery-easing/1.3/jquery.easing.min.js" type="text/javascript">
</script>
<script src="https://cdn.syncfusion.com/28.1.33/js/web/ej.web.all.min.js"></script>
</head>
Add Control in ASPX Page
-
Drag the ReportViewer control from the Syncfusion Web Toolbox onto the Design Page
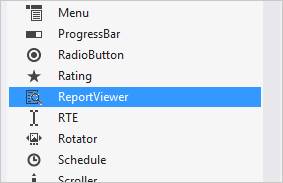
ReportViewer Control in Toolbox
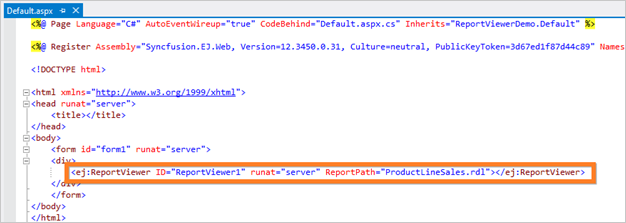
ReportViewer Control in Source Tab Section
-
Set the desired ReportPath and ReportServiceUrl to ReportViewer.
<form id="form1" runat="server">
    <div style="height: 650px;width: 950px;min-height:404px;">
        <ej:ReportViewer runat="server" ID="viewer"  ReportPath="~/App_Data/Sales Dashboard.rdl" ReportServiceUrl="/api/ReportApi">
        </ej:ReportViewer>
    </div>
</form>
NOTE
Add your report files to your application’s App_Data folder.You can obtain sample rdl/rdlc files from Syncfusion installed location (%userprofile%\AppData\Local\Syncfusion\EssentialStudio\28.1.33\Common\Data\ejReportTemplate). 28.1.33 is the Essential Studio Release Version.
Add WebAPI controller for ReportViewer
The ASP.NET ReportViewer uses WebApi services to process the report file and process the request from control.
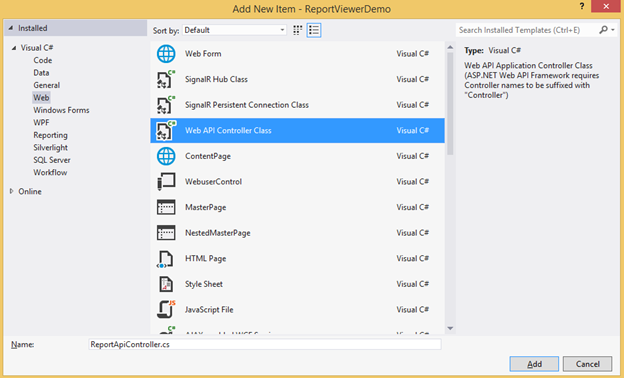
Adding WebApi Controller
Inherit the ReportViewer IReportController
The ApiController inherits the IReportController and you can add the following code example to its methods definition in order to process the report file. The interface IReportController contains the required actions and helper methods declaration to process the report. The ReportHelper class contains helper methods that helps to process Post/Get request from control and return the response to control.
using Syncfusion.EJ.ReportViewer;
using System;
using System.Collections.Generic;
using System.Linq;
using System.Net;
using System.Net.Http;
using System.Web.Http;

namespace ReportViewerDemo.Api
{
    public class ReportApiController : ApiController, IReportController
    {
        //Post action for processing the rdl/rdlc report
        public object PostReportAction(Dictionary<string, object> jsonResult)
        {
            return ReportHelper.ProcessReport(jsonResult, this);
        }
        //Get action for getting resources from the report
        [System.Web.Http.ActionName("GetResource")]
        [AcceptVerbs("GET")]
        public object GetResource(string key, string resourcetype, bool isPrint)
        {
            return ReportHelper.GetResource(key, resourcetype, isPrint);
        }
        //Method will be called when initialize the report options before start processing the report
        public void OnInitReportOptions(ReportViewerOptions reportOption)
        {
            //You can update report options here
        }
        //Method will be called when reported is loaded
        public void OnReportLoaded(ReportViewerOptions reportOption)
        {
            //You can update report options here
        }
    }
}
WebAPI Routing
-
Right-click the project and select Add and select Global.asax file from the listed templates.
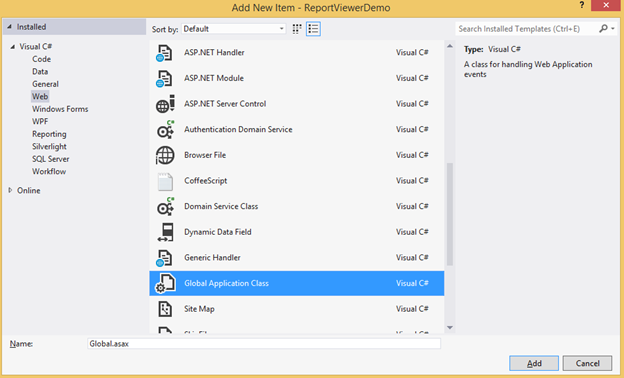
Adding Global.asax
-
You can route the WebAPI in Application_Start event into Global.asax file as follows.
using System;
using System.Collections.Generic;
using System.Linq;
using System.Web;
using System.Web.Security;
using System.Web.SessionState;
using System.Web.Http;

namespace ReportViewerDemo
{
    public class Global: System.Web.HttpApplication
    {
        protected void Application_Start(object sender, EventArgs e)
        {
            System.Web.Http.GlobalConfiguration.Configuration.Routes.MapHttpRoute(
            name: "DefaultApi",
            routeTemplate: "api/{controller}/{action}/{id}",
            defaults: new { id = RouteParameter.Optional });
        }
    }
}
Run the Application
Run the sample application and you can see the ReportViewer on the page as displayed in the following screenshot.
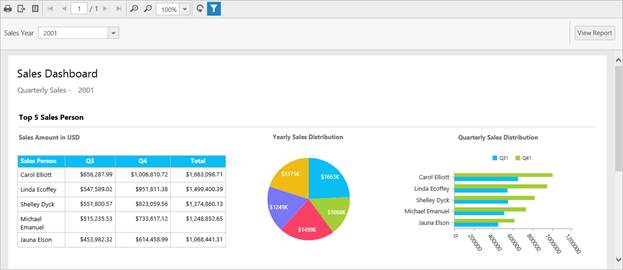
ReportViewer with Sales Dashboard Report
Load SSRS Server Reports
ReportViewer supports to load RDL/RDLC files from SSRS Server. The following steps help you to load reports from SSRS Server.
-
Set the ReportPath from SSRS and SSRS ReportServerUrl in the ReportViewer properties.
<form id="form1" runat="server"> <div style="height: 650px;width: 950px;min-height:404px;"> <ej:ReportViewer ID="viewer" runat="server" ReportServiceUrl="/api/ReportApi" ReportServerUrl="http://mvc.syncfusion.com/ReportServer" ReportPath="/SSRSSamples2/Territory Sales"> </ej:ReportViewer> </div> </form> -
Add the credential information in ReportApiController’sOnInitReportOptions method that is available in IReportController
public void OnInitReportOptions(ReportViewerOptions reportOption) { //Add SSRS Server and database credentials here reportOption.ReportModel.ReportServerCredential = new System.Net.NetworkCredential("ssrs", "RDLReport1"); reportOption.ReportModel.DataSourceCredentials.Add(new DataSourceCredentials("AdventureWorks", "ssrs1", "RDLReport1")); } -
Run the application and you can see the ReportViewer on the page as displayed in the following screenshot.
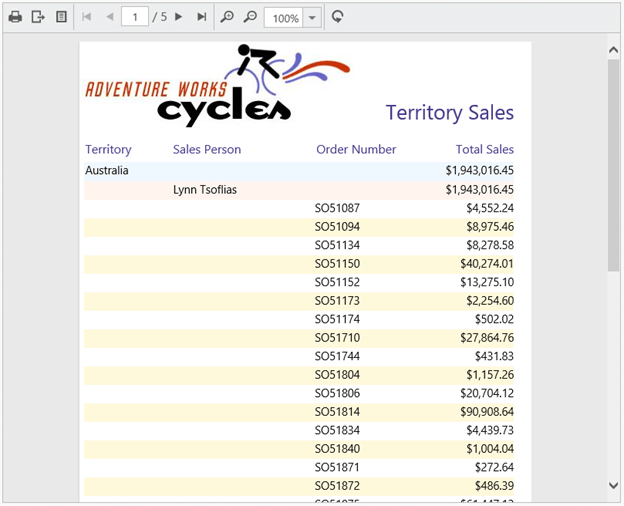
Report from SSRS
Load RDLC Reports
The ReportViewer has data binding support to visualize the RDLC reports. The following steps help you to bind data to ReportViewer.
-
Assign the RDLC report path to ReportViewer’sReportPath property
<div style="width:100%;height:100%;"> <ej:ReportViewer ID="viewer" runat="server" ReportServiceUrl="/api/ReportApi" ReportPath="~/App_Data/Product List.rdlc" ProcessingMode="Local"> </ej:ReportViewer> </div> -
Add business object data source to ReportViewer’sDataSources from aspx.cs.
namespace ReportViewerDemo { public partial class ProductListDemo: System.Web.UI.Page { protected void Page_Load(object sender, EventArgs e) { ProductList prodlist = new ProductList(); List <ReportDataSource> rptDatasources = new List <ReportDataSource> (); ReportDataSource rptDatasource = new ReportDataSource(); rptDatasource.Name = "list"; rptDatasource.Value = prodlist.GetData(); rptDatasources.Add(rptDatasource); this.viewer.DataSources = rptDatasources; } } public class ProductList { public string ProductName { get; set; } public string OrderId { get;set; } public double Price { get; set; } public string Category { get; set; } public string Ingredients { get; set; } public string ProductImage { get; set; } public IList GetData() { List <ProductList> datas = new List <ProductList> (); ProductList data = null; data = new ProductList() { ProductName = "Baked Chicken and Cheese", OrderId = "323B60", Price = 55, Category = "Non-Veg", Ingredients = "grilled chicken, corn and olives.", ProductImage = "" }; datas.Add(data); data = new ProductList() { ProductName = "Chicken Delite", OrderId = "323B61", Price = 100, Category = "Non-Veg", Ingredients = "cheese, chicken chunks, onions & pineapple chunks.", ProductImage = "" }; datas.Add(data); data = new ProductList() { ProductName = "Chicken Tikka", OrderId = "323B62", Price = 64, Category = "Non-Veg", Ingredients = "onions, grilled chicken, chicken salami & tomatoes.", ProductImage = "" }; datas.Add(data); return datas; } } } -
Run the application and you can see the ReportViewer on the page as displayed in the following screenshot.
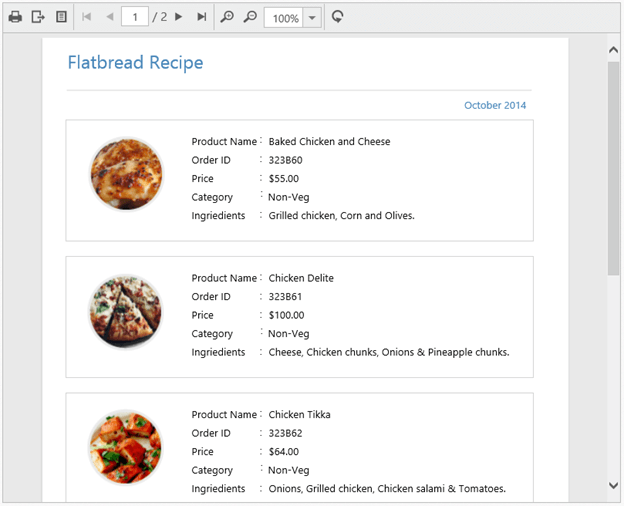
Product List RDLC Report