Getting Started
28 Jun 201715 minutes to read
This section explains briefly about how to create a Checkbox in your application with JavaScript.Essential JavaScript Checkbox provides support for multiple selections, within your web page and allows you to specify an option from the list. From the following guidelines, you can select Multiple or Single Selection List Receiving App using Checkbox. The following screenshot demonstrates the functionality with Checkbox button action.
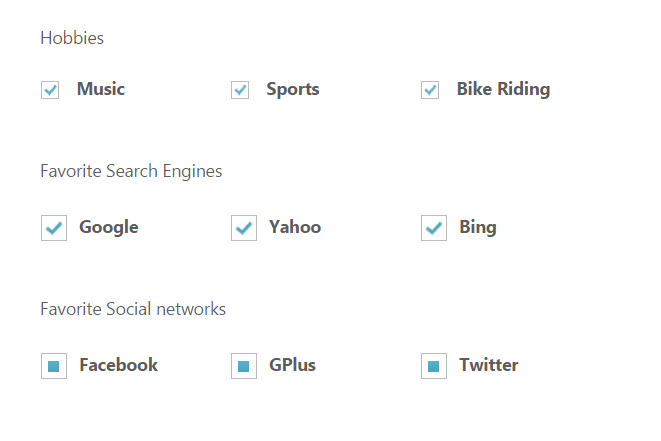
In the above screenshot, you can select Hobbies, Interests list and Social networks Receiving App using Checkbox, Tri-state Checkbox and perform the action to render the checked values when the button is clicked.
Create a Checkbox
Essential JavaScript Checkbox widget has built-in features like intermediate selections. You can easily create the Checkbox widget by using a simple input Checkbox element as follows.
-
Create an HTML file and add required scripts and CSS files to render the Essential JavaScript component as given in the Getting Started.
-
Essential JavaScript includes angular directives for all controls with the ej.widget.angular.min.js script file. All the Essential JS directives have been encapsulated into a single module called ejangular. To render our ej controls in angular, you need to refer the “angular.min.js” and “ej.widget.angular.min.js” in your application.
<!DOCTYPE html>
<html xmlns="http://www.w3.org/1999/xhtml" ng-app="CheckboxCtrl">
   <head>
      <meta name="viewport" content="width=device-width, initial-scale=1.0" charset="utf-8"  />
      <title>Getting Started Essential JS</title>
      <!-- Style sheet for default theme (flat azure) -->
      <lin khref="http://cdn.syncfusion.com/28.1.33/js/web/flat-azure/ej.web.all.min.css"rel="stylesheet"/>
      <!--Scripts-->
      <script src="http://cdn.syncfusion.com/js/assets/external/jquery-1.10.2.min.js"></script>
      <script src="http://cdn.syncfusion.com/28.1.33/js/web/ej.web.all.min.js"></script>
      <!--Add custom scripts here -->
   </head>
   <body ng-controller="CheckboxCtrller">
      <!-- Add checkbox element here -->
      <input type="checkbox" ej-checkbox id="check1" e-value="checkbox1" />
      <label for="check1">Checkbox</label>
   </body>
</html>
The ng-app directive explains the root element (<html> or <body> tags) of the application. You will assign a name to the ng-app directive, then you must create a module with that name. In this module, you will have to define your directives, services, filters and configurations.
Properties can be bind to ejCheckBox control using the prefix e- and particular property name as shown as below
<div class="frame">
    Hobbies <br /><br />
    <table>
        <tr>
            <td class="chkrad">
                <input type="checkbox" ej-checkbox id="check1" e-value="Music" e-checked="true" />
                <label for="check1">Music</label>
            </td>
            <td class="chkrad">
                <input type="checkbox" ej-checkbox id="Checkbox3" e-value="Sports" />
                <label for="Checkbox3">Sports</label>
            </td>
            <td class="chkrad">
                <input type="checkbox" ej-checkbox id="Checkbox4" e-value="Bike riding" />
                <label for="Checkbox4" class="clslab">Bike Riding</label>
            </td>
        </tr>
    </table><br /><br />
    Favorite Search Engines<br /><br />
    <table>
        <tr>
            <td class="chkrad">
                <input type="checkbox" ej-checkbox id="Checkbox1" e-value="playing Games" e-size="medium" e-checked="true" />
                <label for="Checkbox1">Playing Games</label>
            </td>
            <td class="chkrad">
                <input type="checkbox" ej-checkbox id="Checkbox5" e-value="Hearing Songs" e-size="medium" />
                <label for="Checkbox5">Hearing Songs</label>
            </td>
            <td class="chkrad">
                <input type="checkbox" ej-checkbox id="Checkbox6" e-value="Watching tv" e-size="medium" />
                <label for="Checkbox6">Watching Tv</label>
            </td>
        </tr>
    </table><br /><br />
    Media Player<br /><br />
    <table>
        <tr>
            <td class="chkrad">
                <input type="checkbox" ej-checkbox id="Checkbox2" e-value="Video" e-size="medium" e-enabletristate="true" e-checkstate="indeterminate" />
                <label for="Checkbox2">Video</label>
            </td>
            <td class="chkrad">
                <input type="checkbox" ej-checkbox id="Checkbox7" e-value="Audio" e-size="medium" e-enabletristate="true" e-checkstate="indeterminate" />
                <label for="Checkbox7">Audio</label>
            </td>
            <td class="chkrad">
                <input type="checkbox" ej-checkbox id="Checkbox8" e-value="Picture" e-size="medium" e-enabletristate="true" />
                <label for="Checkbox8">Picture</label>
            </td>
        </tr>
    </table>
   <br />
   <div>
        <button id="button11" ej-button e-showroundedcorner="true" e-width="60px" e-size="normal" e-text="SUBMIT" e-click="onClick"></button>
   </div>
</div>
Add the following styles to show the Checkbox control in an order.
 <style>

  .frame
    {
        width: 80%;
    }
    .chkrad
    {
        width: 150px;
    }

</style>
Add the following in the script section.
angular.module('CheckboxCtrl', ['ejangular'])
           .controller('CheckboxCtrller', function ($scope) {
              $scope.onClick = function(e) {
                    var checkeditem = [], proxy = this;
                    $("input[type=checkbox]").each(function () {
                        if ($("#" + $(proxy)[0].id).ejCheckBox("option", "checked"))
                            checkeditem.push($(proxy).val());
                    });
                    alert(checkeditem);
              }
           });
The following screenshot displays a Checkbox control.

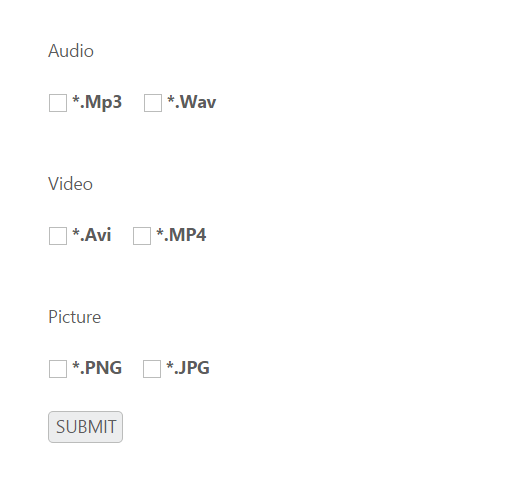
File Selection in Media Player
You can get the file type of Media player applications such as video, audio and picture using Checkbox. Follow the given steps to get media player file types.
Add the following code in the <body> element of the corresponding view page.
<div class="frame">
   Audio <br /><br />
   <table>
      <tr>
         <td >
            <input type="checkbox" ej-checkbox id="Checkbox1" e-value="Mp3" />
            <label for="Checkbox1"  >*.Mp3</label>
         </td>
         <td >
            <input type="checkbox" ej-checkbox id="Checkbox2" e-value="Wav" />
            <label for="Checkbox2"  >*.Wav</label>
         </td>
      </tr>
   </table>
   <br /><br />
   Video<br /><br />
   <table>
      <tr>
         <td >
            <input type="checkbox" ej-checkbox id="Checkbox3" e-value="Avi" />
            <label for="Checkbox3"  >*.Avi</label>
         </td>
         <td >
            <input type="checkbox" ej-checkbox id="Checkbox4" e-value="MP4" />
            <label for="Checkbox4"  >*.MP4</label>
         </td>
      </tr>
   </table>
   <br /><br />
   Picture<br /><br />
   <table>
      <tr>
         <td>
            <input type="checkbox" ej-checkbox id="Checkbox5" e-value="PNG" />
            <label for="Checkbox5" >*.PNG</label>
         </td>
         <td>
            <input type="checkbox" ej-checkbox id="Checkbox6" e-value="JPG" />
            <label for="Checkbox6" >*.JPG</label>
         </td>
       </tr>
   </table>
   <br />
   <div>
        <button id="button11" ej-button e-showroundedcorner="true" e-width="60px" e-size="normal" e-text="SUBMIT" e-click="onClick"></button>
   </div>
</div>angular.module('CheckboxCtrl', ['ejangular'])
.controller('CheckboxCtrller', function ($scope) {
$scope.onClick = function(e) {
var checkeditem = [], proxy = this;
$("input[type=checkbox]").each(function () {
if ($("#" + $(proxy)[0].id).ejCheckBox("option", "checked"))
checkeditem.push($(proxy).val());
});
alert(checkeditem);
}
});Execute the code to render the resultant output.