How can I help you?
Getting Started with AngularJS Button
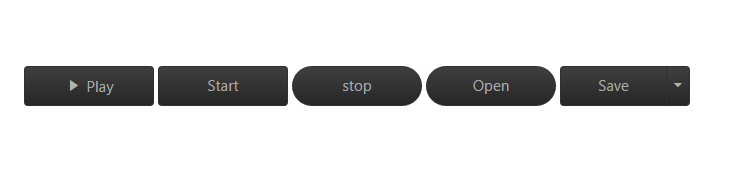
This section explains you briefly on how to create a Button in your application with JavaScript. Essential JavaScript Button helps to display a Button widget within a web page and allows you to Click, Toggle Click, Reset, and Submit. The following example illustrates how to customize Button control in a Media Player and Office Ribbon Application.
The following screenshot illustrates the functionality of a Button control in Media Player and Office Ribbon Application.
Create Button Widget
Essential JavaScript Button control has different functionalities such as display only Image Content or Image Content with Text.
- Create an HTML file and add required scripts and CSS files to render the Essential JavaScript component as given in the Getting Started.
- Essential JavaScript includes angular directives for all controls with the ej.widget.angular.min.js script file. All the Essential JS directives have been encapsulated into a single module called ejangular. To render our ej controls in angular, you need to refer the “angular.min.js” and “ej.widget.angular.min.js” in your application.
<!DOCTYPE html>
<html xmlns="http://www.w3.org/1999/xhtml" ng-app="BtnCtrl">
   <head>
      <meta name="viewport" content="width=device-width, initial-scale=1.0" charset="utf-8" />
      <!-- Style sheet for default theme (flat azure) -->
      <link href="http://cdn.syncfusion.com/32.2.3/js/web/gradient-saffron-dark/ej.web.all.min.css" rel="stylesheet" />
      <!--Scripts-->
      <script src="http://cdn.syncfusion.com/js/assets/external/jquery-1.10.2.min.js"></script>
      <script src="http://cdn.syncfusion.com/32.2.3/js/web/ej.web.all.min.js"></script>
      <!--Add custom scripts here -->
   </head>
   <body ng-controller="BtnController">
      <!-- Add button element Here -->
      <button id="button1" ej-button e-showroundedcorner="true" e-size="medium" e-text="login"></button>
   </body>
</html>
The ng-app directive explains the root element (<html> or <body> tags) of the application. You will assign a name to the ng-app directive, then you must create a module with that name. In this module, you will have to define your directives, services, filters and configurations.
Properties can be bind to ejButton control using the prefix e- and particular property name as shown as below.
Add <Button> element to create a Button control.
<div class="case1">
   <table>
        <tr>
            <td>
                <input type="checkbox" id="play" ej-togglebutton e-showroundedcorner="true" e-size="large" e-contenttype="textandimage" e-defaulttext="Play" e-activetext="Pause" e-defaultprefixicon="e-icon e-play" e-activeprefixicon="e-icon e-pause" />
            </td>
            <td>
                <button id="start" ej-button e-showroundedcorner="true" e-size="large" e-text="Start"></button>
            </td>
            <td>
                <button id="stop" ej-button e-showroundedcorner="true" e-size="large" e-text="stop"></button>
            </td>
            <td>
                <button id="open" ej-button e-showroundedcorner="true" e-size="large" e-text="Open"></button>
            </td>
            <td>
                <button id="save" ej-splitbutton e-size="large" e-showroundedcorner="true" e-targetid="menu1" e-text="Save"></button>
                <ul id="menu1">
                    <li><span>Open...</span></li>
                    <li><span>Save</span></li>
                    <li><span>Delete</span></li>
                </ul>
            </td>
        </tr>
   </table>
</div>
Add the following in the script section.
angular.module('BtnCtrl', ['ejangular'])
           .controller('BtnController', function ($scope) {

           });
Add the following styles to show the Button control in the center of a webpage.
<style>
    #play, #pause, #stop, #open, #bold, #italic, #underline {
        border-radius: 100px; /* for rounded corners*/
    }

    ul li span {
        color: white;
    }

    .case1 {
        margin: 100px;
    }

    .officeribben {
        margin: 100px;
    }

    .sample {
        margin: 100px;
    }

    .audiodiv {
        margin: 100px;
    }
</style>
Create Office Ribbon Control
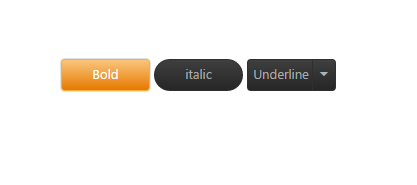
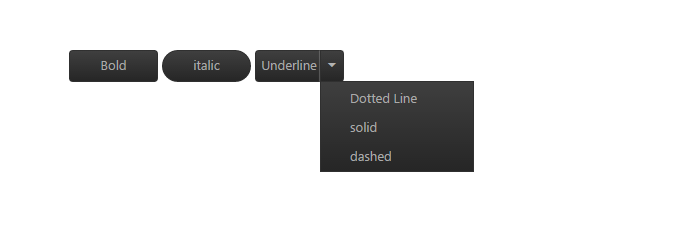
In a real-time scenario, Microsoft Office Bold and Italic options work as Toggle Button and Underline option works as a Split Button. Here, you can learn how to use Button control feature using Office Ribbon options.
Add <Button> element using the following code example.
<div class="case1">
        <table>
            <tr>
                <td>
                    <input type="checkbox" id="bold" ej-togglebutton e-showroundedcorner="true" e-size="large"e-defaulttext="Bold" e-activetext="bold" e-click="boldClick" />
                </td>
                <td>
                    <button id="italic" ej-button e-showroundedcorner="true" e-size="small" e-text="italic" e-click="italicClick"></button>
                </td>
                <td>
                    <button id="Underline" ej-splitbutton e-size="small" e-showroundedcorner="true" e-text="Underline" e-targetid="menu11" e-click="underlineClick" e-create="spltbtnLoad"></button>
                    <ul id="menu11">
                        <li><span>Dotted Line</span></li>
                        <li><span>solid</span></li>
                        <li><span>dashed</span></li>
                    </ul>
                </td>
            </tr>
        </table>
   </div>
Initialize <Button> script with required properties.
Add the following function definition for Button in the script section.
angular.module('BtnCtrl', ['ejangular'])
           .controller('BtnController', function ($scope) {
              $scope.boldClick = function(e) {
                    if (e.isChecked) {
                        $(".sample span").wrap("<b></b>");// add the bold tag to span
                    }
                    else {
                        $(".sample span").unwrap("<b></b>");// remove the bold tag to span
                    }
              }
              $scope.italicClick = function(e) {
                    if ($(".sample span").parents().is("i")) {
                        $(".sample span").unwrap("<i></i>");// remove the italic tag to span
                    }
                    else {
                        $(".sample span").wrap("<i></i>");// remove the italic tag to span
                    }
              }
              $scope.underlineClick = function(e) {
                    if ($(".sample span").parents().is("u")) {
                        $(".sample span").unwrap("<u></u>");// remove the italic tag to span
                    } else {
                        $(".sample span").wrap("<u></u>");// remove the italic tag to span
                    }
              }
           });
The following screenshot displays Office Ribbon Application.
The following screenshot displays Office Ribbon Bold Option.