How can I help you?
Getting started with Angular SpreadSheet
Before we start with the Spreadsheet, please refer this page for general information regarding integrating Syncfusion widget’s.
This section explains you the steps required to populate the Spreadsheet with data, format, and export it as excel file. This section covers only the minimal features that you need to know to get started with the Spreadsheet.
Adding Script Reference
To render the Spreadsheet control, the following list of external dependencies are needed,
- jQuery - 1.7.1 and later versions
The required Angular script as ej.angular2.min.js which can be available in below CDN link:
For other required internal dependencies refer the link
NOTE
Spreadsheet uses one or more sub-controls, therefore refer the
ej.web.all.min.js(which encapsulates all theejcontrols and frameworks in a single file) in the application instead of referring all the above specified internal dependencies.
To get the real appearance of the Spreadsheet, the dependent CSS file ej.web.all.min.css (which includes styles of all the widgets) should also needs to be referred.
So the complete boilerplate code is
<!DOCTYPE html>
<html>
   <head>
    <link href="//cdn.syncfusion.com/14.3.0.49/js/web/flat-azure/ej.web.all.min.css" rel="stylesheet" />
    <script src="node_modules/core-js/client/shim.min.js"></script>
    <script src="node_modules/zone.js/dist/zone.js"></script>
    <script src="node_modules/reflect-metadata/Reflect.js"></script>
    <script src="node_modules/systemjs/dist/system.src.js"></script>
    <script src="https://code.jquery.com/jquery-3.0.0.min.js"></script>
    <script src="http://cdn.syncfusion.com/js/assets/external/jsrender.min.js" type="text/javascript"></script>
    <script src="https://ajax.aspnetcdn.com/ajax/jquery.validate/1.14.0/jquery.validate.min.js">
    </script>
    <script src="http://cdn.syncfusion.com/14.3.0.49/js/web/ej.web.all.min.js" type="text/javascript"></script>
    <script src ="http://cdn.syncfusion.com/14.3.0.49/js/common/ej.angular2.min.js"></script>
    <script src="systemjs.config.js"></script>
  </head>
  <body>
   <ej-app>Loading...</ej-app>
  </body>
</html>
NOTE
In production, we highly recommend you to use our
custom script generatorto create custom script file with required controls and its dependencies only. Also to reduce the file size further please useGZip compressionin your server.
For themes, you can use theej.web.all.min.cssCDN link from the code example given. To add the themes in your application, please refer tothis link.
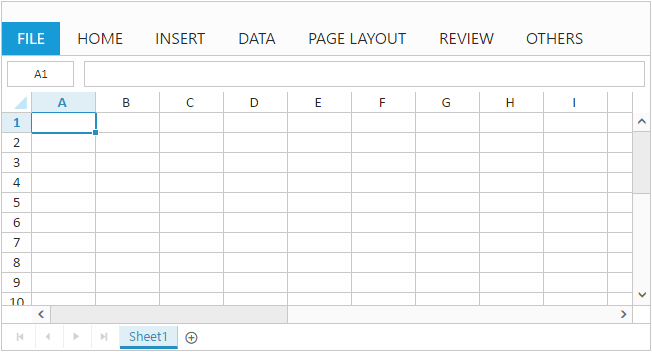
Initialize Spreadsheet
The Spreadsheet component can be created with prefix of ej-.The code example for defining controls in Angular is as follows,
<ej-spreadsheet id="spreadsheet">
</ej-spreadsheet>import {Component, ViewEncapsulation} from '@angular/core';
@Component({
selector: 'ej-app',
templateUrl: 'app/app.component.html', //give the path file for spreadsheet component html file.
})
export class AppComponent {
}Now, the Spreadsheet is rendered with default row and column count.
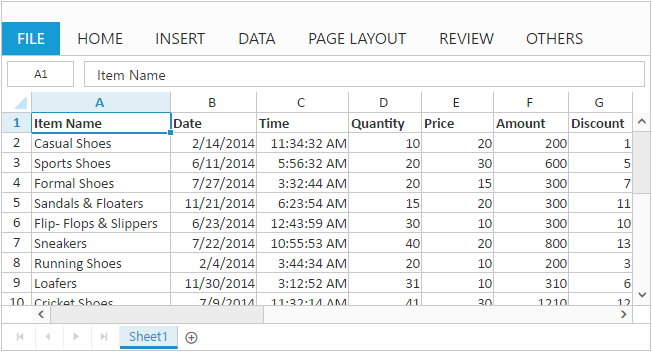
Populate Spreadsheet with data
Now, this section explains how to populate JSON data to the Spreadsheet. You can set dataSource property in e-rangesettings to populate JSON data in Spreadsheet.
<ej-spreadsheet id="spreadsheet">
        <e-sheets>
            <e-sheet>
                 <e-rangesettings>
                    <e-rangesetting [dataSource]="spreadData" startCell="A1" [headerStyles]="{'font-weight':'bold'}"></e-rangesetting>
                 </e-rangesettings>
            </e-sheet>
        </e-sheets>
</ej-spreadsheet>import {Component, ViewEncapsulation} from '@angular/core';
@Component({
selector: 'ej-app',
templateUrl: 'app/app.component.html', //give the path file for spreadsheet control html file.
})
export class AppComponent {
public spreadData;
constructor() {
this.spreadData = [{
"Item Name": "Casual Shoes", Date: "02/14/2014", Time: "11:34:32 AM", Quantity: 10, Price: "20", Amount: "200", Discount: "1", Profit: "10" },
{ "Item Name": "Sports Shoes", Date: "06/11/2014", Time: "05:56:32 AM", Quantity: 20, Price: "30", Amount: "600", Discount: "5", Profit: "50" },
{ "Item Name": "Formal Shoes", Date: "07/27/2014", Time: "03:32:44 AM", Quantity: 20, Price: "15", Amount: "300", Discount: "7", Profit: "27" },
{ "Item Name": "Sandals & Floaters", Date: "11/21/2014", Time: "06:23:54 AM", Quantity: 15, Price: "20", Amount: "300", Discount: "11", Profit: "67" },
{ "Item Name": "Flip- Flops & Slippers", Date: "06/23/2014", Time: "12:43:59 AM", Quantity: 30, Price: "10", Amount: "300", Discount: "10", Profit: "70" },
{ "Item Name": "Sneakers", Date: "07/22/2014", Time: "10:55:53 AM", Quantity: 40, Price: "20", Amount: "800", Discount: "13", Profit: "66" },
{ "Item Name": "Running Shoes", Date: "02/04/2014", Time: "03:44:34 AM", Quantity: 20, Price: "10", Amount: "200", Discount: "3", Profit: "14" },
{ "Item Name": "Loafers", Date: "11/30/2014", Time: "03:12:52 AM", Quantity: 31, Price: "10", Amount: "310", Discount: "6", Profit: "29" },
{ "Item Name": "Cricket Shoes", Date: "07/09/2014", Time: "11:32:14 AM", Quantity: 41, Price: "30", Amount: "1210", Discount: "12", Profit: "166" },
{ "Item Name": "T-Shirts", Date: "10/31/2014", Time: "12:01:44 AM", Quantity: 50, Price: "10", Amount: "500", Discount: "9", Profit: "55" }]
}
}
}
NOTE
For more details about
data bindingrefer followinglink
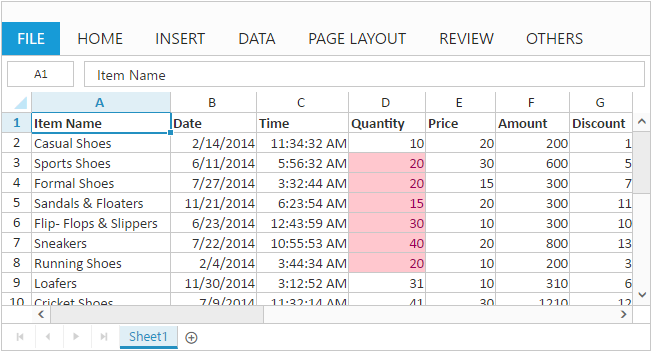
Apply Conditional Formatting
Conditional formatting helps you to apply formats to a cell or range with certain color based on the cells values. You can use allowConditionalFormats property within square bracket([]) to enable/disable Conditional formats.
<ej-spreadsheet #spreadsheet id="Spreadsheet" [allowConditionalFormats]= true>
        <e-sheets >
            <e-sheet [dataSource]="spreadData" startCell="A1" [headerStyles]="{'font-weight':'bold'}">
            <e-sheet>
        </e-sheets>
    </ej-spreadsheet>
To apply conditional formats for a range use setCFRule method. The following code example illustrates this,
import { Component, ViewChild } from '@angular/core';
import { EJComponents } from 'ej-angular2';

@Component({
    selector: 'ej-app',
    templateUrl: 'app/app.component.html',  //give the path file for spreadsheet control html file.
})

export class AppComponent {
    public spreadData;
    constructor(){
        // The datasource "window.defaultData" is referred from 'http://js.syncfusion.com/demos/web/scripts/xljsondata.min.js'
        this.spreadData = (window as any).defaultData;
    }
    @ViewChild('spreadsheet') xlObj: EJComponents<any, any>;
    ngAfterViewInit() {
        this.xlObj.widget.XLCFormat.setCFRule({ "action": "greaterthan", "inputs": ["10"], "color": "redft", "range": "D2:D8" });
    }
}
NOTE
For more details about
Conditional Formattingrefer followinglink
Export Spreadsheet as Excel File
The Spreadsheet can save its data, style, format into an excel file. To enable save option in Spreadsheet set exportSettings.allowExporting option as trueand Specify exportSettings.excelUrl option to save documents using server side helper. The following code example illustrates this,
<ej-spreadsheet id="spreadsheet" exportSettings.excelUrl="http://js.syncfusion.com/demos/ejservices/api/Spreadsheet/ExcelExport">
    <e-sheets >
        <e-sheet [dataSource]="spreadData" startCell="A1" [headerStyles]="{'font-weight':'bold'}"></e-sheet>
    </e-sheets>
</ej-spreadsheet>import {Component} from '@angular/core';
@Component({
selector: 'ej-app',
templateUrl: 'app/app.component.html', //give the path file for spreadsheet control html file.
})
export class AppComponent {
public spreadData;
constructor(){
// The datasource "window.defaultData" is referred from 'http://js.syncfusion.com/demos/web/scripts/jsondata.min.js'
this.spreadData = (window as any).defaultData;
}
}Use shortcut Ctrl + S to save Spreadsheet as excel file.
NOTE