Rendering Mode
7 Jun 20174 minutes to read
DropDownList widget can be created in three ways.
- Using an input element
- Using a select element
- Using UL-LI
Using an input element
Create an input element with the HTML “id” attribute set to it. To initialize the DropDownList, you should call the “ejDropDownList” jQuery plug-in function with the options as parameter
You can bind the local JSON array data source to the DropDownList using dataSource and fields properties. Fields property is used to map with the corresponding columns.
<input id="dropdown1" ej-dropdownlist [dataSource]="data" [fields]="fieldsvalues"/>import {Component} from '@angular/core';
@Component({
selector: 'sd-home',
templateUrl: 'app/components/dropdown/dropdown.component.html'
})
export class DropDownListComponent {
data: Array<Object> = [];
fieldsvalues: Object;
constructor() {
this.data = [
{text: "ListItem 1", value: "ListItem 1" },
{text: "ListItem 2", value: "ListItem 2" },
{text: "ListItem 3", value: "ListItem 3" },
{text: "ListItem 4", value: "ListItem 4" },
{text: "ListItem 5", value: "ListItem 5" }
];
this.fieldsvalues = { dataSource: this.data, text: "text", value: "value" };
}
}Using Select Element
You can create a DropDownList using a select element. Refer to the below code.
<select id="dropdown1" ej-dropdownlist [dataSource]="data" [fields]="fieldsvalues"></select>import {Component} from '@angular/core';
@Component({
selector: 'sd-home',
templateUrl: 'app/components/dropdown/dropdown.component.html'
})
export class DropDownListComponent {
data: Array<Object> = [];
fieldsvalues: Object;
constructor() {
this.data = [
{text: "ListItem 1", value: "ListItem 1" },
{text: "ListItem 2", value: "ListItem 2" },
{text: "ListItem 3", value: "ListItem 3" },
{text: "ListItem 4", value: "ListItem 4" },
{text: "ListItem 5", value: "ListItem 5" }
];
this.fieldsvalues = { dataSource: this.data, text: "text", value: "value" };
}
}Using UL-LI
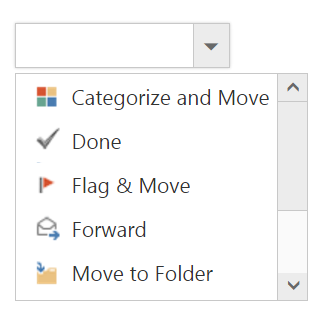
You can bind the predefined set of UL-LI elements to generate the list of popup items. These items can be customized by adding any images, div elements, radio buttons, text boxes etc.
Create a div with UL-LI elements and assign that div id into targetID property and initialize the widget.
<input id="dropdown1" ej-dropdownlist [targetID]="list"/>
<div id="mailtoolslist">
	<ul>
		<li><div class="mailtools categorize"></div>Categorize and Move</li>
		<li><div class="mailtools done"></div>Done</li>
		<li><div class="mailtools flag"></div>Flag & Move</li>
		<li><div class="mailtools forward"></div>Forward</li>
		<li><div class="mailtools movetofolder"></div>Move to Folder</li>
		<li><div class="mailtools newmail"></div>New E-mail</li>
		<li><div class="mailtools meeting"></div>New Meeting</li>
		<li><div class="mailtools reply"></div>Reply & Delete</li>
	</ul>
</div>import {Component} from '@angular/core';
import {ViewEncapsulation} from '@angular/core';
@Component({
selector: 'sd-home',
templateUrl: 'app/components/dropdown/dropdown.component.html',
styleUrls: ['app/components/dropdown/dropdown.component.css'],
encapsulation: ViewEncapsulation.None
})
export class DropDownListComponent {
list: string;
constructor() {
this.list = "mailtoolslist";
}
}Add the below css in dropdown.component.css file.
.mailtools {
        	display: block;
        	background-image: url('iconsapps.png');
            height: 25px;
            width: 25px;
            background-position: center center;
            background-repeat: no-repeat;
        }
		.mailtools.done {
			background-position: 0 0;
		}

		.mailtools.movetofolder {
			background-position: 0 -22px;
		}

		.mailtools.categorize {
			background-position: 0 -46px;
		}

		.mailtools.flag {
			background-position: 0 -70px;
		}

		.mailtools.forward {
			background-position: 0 -94px;
		}

		.mailtools.newmail {
			background-position: 0 -116px;
		}

		.mailtools.reply {
			background-position: 0 -140px;
		}

		.mailtools.meeting {
			background-position: 0 -164px;
		}
NOTE
Images for this sample are available in (installed location)\Syncfusion\Essential Studio\25.1.35\JavaScript\ng1 app\content\images