How can I help you?
View customization
9 Mar 20186 minutes to read
Appointment Customization
ScheduleAppointment created in schedule are arranged based on its duration, where the appointments viewed through day, week and work week view are positioned in the timeslots.
Appointment Style
Schedule Appointment can be customized in two ways,
- AppointmentStyle property.
- AppointmentLoadedEvent.
Using AppointmentStyle property
ScheduleAppointment can be customized by setting appointment style properties such as TextColor,TextStyle,BorderColor,BorderCornerRadius,BorderWidth,SelectionBorderColor,SelectionTextColor to the AppointmentStyle property of schedule.
AppointmentStyle appointmentStyle = new AppointmentStyle();
appointmentStyle.TextColor = Color.Red;
appointmentStyle.TextStyle = Font.SystemFontOfSize(15,FontAttributes.Bold);
appointmentStyle.BorderColor = Color.Blue;
appointmentStyle.BorderCornerRadius = 12;
appointmentStyle.BorderWidth = 10;
appointmentStyle.SelectionBorderColor = Color.Yellow;
appointmentStyle.SelectionTextColor = Color.Yellow;
schedule.AppointmentStyle = appointmentStyle;
Using AppointmentLoaded Event
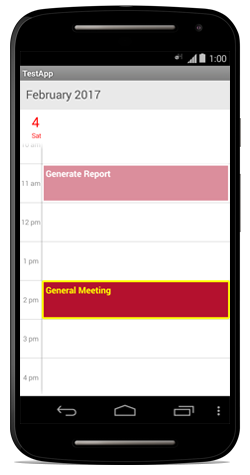
Schedule appointment view can be customized during runtime using AppointmentLoaded Event.In AppointmentLoaded event, the properties such as appointmentStyle,appointment,view,Bounds are passed in the AppointmentLoadedEventArgs.
ScheduleAppointment can be customized using the appointmentStyle property as follows,
schedule.AppointmentLoaded += (object sender, SfSchedule.AppointmentLoadedEventArgs e) =>
{
	e.P0.AppointmentStyle.BorderColor = Color.AliceBlue;
	e.P0.AppointmentStyle.BorderCornerRadius = 5;
	e.P0.AppointmentStyle.BorderWidth = 10;
	e.P0.AppointmentStyle.SelectionBorderColor = Color.Blue;
	e.P0.AppointmentStyle.SelectionTextColor = Color.Yellow;
	e.P0.AppointmentStyle.TextColor = Color.Brown;
	e.P0.AppointmentStyle.TextStyle = Font.SystemFontOfSize(15,FontAttributes.Bold);
};
Appointment Custom View
You can also add an object in the appointment view using view property passed through AppointmentLoadedEventArgs.
schedule.AppointmentLoaded += (object sender, SfSchedule.AppointmentLoadedEventArgs e) =>
{
	Button button = new Button(this);
	button.SetBackgroundColor(Color.Red);
	e.P0.View = button;
};
MonthCell Customization
Schedule views are designed as per the native calendar control with some enriched user interface for the control interaction and usability. Month view cell contains the date along with its appointments if available.
MonthCell Style
You can customize the MonthView cell in two ways,
- MonthCellStyle property.
- MonthCellLoadedEvent.
Using MonthCellStyle property
MonthView can be customized by setting monthCellStyle properties such as TextColor,TextStyle,BackgroundColor to the MonthCellStyle property of schedule.
MonthCellStyle monthCellStyle = new MonthCellStyle();
	monthCellStyle.BackgroundColor = Color.Gray;
	monthCellStyle.TextColor = Color.Blue;
	monthCellStyle.TextSize = 12;
	monthCellStyle.TextStyle = Font.SystemFontOfSize(15,FontAttributes.Bold);
	schedule.MonthCellStyle = monthCellStyle;
Using MonthCellLoaded Event
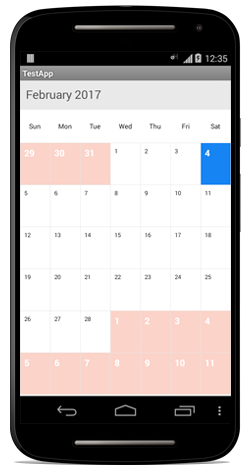
You can customize the month view during runtime using MonthCellLoaded Event. In MonthCellLoaded event, the properties such as CellStyle,Appointments,Calendar,view and boolean properties such as IsToday,IsPreviousMonthDate,IsNextMonthDate,IsBlackoutDate are passed in the MonthCellLoadedEventArgs.
Month cells can be customized using the CellStyle property as follows,
schedule.MonthCellLoaded += (object sender, SfSchedule.MonthCellLoadedEventArgs e) =>
	{
	if (e.P0.IsToday)
	{
	e.P0.CellStyle.BackgroundColor = Color.Gray;
	e.P0.CellStyle.TextColor = Color.Blue;
	e.P0.CellStyle.TextSize = 12;
	e.P0.CellStyle.TextStyle = Font.SystemFontOfSize(15,FontAttributes.Bold);
	}
	};
MonthCell Custom View
You can also add an object in the month cell view using View property passed through MonthCellLoadedEventArgs.
schedule.MonthCellLoaded += (object sender, SfSchedule.MonthCellLoadedEventArgs e) =>
	{
	Button button = new Button(this);
	button.SetBackgroundColor(Color.Red);
	e.P0.View = button;
	};
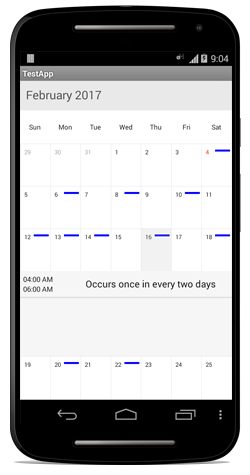
Inline view Customization.
You can able to know the details of appointments in inline using InlineAppointmentTapped event in Schedule. Details of the selected appointment and the corresponding date is passed through InlineAppointmentTappedEventArgs as selectedAppointment and selectedDate respectively.
Inline Style
You can able to customize the inline view style using MonthInlineLoadedEvent
schedule.MonthInlineLoadedEvent += (object sender, SfSchedule.MonthInlineLoadedEventArgs e) =>
	{
	MonthInlineViewStyle monthInlineViewStyle = new MonthInlineViewStyle();
	monthInlineViewStyle.BackgroundColor = Color.ParseColor("#F6F6F6");
	monthInlineViewStyle.TextColor = Color.Black;
	monthInlineViewStyle.TextSize = 12;
	monthInlineViewStyle.TimeTextColor = Color.Black;
	monthInlineViewStyle.TimeTextSize = 10;
	e.P0.MonthInlineViewStyle = monthInlineViewStyle;
	};
Inline Custom View
You can also add an object in the month cell view using View property passed through MonthInlineAppointmentLoadedEvent. To know about this refer the KB.
Inline Appointment Customization
You can able to know the details of appointments in inline using InlineAppointmentTappedEvent event in Schedule. Details of the selected appointment and the corresponding date is passed through InlineAppointmentTappedEventArgs as selectedAppointment and selectedDate respectively.
Selection
Cells can be selected using customized properties by setting selectionStyle property of Schedule.
Selection Style
Cells can be selected using customized properties such as BackgroundColor, BorderColor,BorderThickness,CornerRadius in the selectionStyle property of Schedule.
SelectionStyle selectionStyle = new SelectionStyle();
	selectionStyle.BackgroundColor = Color.Blue;
	selectionStyle.BorderColor = Color.Yellow;
	selectionStyle.BorderThickness = 5;
	schedule.SelectionStyle = selectionStyle;
Selection View
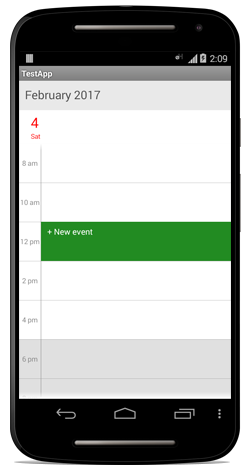
Also custom view can be passed using the SelectionView in Schedule.
Button button = new Button(context);
	button.Text = "+ New event";
	button.SetTextColor(Color.White);
	button.Gravity = GravityFlags.Left;
	button.SetBackgroundColor(Color.ForestGreen);
	schedule.SelectionView = button;