Data Population in WPF TreeView
18 Nov 201823 minutes to read
The WPF TreeView control can be populated with a data source by using the ItemsSource property or by creating and adding a TreeViewNode to the hierarchical structure through the Nodes property.
Populating Nodes by data binding – Bound Mode
Nodes can be populated in bound mode by following these steps.
- Create hierarchical data model
- Bind data model to WPF TreeView
To update the collection changes in the UI, it is necessary to set the NotificationSubscriptionMode on the WPF TreeView to either CollectionChange or PropertyChange.
NotificationSubscriptionMode has the following enum values:
-
CollectionChange— Updates its tree structure when a child items collection is changed. -
PropertyChange— Updates its child items when the associated collection property is changed. -
None— The default mode. It does not reflect collection/property changes in the UI.
To decide how to populate the nodes, it is necessary to set the NodePopulationMode API on the WPF TreeView.
The NodePopulationMode API has the following enum values:
-
OnDemand— Populates child nodes only when the parent node is expanded. This is the default value. -
Instant— Populates all child nodes when the WPF TreeView control is initially loaded.
Create Data Model for WPF TreeView
Create a simple data source as shown in the following code example in a new class file, and save it as FileManager.cs file:
//FileManager.cs
public class FileManager : INotifyPropertyChanged
{
   private string fileName;
   private ImageSource imageIcon;
   private ObservableCollection<FileManager> subFiles;

   public ObservableCollection<FileManager> SubFiles
   {
      get { return subFiles; }
      set
      {
         subFiles = value;
         RaisedOnPropertyChanged("SubFiles");
      }
   }

   public string ItemName
   {
      get { return fileName; }
      set
      {
         fileName = value;
         RaisedOnPropertyChanged("FolderName");
      }
   }

   public ImageSource ImageIcon
   {
       get { return imageIcon; }
       set
       {
          imageIcon = value;
          RaisedOnPropertyChanged("ImageIcon");
       }
   }

   public event PropertyChangedEventHandler PropertyChanged;

   public void RaisedOnPropertyChanged(string _PropertyName)
   {
      if (PropertyChanged != null)
      {
         PropertyChanged(this, new PropertyChangedEventArgs(_PropertyName));
      }
   }
}
Create a model repository class with ImageNodeInfo collection property initialized with required number of data objects in a new class file as shown in the following code example, and save it as FileManagerViewModel.cs file:
public class FileManagerViewModel
{
   private ObservableCollection<FileManager> imageNodeInfo;

   public FileManagerViewModel()
   {
      GenerateSource();
   }

   public ObservableCollection<FileManager> ImageNodeInfo
   {
      get { return imageNodeInfo; }
      set { this.imageNodeInfo = value; }
   }

   private void GenerateSource()
   {
      var nodeImageInfo = new ObservableCollection<FileManager>();
      Assembly assembly = typeof(GettingStated).GetTypeInfo().Assembly;
      var doc = new FileManager() { ItemName = "Documents", ImageIcon = new BitmapImage(new Uri("pack://application:,,,/NodeWithImageDemo;component/Icons/treeview_folder.png")) };
      var download = new FileManager() { ItemName = "Downloads", ImageIcon = new BitmapImage(new Uri("pack://application:,,,/NodeWithImageDemo;component/Icons/treeview_folder.png")) };
      var mp3 = new FileManager() { ItemName = "Music", ImageIcon = new BitmapImage(new Uri("pack://application:,,,/NodeWithImageDemo;component/Icons/treeview_folder.png")) };
      var pictures = new FileManager() { ItemName = "Pictures", ImageIcon = new BitmapImage(new Uri("pack://application:,,,/NodeWithImageDemo;component/Icons/treeview_folder.png")) };
      var video = new FileManager() { ItemName = "Videos", ImageIcon = new BitmapImage(new Uri("pack://application:,,,/NodeWithImageDemo;component/Icons/treeview_folder.png")) };

      var pollution = new FileManager() { ItemName = "Environmental Pollution.docx", ImageIcon = new BitmapImage(new Uri("pack://application:,,,/NodeWithImageDemo;component/Icons/treeview_word.png"))} };
      var globalWarming = new FileManager() { ItemName = "Global Warming.ppt", ImageIcon = new BitmapImage(new Uri("pack://application:,,,/NodeWithImageDemo;component/Icons/treeview_ppt.png")) };
      var sanitation = new FileManager() { ItemName = "Sanitation.docx", ImageIcon = new BitmapImage(new Uri("pack://application:,,,/NodeWithImageDemo;component/Icons/treeview_word.png")) };
      var socialNetwork = new FileManager() { ItemName = "Social Network.pdf", ImageIcon = new BitmapImage(new Uri("pack://application:,,,/NodeWithImageDemo;component/Icons/treeview_pdf.png")) };
      var youthEmpower = new FileManager() { ItemName = "Youth Empowerment.pdf", ImageIcon = new BitmapImage(new Uri("pack://application:,,,/NodeWithImageDemo;component/Icons/treeview_pdf.png")) };

      var games = new FileManager() { ItemName = "Game.exe", ImageIcon = new BitmapImage(new Uri("pack://application:,,,/NodeWithImageDemo;component/Icons/treeview_exe.png")) };
      var tutorials = new FileManager() { ItemName = "Tutorials.zip", ImageIcon = new BitmapImage(new Uri("pack://application:,,,/NodeWithImageDemo;component/Icons/treeview_zip.png")) };
      var TypeScript = new FileManager() { ItemName = "TypeScript.7z", ImageIcon = new BitmapImage(new Uri("pack://application:,,,/NodeWithImageDemo;component/Icons/treeview_zip.png")) };
      var uiGuide = new FileManager() { ItemName = "UI-Guide.pdf", ImageIcon = new BitmapImage(new Uri("pack://application:,,,/NodeWithImageDemo;component/Icons/treeview_pdf.png")) };

      var song = new FileManager() { ItemName = "Goutiest", ImageIcon = new BitmapImage(new Uri("pack://application:,,,/NodeWithImageDemo;component/Icons/treeview_mp3.png")) };

      var camera = new FileManager() { ItemName = "Camera Roll", ImageIcon = new BitmapImage(new Uri("pack://application:,,,/NodeWithImageDemo;component/Icons/treeview_folder.png")) };
      var stone = new FileManager() { ItemName = "Stone.jpg", ImageIcon = new BitmapImage(new Uri("pack://application:,,,/NodeWithImageDemo;component/Icons/treeview_png.png")) };
      var wind = new FileManager() { ItemName = "Wind.jpg", ImageIcon = new BitmapImage(new Uri("pack://application:,,,/NodeWithImageDemo;component/Icons/treeview_png.png")) };

      var img0 = new FileManager() { ItemName = "WIN_20160726_094117.JPG", ImageIcon = new BitmapImage(new Uri("pack://application:,,,/NodeWithImageDemo;component/Icons/treeview_img0.png")) };
      var img1 = new FileManager() { ItemName = "WIN_20160726_094118.JPG", ImageIcon = new BitmapImage(new Uri("pack://application:,,,/NodeWithImageDemo;component/Icons/treeview_img1.png")) };

      var video1 = new FileManager() { ItemName = "Naturals.mp4", ImageIcon = new BitmapImage(new Uri("pack://application:,,,/NodeWithImageDemo;component/Icons/treeview_video.png")) };
      var video2 = new FileManager() { ItemName = "Wild.mpg", ImageIcon = new BitmapImage(new Uri("pack://application:,,,/NodeWithImageDemo;component/Icons/treeview_video.png")) };

      doc.SubFiles = new ObservableCollection<FileManager>
      {
         pollution,
         globalWarming,
         sanitation,
         socialNetwork,
         youthEmpower
      };

      download.SubFiles = new ObservableCollection<FileManager>
      {
         games,
         tutorials,
         TypeScript,
         uiGuide
      };

      mp3.SubFiles = new ObservableCollection<FileManager>
      {
         song
      };

      pictures.SubFiles = new ObservableCollection<FileManager>
      {
         camera,
         stone,
         wind
      };

      camera.SubFiles = new ObservableCollection<FileManager>
      {
         img0,
         img1
      };

      video.SubFiles = new ObservableCollection<FileManager>
      {
         video1,
         video2
      };

      nodeImageInfo.Add(doc);
      nodeImageInfo.Add(download);
      nodeImageInfo.Add(mp3);
      nodeImageInfo.Add(pictures);
      nodeImageInfo.Add(video);
      imageNodeInfo = nodeImageInfo;
  }
}
Bind to hierarchical datasource
To create a WPF TreeView using data binding, set a hierarchical data collection to the ItemsSource property. And set the child object name to the ChildPropertyName property.
<Window x:Class="NodeWithImageDemo.MainWindow"
        xmlns="http://schemas.microsoft.com/winfx/2006/xaml/presentation"
        xmlns:x="http://schemas.microsoft.com/winfx/2006/xaml"
        xmlns:d="http://schemas.microsoft.com/expression/blend/2008"
        xmlns:mc="http://schemas.openxmlformats.org/markup-compatibility/2006"
        xmlns:local="clr-namespace:NodeWithImageDemo"
        xmlns:syncfusion="http://schemas.syncfusion.com/wpf"
        xmlns:Engine="clr-namespace:Syncfusion.UI.Xaml.TreeView.Engine;assembly=Syncfusion.SfTreeView.WPF"
        mc:Ignorable="d">

    <Window.DataContext>
        <local:FileManagerViewModel/>
    </Window.DataContext>

    <Grid>
        <syncfusion:SfTreeView x:Name="sfTreeView"
                               ChildPropertyName="SubFiles"
                               ItemsSource="{Binding ImageNodeInfo}">

            <syncfusion:SfTreeView.ItemTemplate>
                <DataTemplate>
                    <Grid x:Name="grid">
                        <Grid Grid.Row="0">
                            <Grid.ColumnDefinitions>
                                <ColumnDefinition Width="20" />
                                <ColumnDefinition Width="*" />
                            </Grid.ColumnDefinitions>
                            <Grid>
                                <Image Source="{Binding ImageIcon}"
                                               VerticalAlignment="Center"
                                               HorizontalAlignment="Center"
                                               Height="16"
                                               Width="16"/>
                            </Grid>
                            <Grid Grid.Column="1"
                                              Margin="1,0,0,0"
                                              VerticalAlignment="Center">
                                <TextBlock Text="{Binding ItemName}"
                                                   Foreground="Black"
                                                   FontSize="14"
                                                   VerticalAlignment="Center"
                            </Grid>
                        </Grid>
                    </Grid>
                </DataTemplate>
            </syncfusion:SfTreeView.ItemTemplate>
        </syncfusion:SfTreeView>
    </Grid>
</Window>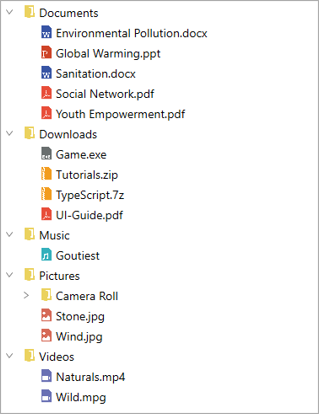
View sample in GitHub.
Populating Nodes without data source – Unbound Mode
You can create and manage the TreeViewNode objects by yourself to display the data in a hierarchical view. To create a WPF TreeView, you use a SfTreeView control and a hierarchy of TreeViewNode objects. You create the node hierarchy by adding one or more root nodes to the SfTreeView.Nodes collection. Each TreeViewNode can contain child nodes through its Children collection, allowing you to create hierarchical structures with any level of nesting.
<Window
        xmlns="http://schemas.microsoft.com/winfx/2006/xaml/presentation"
        xmlns:x="http://schemas.microsoft.com/winfx/2006/xaml"
        xmlns:d="http://schemas.microsoft.com/expression/blend/2008"
        xmlns:mc="http://schemas.openxmlformats.org/markup-compatibility/2006"
        xmlns:local="clr-namespace:GettingStarted"
        xmlns:Syncfusion="http://schemas.syncfusion.com/wpf" xmlns:Engine="clr-namespace:Syncfusion.UI.Xaml.TreeView.Engine;assembly=Syncfusion.SfTreeView.WPF" x:Class="GettingStarted.MainWindow"
        mc:Ignorable="d"
        Title="MainWindow" Height="450" Width="800">
    <Grid>
        <Syncfusion:SfTreeView HorizontalAlignment="Left" Height="414" Margin="318,0,0,0" VerticalAlignment="Center" Width="250">
            <Syncfusion:SfTreeView.Nodes>
                <Engine:TreeViewNode Content="Grains" IsExpanded="True">
                    <Engine:TreeViewNode.ChildNodes>
                        <Engine:TreeViewNode Content="Cereals" IsExpanded="True">
                            <Engine:TreeViewNode.ChildNodes>
                                <Engine:TreeViewNode Content="Rice"/>
                                <Engine:TreeViewNode Content="Barley"/>
                            </Engine:TreeViewNode.ChildNodes>
                        </Engine:TreeViewNode>
                        <Engine:TreeViewNode Content="Oilseeds">
                            <Engine:TreeViewNode.ChildNodes>
                                <Engine:TreeViewNode Content="Safflower"/>
                            </Engine:TreeViewNode.ChildNodes>
                        </Engine:TreeViewNode>
                    </Engine:TreeViewNode.ChildNodes>
                </Engine:TreeViewNode>
                <Engine:TreeViewNode Content="Fruits" IsExpanded="true">
                    <Engine:TreeViewNode.ChildNodes>
                        <Engine:TreeViewNode Content="Orange"/>
                        <Engine:TreeViewNode Content="Apples" IsExpanded="true"/>
                    </Engine:TreeViewNode.ChildNodes>
                </Engine:TreeViewNode>
                <Engine:TreeViewNode Content="Vegetables" IsExpanded="true">
                    <Engine:TreeViewNode.ChildNodes>
                        <Engine:TreeViewNode Content="Root Vegetables" IsExpanded="true">
                            <Engine:TreeViewNode.ChildNodes>
                                <Engine:TreeViewNode Content="Potato"/>
                                <Engine:TreeViewNode Content="Carrot"/>
                            </Engine:TreeViewNode.ChildNodes>
                        </Engine:TreeViewNode>
                        <Engine:TreeViewNode Content="Podded">
                            <Engine:TreeViewNode.ChildNodes>
                                <Engine:TreeViewNode Content="Peanut"/>
                                <Engine:TreeViewNode Content="Lentil"/>
                            </Engine:TreeViewNode.ChildNodes>
                        </Engine:TreeViewNode>
                    </Engine:TreeViewNode.ChildNodes>
                </Engine:TreeViewNode>
            </Syncfusion:SfTreeView.Nodes>
        </Syncfusion:SfTreeView>
    </Grid>
</Window>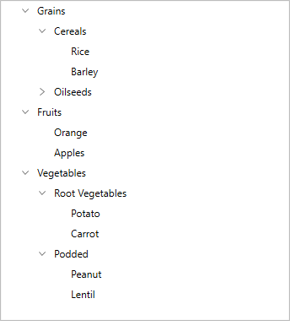
View sample in GitHub.
You can refer to our WPF TreeView feature tour page for its key feature highlights. You can also explore our WPF TreeView example to know how to represent hierarchical data in a tree-like structure with expand and collapse node options.