How can I help you?
Stamp Annotation in WPF Pdf Viewer
5 Sep 202514 minutes to read
PDF viewer WPF allows the user to include stamp annotation in the PDF document and provides options to edit or remove the existing stamp annotation in the PDF document.
The following code shows how to switch to stamp annotation mode in code behind.
private void Window_Loaded(object sender, RoutedEventArgs e)
{
    PdfLoadedDocument pdf = new PdfLoadedDocument("Input.pdf");
    pdfviewer.Load(pdf);
    pdfviewer.AnnotationMode = PdfDocumentView.PdfViewerAnnotationMode.Stamp;
}
Private Sub Window_Loaded(sender As Object, e As RoutedEventArgs)
Dim pdf As New PdfLoadedDocument(“Input.pdf”)
pdfViewer.Load(pdf)
pdfviewer.AnnotationMode = PdfDocumentView.PdfViewerAnnotationMode.Stamp
End SubThe following image shows the stamp annotation being included in the PDF Document.
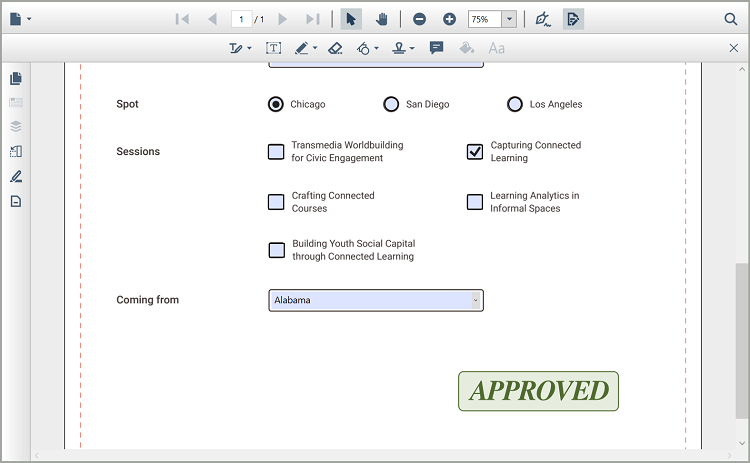
How to set the opacity of the stamp annotation?
The opacity of the stamp annotation can be customized at the time of inclusion itself. The following code shows how to set opacity value of the stamp annotation to be included.
private void Window_Loaded(object sender, RoutedEventArgs e)
{
    PdfLoadedDocument pdf = new PdfLoadedDocument("Input.pdf");
    pdfviewer.Load(pdf);
    pdfviewer.StampAnnotationSettings.Opacity = 0.5F;
}
Private Sub Window_Loaded(sender As Object, e As RoutedEventArgs)
Dim pdf As New PdfLoadedDocument(“Input.pdf”)
pdfViewer.Load(pdf)
pdfviewer.StampAnnotationSettings.Opacity = 0.5F
End SubHow to set the author and subject of the stamp annotation?
The author and subject fields of the stamp annotation can be added for the stamp annotation to be added to the PDF document. The follow code shows how to set the author and subject field of the stamp annotation to be included.
private void Window_Loaded(object sender, RoutedEventArgs e)
{
    PdfLoadedDocument pdf = new PdfLoadedDocument("Input.pdf");
    pdfviewer.Load(pdf);
    pdfviewer.StampAnnotationSettings.Author = "Syncfusion Softwares";
    pdfviewer.StampAnnotationSettings.Subject = "Stamp annotation";
}
Private Sub Window_Loaded(sender As Object, e As RoutedEventArgs)
Dim pdf As New PdfLoadedDocument(“Input.pdf”)
pdfViewer.Load(pdf)
pdfviewer.StampAnnotationSettings.Author = "Syncfusion Softwares"
pdfviewer.StampAnnotationSettings.Subject = "Stamp annotation"
End SubHow to set the icon of the stamp annotation?
The icon of the stamp annotation can be customized at the time of inclusion itself. The following code shows how to set icon value of the stamp annotation to be included.
private void Window_Loaded(object sender, RoutedEventArgs e)
{
    PdfLoadedDocument pdf = new PdfLoadedDocument("Input.pdf");
    pdfviewer.Load(pdf);
    pdfviewer.StampAnnotationSettings.Icon = Syncfusion.Pdf.Interactive.PdfRubberStampAnnotationIcon.NotApproved;
}
Private Sub Window_Loaded(sender As Object, e As RoutedEventArgs)
Dim pdf As New PdfLoadedDocument(“Input.pdf”)
pdfViewer.Load(pdf)
pdfviewer.StampAnnotationSettings.Icon = Syncfusion.Pdf.Interactive.PdfRubberStampAnnotationIcon.NotApproved
End SubHow to set the text for popup note of the stamp annotation?
The text for popup note of the stamp annotation can be customized at the time of inclusion itself. The following code shows how to set text for popup note of the stamp annotation to be included.
private void Window_Loaded(object sender, RoutedEventArgs e)
{
    PdfLoadedDocument pdf = new PdfLoadedDocument("Input.pdf");
    pdfviewer.Load(pdf);
    pdfviewer.StampAnnotationSettings.Text = “Syncfusion Software”;
}
Private Sub Window_Loaded(sender As Object, e As RoutedEventArgs)
Dim pdf As New PdfLoadedDocument(“Input.pdf”)
pdfViewer.Load(pdf)
pdfviewer.StampAnnotationSettings.Text = “Syncfusion Software”
End SubWorking with included/existing stamp annotations
Stamp annotation supports adding notes along with it, also it allows editing its opacity. To use these options, select the included/existing stamp annotation and click right using mouse, over the selected annotation, a pop up context menu will appear with the following options,
- Open Pop-up note
- Properties
- Delete
Open Pop-up notes
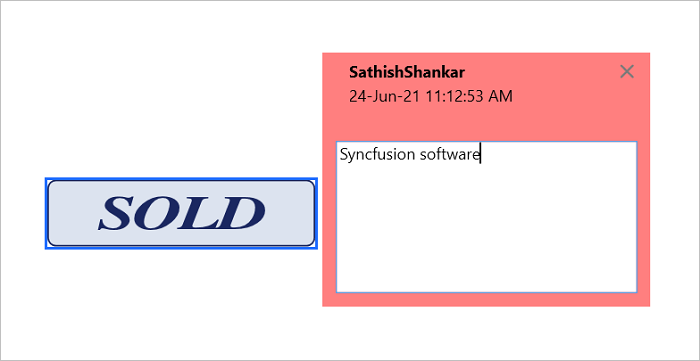
We can add notes to the stamp annotation choosing Open Pop-up note option from the context menu. The following image illustrates the notes added to the selected stamp annotation. The added notes will be saved along with the PDF document and if there are any existing notes, that will be displayed in here.
Properties
Selecting properties from the context menu will display the Stamp Properties window, which would consist of two tabs
- Appearance
- General
Appearance tab
The opacity of the stamp annotation can be edited using Appearance tab of Stamp Properties window.
Editing opacity of the annotation
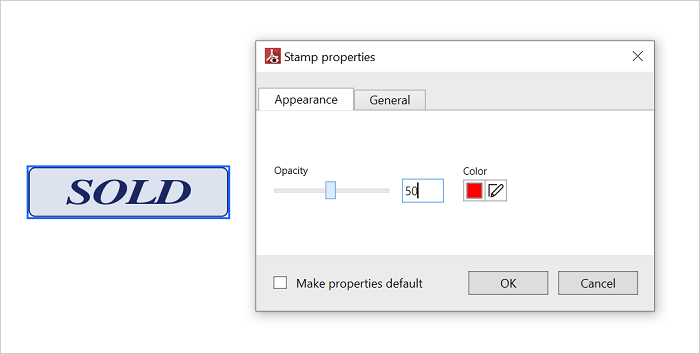
The slider control displayed in the Appearance tab allows modifying opacity of the selected stamp annotation. You can also modify the opacity of the selected stamp annotation by giving numeric value in the opacity text box.
The following image illustrates how to change the opacity of the stamp annotation.
Editing color
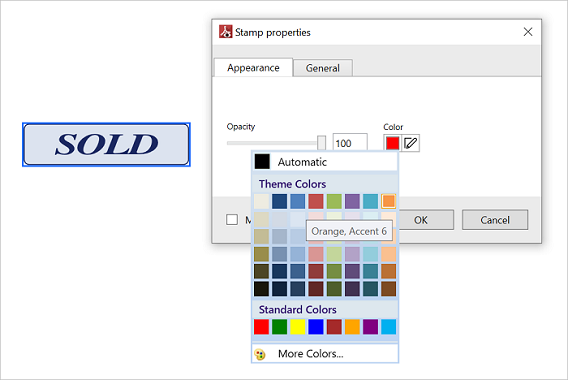
The background color of popup note of the selected stamp will be displayed in the color row in the appearance tab. Selecting the Color would display the color palette control, choosing a color from the color palette and clicking OK will apply the background color to the popup note of the stamp annotation.
The following image illustrates how to change the color of the stamp annotation included.
General tab
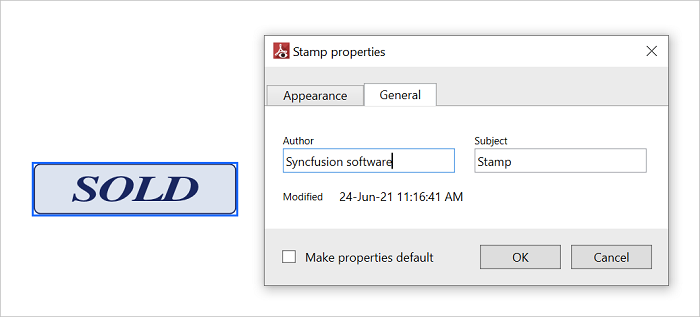
We can add or edit the Author and Subject of the stamp annotation using General tab of the Stamp Properties window.
The following image illustrates the change in Author and Subject of the included Stamp annotation.
Deleting an annotation
Selecting delete option from the context menu which is displayed when clicking right on the selected annotation would delete the respective annotation from the PDF document.
The following image illustrates how to delete the included annotation from the PDF document.

Adding your standard stamps in the toolbar
You can add your standard stamps from images in the toolbar using the StampAnnotations collection. This stamp will be added to the existing standard stamps collection in the toolbar. You can select and include the stamp at the required location of the page using a mouse-tap. Refer to the following code to clear the existing standard stamps and to add a custom stamp in the toolbar.
private void AddStandardStamp()
{
    // Clear the existing standard stamps if it is not needed.
    pdfViewer.ToolbarSettings.StampAnnotations.Clear();
    //Load the custom image from the local disk.
    System.Windows.Controls.Image image = new System.Windows.Controls.Image();
    image.Source = new BitmapImage(new Uri(@"..\..\Data\AdventureCycle.jpg", UriKind.RelativeOrAbsolute));
    //Create a new standard stamp from the image.
    PdfStampAnnotation newStandardStamp = new PdfStampAnnotation(image);
    //Add the custom stamp in the toolbar.
    pdfViewer.ToolbarSettings.StampAnnotations.Add(newStandardStamp);
}
NOTE
The complete sample project of adding your standard stamps in the toolbar using the Syncfusion® PDF viewer is available in the Github.
Adding custom stamps in the toolbar
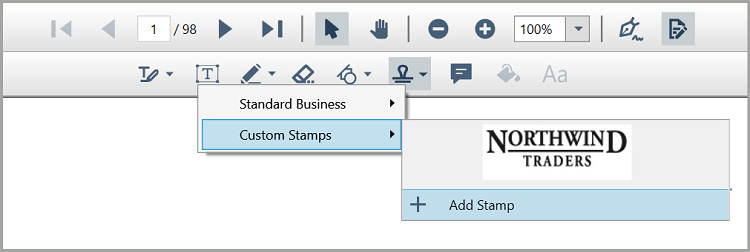
You can create and add your custom stamps from the images available on the disk using the “Add Stamp” option available in the custom stamps’ category of the toolbar (as shown in the following screenshot). It allows you to browse the image from the disk and creates a custom stamp from the image and allows you to include the stamp at the required location of the page using a mouse-tap. It also adds the stamp to the custom stamp collection for future use.
Adding custom stamp to the desired page programmatically
The Custom stamp can be added to the desired page programmatically either with the actual size (the original size of the image) or with the desired size (the size at which we need the custom stamp) by using the AddStamp API.
Actual size
PDF Viewer allows the user to add custom stamps to the desired page with the actual size by passing the image as PdfStampAnnotation, page number and position where the custom stamp needs to be added as parameters to the AddStamp method. The following code snippet illustrates adding a custom stamp with the actual size to the desired page programmatically.
private void AddStamp_Click(object sender, RoutedEventArgs e)
{
    //Enter the page number ranges from 1 to page count.
    int pageNumber = 1;
    //Create the custom stamp with the required image.
    Image image = new Image() { Source = new BitmapImage(new Uri("//Enter your stamp location", UriKind.RelativeOrAbsolute)) };
    PdfStampAnnotation stamp = new PdfStampAnnotation(image);
    //Enter the location of the stamp.
    point position = new point(100,100);
    //Adds the custom stamp with the actual size.
    PdfViewer.AddStamp(stamp, pageNumber, position);
}
Desired size
PDF Viewer allows the user to add custom stamps to the desired page with the desired size by passing the image as PdfStampAnnotation, page number, position where the custom stamp needs to be added and size of the stamp in the System.Windows.Size as parameters to the AddStamp method. The following code snippet illustrates adding a custom stamp with the desired size to the desired page programmatically.
private void AddStamp_Click(object sender, RoutedEventArgs e)
{
    //Enter the page number ranges from 1 to page count.
    int pageNumber = 1;
    //Create the custom stamp with the required image.
    Image image = new Image() { Source = new BitmapImage(new Uri("//Enter your stamp location", UriKind.RelativeOrAbsolute)) };
    PdfStampAnnotation stamp = new PdfStampAnnotation(image);
    //Enter the location of the stamp.
    point position = new point(100,100);
    //Enter the required size of the stamp.
    System.Windows.Size stampSize = new System.Windows.Size (200,200);
    //Adds the custom stamp with the desired size.
    PdfViewer.AddStamp(stamp, pageNumber, position, stampSize);
}
Events
The PdfViewerControl notifies through events, when AnnotationChangedAction such us adding, deleting, select, deselect, moving and resizing made in annotations. It also provides the annotations common information such as annotation name, page number, bounds and action type performed in respective annotation.
StampAnnotationChanged Event
The StampAnnotationChanged event occurs when the Action performed in stamp annotation. It provides the common information and annotation properties which are available in Settings through the StampAnnotationChangedEventArgs. The user can modify the annotation properties through Settings.
The following code shows how to write the StampAnnotationChanged event in PdfViewerControl
private void PdfViewer_StampAnnotationChanged(object sender, StampAnnotationChangedEventArgs e)
{
    //COMMON PROPERTIES
    //AnnotationChangedAction to identify action performed for annotation
    AnnotationChangedAction action = e.Action;
    //Page number in which this shape annotation was modified
    int pageNumber = e.PageNumber;
    //Annotation's previous position and current position
    RectangleF currentBounds = e.NewBounds;
    RectangleF previousBounds = e.OldBounds;
    PdfViewerStampSettings settings = e.Settings;
    //Annotation's properties which can be modify
    string author = settings.Author;
    string subject = settings.Subject;
    string Text = settings.Text;
    float opacity = settings.Opacity;
    System.Windows.Media.Color color = settings.Color;
    PdfRubberStampAnnotationIcon stampAnnotationIcon = settings.Icon;
}
NOTE
You can refer to our WPF PDF Viewer feature tour page for its groundbreaking feature representations. You can also explore our WPF PDF Viewer example to know how to render and configure the pdfviewer.