Resource View Gantt Inline Items in WPF Gantt
25 Jun 202424 minutes to read
By default, the Gantt chart will display a single node in a row. This helps you to manage the project. When you want to manage the resources in a project, you need multiple nodes in a single row. A Resource view Gantt enables you to manage the resources involved in a project.
In a normal Gantt, a node represents a task or activity of the project. In a resource view Gantt, the node represents task assigned to a resource. Multiple tasks assigned to a resource can be displayed in a single row. You can achieve this by using the mapping attribute of the InLineTaskMapping.
Essential Gantt will listen to the dynamic inclusion of inline items and refresh the chart region.
The following code illustrates how to add inline items dynamically to the underlying collection.
//To add dynamic inline items
Item item = new Item()
{
    StartDate = new DateTime(2012, 01, 19),
    FinishDate = new DateTime(2012, 01, 25)
};

viewModel.GanttItemSource[0].SubItems[0].InLineItems.Add(item);
Use Case Scenarios
A resource view is very useful when you need to manage the resources in a project.
Example: A very big development project that contains multiple phases to complete the project. The management needs to track the status of the project. In this scenario, they can manage the project with a Resource view Gantt easily. The Resource view Gantt will show all the tasks in a single row that are assigned to a particular resource.
Adding Inline Items to an Application
You can populate a resource view Gantt by populating the collection of tasks in a single row by mapping the corresponding field in the underlying source to the InLineTaskMapping.
You can populate a Resource view Gantt for both date-time schedules and numeric schedules.
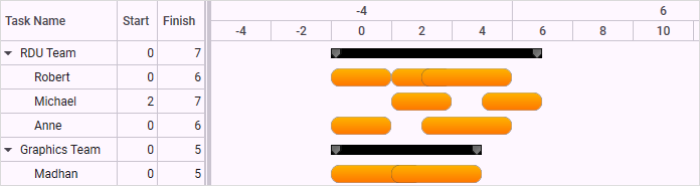
Resource View Gantt in a Custom Numeric Schedule
To populate a Resource view Gantt in a Custom Numeric Schedule:
- Define the Gantt with a custom numeric schedule source. For more information about custom numeric schedules, visit the following link: https://help.syncfusion.com/wpf/gantt/custom-schedule#custom-numeric
- You can populate the collection of tasks in a single row by mapping the corresponding field in the underlying source to the InLineTaskMapping.
<syncfusion:GanttControl x:Name="ganttControl"
ScheduleType="CustomNumeric"
CustomScheduleSource="{Binding CustomScheduleInfo}"
ItemsSource="{Binding Items}">
<syncfusion:GanttControl.TaskAttributeMapping>
<syncfusion:TaskAttributeMapping TaskNameMapping="Name"
StartPointMapping="Start"
ChildMapping="SubItems"
FinishPointMapping="End"
InLineTaskMapping="InLineItems" />
</syncfusion:GanttControl.TaskAttributeMapping>
<syncfusion:GanttControl.Resources>
<Style TargetType="chart:HeaderNode">
<Setter Property="MaxHeight"
Value="24" />
<Setter Property="Template">
<Setter.Value>
<ControlTemplate TargetType="chart:HeaderNode">
<Border Background="{TemplateBinding Background}" Height="10"
Name="PART_HeaderBorder"
BorderBrush="{TemplateBinding BorderBrush}"
BorderThickness="0">
<Grid VerticalAlignment="Center">
<Grid.ColumnDefinitions>
<ColumnDefinition Width="10" />
<ColumnDefinition Width="*" />
<ColumnDefinition Width="10" />
</Grid.ColumnDefinitions>
<Rectangle HorizontalAlignment="Left"
Grid.Column="1"
Height="6.4"
VerticalAlignment="Top"
Stroke="#FF111111">
<Rectangle.Fill>
<LinearGradientBrush EndPoint="0.5,1"
StartPoint="0.5,0">
<GradientStop Color="#FF414141"
Offset="0" />
<GradientStop Color="#FF6D6D6D"
Offset="0.087" />
<GradientStop Color="#FF767676"
Offset="0.304" />
<GradientStop Color="Black"
Offset="0.957" />
<GradientStop Color="#FF343434"
Offset="1" />
</LinearGradientBrush>
</Rectangle.Fill>
</Rectangle>
<Path Data="M0.3,0.3 L9.834909,0.30036073 9.8351226,5.9832297 5.0695471,10.734966 0.32096295,5.9863821 z"
HorizontalAlignment="Left"
Grid.Column="0"
Height="11.435"
Stretch="Fill"
Stroke="#FF111111"
VerticalAlignment="Top"
Width="10.135">
<Path.Fill>
<LinearGradientBrush EndPoint="1.009,0.985"
StartPoint="0.339,0.286">
<GradientStop Color="DimGray"
Offset="0.008" />
<GradientStop Color="#FF7F7F7F"
Offset="0.511" />
<GradientStop Color="#FF2A2A2A"
Offset="1" />
</LinearGradientBrush>
</Path.Fill>
</Path>
<Path Data="M0.3,0.3 L9.834909,0.30036073 9.8351226,5.9832297 5.0695471,10.734966 0.32096295,5.9863821 z"
HorizontalAlignment="Left"
Grid.Column="2"
Height="11.435"
Stretch="Fill"
Stroke="#FF111111"
VerticalAlignment="Top"
Width="10.135">
<Path.Fill>
<LinearGradientBrush EndPoint="1.009,0.985"
StartPoint="0.339,0.286">
<GradientStop Color="DimGray"
Offset="0.008" />
<GradientStop Color="#FF7F7F7F"
Offset="0.511" />
<GradientStop Color="#FF2A2A2A"
Offset="1" />
</LinearGradientBrush>
</Path.Fill>
</Path>
</Grid>
</Border>
</ControlTemplate>
</Setter.Value>
</Setter>
</Style>
<!-- Task Node style-->
<Style x:Key="TaskNode"
TargetType="{x:Type chart:GanttNode}">
<Setter Property="Template">
<Setter.Value>
<ControlTemplate TargetType="{x:Type chart:GanttNode}">
<Border Name="PART_Border"
Height="18"
VerticalAlignment="Center" CornerRadius="8"
BorderThickness="0.5"
BorderBrush="#FF4D4D4D">
<Border.Background>
<LinearGradientBrush EndPoint="0.5,1"
StartPoint="0.5,0">
<GradientStop Color="#FFFEB300"
Offset="0" />
<GradientStop Color="#FFFE7600"
Offset="1" />
</LinearGradientBrush>
</Border.Background>
<Grid>
<Grid.ColumnDefinitions>
<ColumnDefinition Width="Auto" />
<ColumnDefinition Width="*" />
<ColumnDefinition Width="Auto" />
</Grid.ColumnDefinitions>
<!-- To access the drag and drop feature, have the thumb with specified name -->
<Thumb Cursor="SizeAll"
x:Name="PART_DragDropThumb"
Grid.Column="0"
Grid.ColumnSpan="3">
<Thumb.Template>
<ControlTemplate>
<Border Background="Transparent" />
</ControlTemplate>
</Thumb.Template>
</Thumb>
<Border HorizontalAlignment="Left"
VerticalAlignment="Center"
Width="{TemplateBinding ProgressWidth}"
Grid.Column="0"
Grid.ColumnSpan="3">
<Grid HorizontalAlignment="Stretch"
Width="{TemplateBinding ProgressWidth}">
<Rectangle HorizontalAlignment="Stretch"
Height="12"
Stroke="#FFD26202"
VerticalAlignment="Center">
<Rectangle.Fill>
<LinearGradientBrush EndPoint="0.5,1"
StartPoint="0.5,0">
<GradientStop Color="#FFFEB300"
Offset="0" />
<GradientStop Color="#FFFE7600"
Offset="1" />
</LinearGradientBrush>
</Rectangle.Fill>
</Rectangle>
<!-- To access the progress resizing feature, have the thumb with specified name -->
<Thumb Cursor="SizeWE"
x:Name="PART_ProgressThumb"
HorizontalAlignment="Right">
<Thumb.Template>
<ControlTemplate>
<Border Background="Transparent"
BorderBrush="Transparent">
<Rectangle Height="2"
Width="5"
Fill="Transparent" />
</Border>
</ControlTemplate>
</Thumb.Template>
</Thumb>
</Grid>
</Border>
<!-- To access the resizing feature, have the thumb with the specified name -->
<Thumb Cursor="ScrollE"
Grid.Column="2"
x:Name="PART_RightThumb"
HorizontalAlignment="Right">
<Thumb.Template>
<ControlTemplate>
<Border Background="Transparent"
BorderBrush="Transparent"
BorderThickness="0"
Width="4"
Height="20" />
</ControlTemplate>
</Thumb.Template>
</Thumb>
<!-- To access the resizing feature, have the thumb with the specified name -->
<Thumb Cursor="SizeWE"
Grid.Column="0"
x:Name="PART_LeftThumb"
HorizontalAlignment="Left">
<Thumb.Template>
<ControlTemplate>
<Border Background="Transparent"
BorderBrush="Transparent"
BorderThickness="0"
Width="4"
Height="20" />
</ControlTemplate>
</Thumb.Template>
</Thumb>
</Grid>
</Border>
</ControlTemplate>
</Setter.Value>
</Setter>
</Style>
<Style TargetType="chart:GanttNode" BasedOn="{StaticResource TaskNode}" />
<Style TargetType="chart:MileStone" BasedOn="{StaticResource MileStone}" />
</syncfusion:GanttControl.Resources>
<syncfusion:GanttControl.DataContext>
<local:ViewModel/>
</syncfusion:GanttControl.DataContext>
</syncfusion:GanttControl>this.Gantt.ScheduleType = ScheduleType.CustomNumeric;
this.ganttControl.ItemsSource = new ViewModel().Items;
// Task attribute mapping
TaskAttributeMapping taskAttributeMapping = new TaskAttributeMapping();
taskAttributeMapping.TaskNameMapping = "Name";
taskAttributeMapping.StartPointMapping = "StartDate";
taskAttributeMapping.ChildMapping = "SubItems";
taskAttributeMapping.FinishPointMapping = "End";
taskAttributeMapping.InLineTaskMapping = "InLineItems";
this.ganttControl.TaskAttributeMapping = taskAttributeMapping;public class Item : NotificationObject
{
/// <summary>
/// Holds the id value.
/// </summary>
private int id;
/// <summary>
/// Holds the name value.
/// </summary>
private string name;
// <summary>
/// Holds the end value.
/// </summary>
private double _end;
/// <summary>
/// Holds the progress value.
/// </summary>
private double _progress = 100;
/// <summary>
/// Holds the start value.
/// </summary>
private double _start;
ObservableCollection<Item> _subItems = new ObservableCollection<Item>();
ObservableCollection<Item> _inLineItems = new ObservableCollection<Item>();
/// <summary>
/// Initializes a new instance of the <see cref="Item"/> class.
/// </summary>
public Item()
{
this._subItems.CollectionChanged += ItemsCollectionChanged;
this._inLineItems.CollectionChanged += ItemsCollectionChanged;
}
/// <summary>
/// Gets or sets the name.
/// </summary>
/// <value>The name.</value>
public string Name
{
get
{
return this.name;
}
set
{
this.name = value;
RaisePropertyChanged("Name");
}
}
/// <summary>
/// Gets or sets the start date.
/// </summary>
/// <value>The start date.</value>
public double Start
{
get
{
return this._start;
}
set
{
this._start = value;
RaisePropertyChanged("StartDate");
}
}
/// <summary>
/// Gets or sets the finish date.
/// </summary>
/// <value>The finish date.</value>
public double End
{
get
{
return this._end;
}
set
{
this._end = value;
RaisePropertyChanged("FinishDate");
}
}
/// <summary>
/// Gets or sets the progress.
/// </summary>
/// <value>The progress.</value>
public double Progress
{
get
{
return this._progress;
}
set
{
this._progress = value;
RaisePropertyChanged("Progress");
}
}
/// <summary>
/// Gets or sets the sub items.
/// </summary>
/// <value>The sub items.</value>
public ObservableCollection<Item> SubItems
{
get
{
return this._subItems;
}
set
{
this._subItems = value;
this._subItems.CollectionChanged += ItemsCollectionChanged;
if (value.Count > 0)
{
this._subItems.ToList().ForEach(n =>
{
/// To listen the changes occuring in child task.
n.PropertyChanged += ItemPropertyChanged;
});
UpdateDates();
}
this.RaisePropertyChanged("SubItems");
}
}
/// <summary>
/// Gets or sets the in line items.
/// </summary>
/// <value>The in line items.</value>
public ObservableCollection<Item> InLineItems
{
get
{
return this._inLineItems;
}
set
{
this._inLineItems = value;
this._inLineItems.CollectionChanged += ItemsCollectionChanged;
if (value.Count > 0)
{
this._inLineItems.ToList().ForEach(n =>
{
/// To listen the changes occuring in child task.
n.PropertyChanged += ItemPropertyChanged;
});
UpdateDates();
}
this.RaisePropertyChanged("InLineItems");
}
}
/// <summary>
/// Itemses the collection changed.
/// </summary>
/// <param name="sender">The sender.</param>
/// <param name="e">The <see cref="System.Collections.Specialized.NotifyCollectionChangedEventArgs"/> instance containing the event data.</param>
void ItemsCollectionChanged(object sender, System.Collections.Specialized.NotifyCollectionChangedEventArgs e)
{
if (e.Action == NotifyCollectionChangedAction.Add)
{
foreach (Item item in e.NewItems)
{
item.PropertyChanged += ItemPropertyChanged;
}
}
else
{
foreach (Item item in e.OldItems)
item.PropertyChanged -= ItemPropertyChanged;
}
UpdateDates();
}
/// <summary>
/// Items the property changed.
/// </summary>
/// <param name="sender">The sender.</param>
/// <param name="e">The <see cref="System.ComponentModel.PropertyChangedEventArgs"/> instance containing the event data.</param>
void ItemPropertyChanged(object sender, PropertyChangedEventArgs e)
{
if (e.PropertyName != null)
if (e.PropertyName == "Start" || e.PropertyName == "End" || e.PropertyName == "Progress")
{
UpdateDates();
}
}
/// <summary>
/// Updates the dates.
/// </summary>
private void UpdateDates()
{
var tempCal = 0d;
if (this._subItems.Count > 0)
{
/// Updating the start and end date based on the chagne occur in the date of child task
Start = _subItems.Select(c => c.Start).Min();
End = _subItems.Select(c => c.End).Max();
Progress = (this._subItems.Aggregate(tempCal, (cur, task) => cur + task.Progress)) / this._subItems.Count;
}
if (this._inLineItems.Count > 0)
{
/// Updating the start and end date based on the chagne occur in the date of child task
Start = _inLineItems.Select(c => c.Start).Min();
Start = _inLineItems.Select(c => c.Start).Max();
Progress = (this._inLineItems.Aggregate(tempCal, (cur, task) => cur + task.Progress)) / this._inLineItems.Count;
}
}
}public class ViewModel
{
/// <summary>
/// Holds the items.
/// </summary>
private ObservableCollection<Item> _items;
/// <summary>
/// Holds the custom schedule information.
/// </summary>
private ObservableCollection<GanttScheduleRowInfo> _customScheduleInfo;
public ViewModel()
{
this._items = GetData();
this._customScheduleInfo = GetCustomScheduleInfo();
}
/// <summary>
/// Collection which is used to store the CountryNamesWith their Flags
/// </summary>
internal static Dictionary<string, string> CountryNamesandFlags = new Dictionary<string, string>();
/// <summary>
/// Gets or sets the custom schedule info.
/// </summary>
/// <value>The custom schedule info.</value>
public ObservableCollection<GanttScheduleRowInfo> CustomScheduleInfo
{
get
{
return this._customScheduleInfo;
}
set
{
this._customScheduleInfo = value;
}
}
/// <summary>
/// Gets or sets the appointment item source.
/// </summary>
/// <value>The appointment item source.</value>
public ObservableCollection<Item> Items
{
get
{
return this._items;
}
set
{
this._items = value;
}
}
/// <summary>
/// Gets the Numeric Schedule Items Info
/// </summary>
/// <returns>The row information</returns>
private ObservableCollection<GanttScheduleRowInfo> GetCustomScheduleInfo()
{
ObservableCollection<GanttScheduleRowInfo> RowInfo = new ObservableCollection<GanttScheduleRowInfo>();
RowInfo.Add(new GanttScheduleRowInfo() { CellsPerUnit = 5 });
RowInfo.Add(new GanttScheduleRowInfo() { CellsPerUnit = 2, PixelsPerUnit = 30d });
return RowInfo;
}
/// <summary>
/// Gets the data.
/// </summary>
/// <returns>The teams</returns>
public ObservableCollection<Item> GetData()
{
ObservableCollection<Item> teams = new ObservableCollection<Item>();
teams.Add(new Item() { Name = "RDU Team" });
Item person = new Item() { Name = "Robert" };
person.InLineItems.Add(new Item() { Start = 0, End = 2, Name = "Market Analysis", Progress = 50 });
person.InLineItems.Add(new Item() { Start = 2, End = 4, Name = "Competitor Analysis", Progress = 20 });
person.InLineItems.Add(new Item() { Start = 3, End = 6, Name = "Design Spec" });
teams[0].SubItems.Add(person);
person = new Item() { Name = "Michael" };
person.InLineItems.Add(new Item() { Start = 2, End = 4, Name = "Basic Requirement Analysis", Progress = 40 });
person.InLineItems.Add(new Item() { Start = 5, End = 7, Name = "Requirement Spec" });
teams[0].SubItems.Add(person);
person = new Item() { Name = "Anne" };
person.InLineItems.Add(new Item() { Start = 0, End = 2, Name = "Estimation", Progress = 30 });
person.InLineItems.Add(new Item() { Start = 3, End = 6, Name = "Budget & Plan Spec" });
teams[0].SubItems.Add(person);
teams.Add(new Item() { Name = "Graphics Team" });
person = new Item() { Name = "Madhan" };
person.InLineItems.Add(new Item() { Start = 0, End = 3, Name = "Identifying UI modules", Progress = 40 });
person.InLineItems.Add(new Item() { Start = 2, End = 5, Name = "Defining UI Design" });
teams[1].SubItems.Add(person);
return teams;
}
}The following shows the Resultant output:
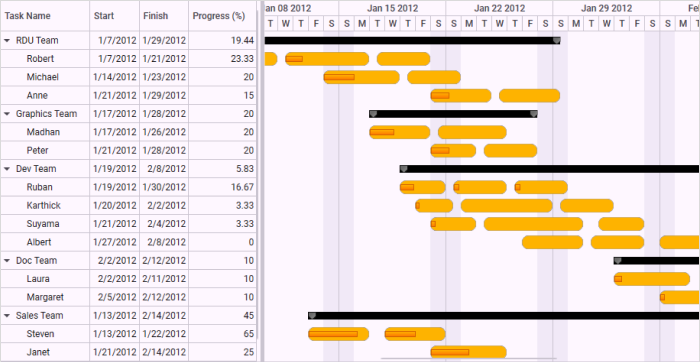
Resource View Gantt with a Date-Time Schedule
To populate the Resource view Gantt with a date-time schedule:
- Define the Gantt with DateTime values.
- Populate the collection of tasks in a single row by mapping the corresponding field in the underlying source to the InLineTaskMapping.
<syncfusion:GanttControl x:Name="ganttControl"
ItemsSource="{Binding TeamDetails}">
<syncfusion:GanttControl.TaskAttributeMapping>
<syncfusion:TaskAttributeMapping TaskNameMapping="Name"
StartDateMapping="StartDate"
ChildMapping="SubItems"
FinishDateMapping="FinishDate"
ProgressMapping="Progress"
InLineTaskMapping="InLineItems">
</syncfusion:TaskAttributeMapping>
</syncfusion:GanttControl.TaskAttributeMapping>
<syncfusion:GanttControl.Resources>
<Style TargetType="chart:HeaderNode">
<Setter Property="MaxHeight"
Value="24" />
<Setter Property="Template">
<Setter.Value>
<ControlTemplate TargetType="chart:HeaderNode">
<Border Background="{TemplateBinding Background}" Height="10"
Name="PART_HeaderBorder"
BorderBrush="{TemplateBinding BorderBrush}"
BorderThickness="0">
<Grid VerticalAlignment="Center">
<Grid.ColumnDefinitions>
<ColumnDefinition Width="10" />
<ColumnDefinition Width="*" />
<ColumnDefinition Width="10" />
</Grid.ColumnDefinitions>
<Rectangle HorizontalAlignment="Left"
Grid.Column="1"
Height="6.4"
VerticalAlignment="Top"
Stroke="#FF111111">
<Rectangle.Fill>
<LinearGradientBrush EndPoint="0.5,1"
StartPoint="0.5,0">
<GradientStop Color="#FF414141"
Offset="0" />
<GradientStop Color="#FF6D6D6D"
Offset="0.087" />
<GradientStop Color="#FF767676"
Offset="0.304" />
<GradientStop Color="Black"
Offset="0.957" />
<GradientStop Color="#FF343434"
Offset="1" />
</LinearGradientBrush>
</Rectangle.Fill>
</Rectangle>
<Path Data="M0.3,0.3 L9.834909,0.30036073 9.8351226,5.9832297 5.0695471,10.734966 0.32096295,5.9863821 z"
HorizontalAlignment="Left"
Grid.Column="0"
Height="11.435"
Stretch="Fill"
Stroke="#FF111111"
VerticalAlignment="Top"
Width="10.135">
<Path.Fill>
<LinearGradientBrush EndPoint="1.009,0.985"
StartPoint="0.339,0.286">
<GradientStop Color="DimGray"
Offset="0.008" />
<GradientStop Color="#FF7F7F7F"
Offset="0.511" />
<GradientStop Color="#FF2A2A2A"
Offset="1" />
</LinearGradientBrush>
</Path.Fill>
</Path>
<Path Data="M0.3,0.3 L9.834909,0.30036073 9.8351226,5.9832297 5.0695471,10.734966 0.32096295,5.9863821 z"
HorizontalAlignment="Left"
Grid.Column="2"
Height="11.435"
Stretch="Fill"
Stroke="#FF111111"
VerticalAlignment="Top"
Width="10.135">
<Path.Fill>
<LinearGradientBrush EndPoint="1.009,0.985"
StartPoint="0.339,0.286">
<GradientStop Color="DimGray"
Offset="0.008" />
<GradientStop Color="#FF7F7F7F"
Offset="0.511" />
<GradientStop Color="#FF2A2A2A"
Offset="1" />
</LinearGradientBrush>
</Path.Fill>
</Path>
</Grid>
</Border>
</ControlTemplate>
</Setter.Value>
</Setter>
</Style>
<!-- Task Node style-->
<Style x:Key="TaskNode"
TargetType="{x:Type chart:GanttNode}">
<Setter Property="Template">
<Setter.Value>
<ControlTemplate TargetType="{x:Type chart:GanttNode}">
<Border Name="PART_Border"
Height="18"
VerticalAlignment="Center"
CornerRadius="8"
BorderThickness="0.5"
BorderBrush="#FF4D4D4D">
<Border.Background>
<LinearGradientBrush EndPoint="0.5,1"
StartPoint="0.5,0">
<GradientStop Color="#FFFEB300"
Offset="0" />
<GradientStop Color="#FFFEB300"
Offset="1" />
</LinearGradientBrush>
</Border.Background>
<Grid>
<Grid.ColumnDefinitions>
<ColumnDefinition Width="Auto" />
<ColumnDefinition Width="*" />
<ColumnDefinition Width="Auto" />
</Grid.ColumnDefinitions>
<!-- To access the drag and drop feature, have the thumb with specified name -->
<Thumb Cursor="SizeAll"
x:Name="PART_DragDropThumb"
Grid.Column="0"
Grid.ColumnSpan="3">
<Thumb.Template>
<ControlTemplate>
<Border Background="Transparent" />
</ControlTemplate>
</Thumb.Template>
</Thumb>
<Border HorizontalAlignment="Left"
VerticalAlignment="Center"
Width="{TemplateBinding ProgressWidth}"
Grid.Column="0"
Grid.ColumnSpan="3">
<Grid HorizontalAlignment="Stretch"
Width="{TemplateBinding ProgressWidth}">
<Rectangle HorizontalAlignment="Stretch"
Height="8"
Stroke="#FFD26202"
VerticalAlignment="Center">
<Rectangle.Fill>
<LinearGradientBrush EndPoint="0.5,1"
StartPoint="0.5,0">
<GradientStop Color="#FFFEB300"
Offset="0" />
<GradientStop Color="#FFFE7600"
Offset="1" />
</LinearGradientBrush>
</Rectangle.Fill>
</Rectangle>
<!-- To access the progress resizing feature, have the thumb with specified name -->
<Thumb Cursor="SizeWE"
x:Name="PART_ProgressThumb"
HorizontalAlignment="Right">
<Thumb.Template>
<ControlTemplate>
<Border Background="Transparent"
BorderBrush="Transparent">
<Rectangle Height="2"
Width="5"
Fill="Transparent" />
</Border>
</ControlTemplate>
</Thumb.Template>
</Thumb>
</Grid>
</Border>
<!-- To access the resizing feature, have the thumb with the specified name -->
<Thumb Cursor="ScrollE"
Grid.Column="2"
x:Name="PART_RightThumb"
HorizontalAlignment="Right">
<Thumb.Template>
<ControlTemplate>
<Border Background="Transparent"
BorderBrush="Transparent"
BorderThickness="0"
Width="4"
Height="20" />
</ControlTemplate>
</Thumb.Template>
</Thumb>
<!-- To access the resizing feature, have the thumb with the specified name -->
<Thumb Cursor="SizeWE"
Grid.Column="0"
x:Name="PART_LeftThumb"
HorizontalAlignment="Left">
<Thumb.Template>
<ControlTemplate>
<Border Background="Transparent"
BorderBrush="Transparent"
BorderThickness="0"
Width="4"
Height="20" />
</ControlTemplate>
</Thumb.Template>
</Thumb>
</Grid>
</Border>
</ControlTemplate>
</Setter.Value>
</Setter>
</Style>
<Style TargetType="chart:GanttNode" BasedOn="{StaticResource TaskNode}" />
<Style TargetType="chart:MileStone" BasedOn="{StaticResource MileStone}" />
</syncfusion:GanttControl.Resources>
<syncfusion:GanttControl.DataContext>
<local:ViewModel/>
</syncfusion:GanttControl.DataContext>
</syncfusion:GanttControl>this.ganttControl.ItemsSource = new ViewModel().Items;
// Task attribute mapping
TaskAttributeMapping taskAttributeMapping = new TaskAttributeMapping();
taskAttributeMapping.TaskNameMapping = "Name";
taskAttributeMapping.StartPointMapping = "StartDate";
taskAttributeMapping.ChildMapping = "SubItems";
taskAttributeMapping.FinishPointMapping = "End";
taskAttributeMapping.InLineTaskMapping = "InLineItems";
this.ganttControl.TaskAttributeMapping = taskAttributeMapping;public class Item : NotificationObject
{
/// <summary>
/// Holds the name value.
/// </summary>
string _name;
/// <summary>
/// Holds the start date value.
/// </summary>
DateTime _startDate;
/// <summary>
/// Holds the end date value.
/// </summary>
DateTime _finishDate;
/// <summary>
/// Holds the progress value.
/// </summary>
double _progress;
/// <summary>
/// Holds the sub items.
/// </summary>
ObservableCollection<Item> _subItems = new ObservableCollection<Item>();
/// <summary>
/// Holds the inline items.
/// </summary>
ObservableCollection<Item> _inLineItems = new ObservableCollection<Item>();
/// <summary>
/// Initializes a new instance of the <see cref="Item"/> class.
/// </summary>
public Item()
{
_subItems.CollectionChanged += ItemsCollectionChanged;
_inLineItems.CollectionChanged += ItemsCollectionChanged;
}
/// <summary>
/// Gets or sets the name.
/// </summary>
/// <value>The name.</value>
public string Name
{
get
{
return this._name;
}
set
{
this._name = value;
RaisePropertyChanged("Name");
}
}
/// <summary>
/// Gets or sets the start date.
/// </summary>
/// <value>The start date.</value>
public DateTime StartDate
{
get
{
return this._startDate;
}
set
{
this._startDate = value;
RaisePropertyChanged("StartDate");
}
}
/// <summary>
/// Gets or sets the finish date.
/// </summary>
/// <value>The finish date.</value>
public DateTime FinishDate
{
get
{
return this._finishDate;
}
set
{
this._finishDate = value;
RaisePropertyChanged("FinishDate");
}
}
/// <summary>
/// Gets or sets the progress.
/// </summary>
/// <value>The progress.</value>
public double Progress
{
get
{
return Math.Round(this._progress, 2);
}
set
{
this._progress = value;
RaisePropertyChanged("Progress");
}
}
/// <summary>
/// Gets or sets the sub items.
/// </summary>
/// <value>The sub items.</value>
public ObservableCollection<Item> SubItems
{
get
{
return this._subItems;
}
set
{
this._subItems = value;
this._subItems.CollectionChanged += ItemsCollectionChanged;
if (value.Count > 0)
{
this._subItems.ToList().ForEach(n =>
{
/// To listen the changes occuring in child task.
n.PropertyChanged += ItemPropertyChanged;
});
UpdateDates();
}
this.RaisePropertyChanged("SubItems");
}
}
/// <summary>
/// Gets or sets the in line items.
/// </summary>
/// <value>The in line items.</value>
public ObservableCollection<Item> InLineItems
{
get
{
return this._inLineItems;
}
set
{
this._inLineItems = value;
this._inLineItems.CollectionChanged += ItemsCollectionChanged;
if (value.Count > 0)
{
this._inLineItems.ToList().ForEach(n =>
{
/// To listen the changes occuring in child task.
n.PropertyChanged += ItemPropertyChanged;
});
UpdateDates();
}
this.RaisePropertyChanged("InLineItems");
}
}
/// <summary>
/// Itemses the collection changed.
/// </summary>
/// <param name="sender">The sender.</param>
/// <param name="e">The <see cref="System.Collections.Specialized.NotifyCollectionChangedEventArgs"/> instance containing the event data.</param>
void ItemsCollectionChanged(object sender, System.Collections.Specialized.NotifyCollectionChangedEventArgs e)
{
if (e.Action == NotifyCollectionChangedAction.Add)
{
foreach (Item item in e.NewItems)
{
item.PropertyChanged += ItemPropertyChanged;
}
}
else
{
foreach (Item item in e.OldItems)
{
item.PropertyChanged -= ItemPropertyChanged;
}
}
this.UpdateDates();
}
/// <summary>
/// Items the property changed.
/// </summary>
/// <param name="sender">The sender.</param>
/// <param name="e">The <see cref="System.ComponentModel.PropertyChangedEventArgs"/> instance containing the event data.</param>
void ItemPropertyChanged(object sender, PropertyChangedEventArgs e)
{
if (e.PropertyName != null)
if (e.PropertyName == "StartDate" || e.PropertyName == "FinishDate" || e.PropertyName == "Progress")
{
UpdateDates();
}
}
/// <summary>
/// Updates the dates.
/// </summary>
private void UpdateDates()
{
var tempCal = 0d;
if (_subItems.Count > 0)
{
/// Updating the start and end date based on the chagne occur in the date of child task
StartDate = _subItems.Select(c => c.StartDate).Min();
FinishDate = _subItems.Select(c => c.FinishDate).Max();
Progress = (_subItems.Aggregate(tempCal, (cur, task) => cur + task.Progress)) / _subItems.Count;
}
if (_inLineItems.Count > 0)
{
/// Updating the start and end date based on the chagne occur in the date of child task
StartDate = _inLineItems.Select(c => c.StartDate).Min();
FinishDate = _inLineItems.Select(c => c.FinishDate).Max();
Progress = (_inLineItems.Aggregate(tempCal, (cur, task) => cur + task.Progress)) / _inLineItems.Count;
}
}
}public class ViewModel
{
/// <summary>
/// Holds the team details.
/// </summary>
private ObservableCollection<Item> _teamDetails;
/// <summary>
/// Initializes a new instance of the <see cref="ViewModel"/> class.
/// </summary>
public ViewModel()
{
this._teamDetails = GetTeamInfo();
}
/// <summary>
/// Gets or sets the appointment item source.
/// </summary>
/// <value>The appointment item source.</value>
public ObservableCollection<Item> TeamDetails
{
get
{
return this._teamDetails;
}
set
{
this._teamDetails = value;
}
}
/// <summary>
/// Gets the team info.
/// </summary>
/// <returns>The teams</returns>
public ObservableCollection<Item> GetTeamInfo()
{
DateTime dateTime = DateTime.Today;
ObservableCollection<Item> teams = new ObservableCollection<Item>();
teams.Add(new Item() { Name = "RDU Team" });
Item person = new Item() { Name = "Robert" };
person.InLineItems.Add(new Item() { StartDate = new DateTime(2012, 01, 07), FinishDate = new DateTime(2012, 01, 11), Name = "Market Analysis", Progress = 50d });
person.InLineItems.Add(new Item() { StartDate = new DateTime(2012, 01, 11, 12, 0, 0), FinishDate = new DateTime(2012, 01, 17), Name = "Competitor Analysis", Progress = 20d });
person.InLineItems.Add(new Item() { StartDate = new DateTime(2012, 01, 17, 12, 0, 0), FinishDate = new DateTime(2012, 01, 21), Name = "Design Spec" });
teams[0].SubItems.Add(person);
person = new Item() { Name = "Michael" };
person.InLineItems.Add(new Item() { StartDate = new DateTime(2012, 01, 14), FinishDate = new DateTime(2012, 01, 19), Name = "Basic Requirement Analysis", Progress = 40 });
person.InLineItems.Add(new Item() { StartDate = new DateTime(2012, 01, 19, 12, 0, 0), FinishDate = new DateTime(2012, 01, 23), Name = "Requirement Spec" });
teams[0].SubItems.Add(person);
person = new Item() { Name = "Anne" };
person.InLineItems.Add(new Item() { StartDate = new DateTime(2012, 01, 21), FinishDate = new DateTime(2012, 01, 25), Name = "Estimation", Progress = 30 });
person.InLineItems.Add(new Item() { StartDate = new DateTime(2012, 01, 25, 12, 0, 0), FinishDate = new DateTime(2012, 01, 29, 12, 0, 0), Name = "Budget & Plan Spec" });
teams[0].SubItems.Add(person);
teams.Add(new Item() { Name = "Graphics Team" });
person = new Item() { Name = "Madhan" };
person.InLineItems.Add(new Item() { StartDate = new DateTime(2012, 01, 17), FinishDate = new DateTime(2012, 01, 21), Name = "Identifying UI modules", Progress = 40 });
person.InLineItems.Add(new Item() { StartDate = new DateTime(2012, 01, 21, 12, 0, 0), FinishDate = new DateTime(2012, 01, 26), Name = "Defining UI Design" });
teams[1].SubItems.Add(person);
person = new Item() { Name = "Peter" };
person.InLineItems.Add(new Item() { StartDate = new DateTime(2012, 01, 21), FinishDate = new DateTime(2012, 01, 24), Name = "Designing Animagions", Progress = 40 });
person.InLineItems.Add(new Item() { StartDate = new DateTime(2012, 01, 24, 12, 0, 0), FinishDate = new DateTime(2012, 01, 28), Name = "Completing Overall Graphics design" });
teams[1].SubItems.Add(person);
teams.Add(new Item() { Name = "Dev Team" });
person = new Item() { Name = "Ruban" };
person.InLineItems.Add(new Item() { StartDate = new DateTime(2012, 01, 19), FinishDate = new DateTime(2012, 01, 22), Name = "Analysis", Progress = 30 });
person.InLineItems.Add(new Item() { StartDate = new DateTime(2012, 01, 22, 12, 0, 0), FinishDate = new DateTime(2012, 01, 26), Name = "Defining Modules", Progress = 10 });
person.InLineItems.Add(new Item() { StartDate = new DateTime(2012, 01, 26, 12, 0, 0), FinishDate = new DateTime(2012, 01, 30), Name = "Development Plan", Progress = 10 });
teams[2].SubItems.Add(person);
person = new Item() { Name = "Karthick" };
person.InLineItems.Add(new Item() { StartDate = new DateTime(2012, 01, 20), FinishDate = new DateTime(2012, 01, 22, 12, 0, 0), Name = "Analysis", Progress = 10 });
person.InLineItems.Add(new Item() { StartDate = new DateTime(2012, 01, 23), FinishDate = new DateTime(2012, 1, 29), Name = "Module Development" });
person.InLineItems.Add(new Item() { StartDate = new DateTime(2012, 01, 29, 12, 0, 0), FinishDate = new DateTime(2012, 02, 2), Name = "Self Testing" });
teams[2].SubItems.Add(person);
person = new Item() { Name = "Suyama" };
person.InLineItems.Add(new Item() { StartDate = new DateTime(2012, 01, 21), FinishDate = new DateTime(2012, 01, 24), Name = "Analysis", Progress = 10 });
person.InLineItems.Add(new Item() { StartDate = new DateTime(2012, 01, 24, 12, 0, 0), FinishDate = new DateTime(2012, 01, 31), Name = "Module Development" });
person.InLineItems.Add(new Item() { StartDate = new DateTime(2012, 02, 1), FinishDate = new DateTime(2012, 02, 4), Name = "Self Testing" });
teams[2].SubItems.Add(person);
person = new Item() { Name = "Albert" };
person.InLineItems.Add(new Item() { StartDate = new DateTime(2012, 01, 27), FinishDate = new DateTime(2012, 01, 31), Name = "Modules Integration" });
person.InLineItems.Add(new Item() { StartDate = new DateTime(2012, 01, 31, 12, 0, 0), FinishDate = new DateTime(2012, 02, 4), Name = "Integration Testing" });
person.InLineItems.Add(new Item() { StartDate = new DateTime(2012, 02, 5), FinishDate = new DateTime(2012, 02, 8, 12, 0, 0), Name = "Completeness" });
teams[2].SubItems.Add(person);
teams.Add(new Item() { Name = "Doc Team" });
person = new Item() { Name = "Laura" };
person.InLineItems.Add(new Item() { StartDate = new DateTime(2012, 02, 02), FinishDate = new DateTime(2012, 02, 07), Name = "User Guide Development", Progress = 10 });
person.InLineItems.Add(new Item() { StartDate = new DateTime(2012, 02, 08), FinishDate = new DateTime(2012, 02, 11), Name = "Publishing User Guide", Progress = 10 });
teams[3].SubItems.Add(person);
person = new Item() { Name = "Margaret" };
person.InLineItems.Add(new Item() { StartDate = new DateTime(2012, 02, 05), FinishDate = new DateTime(2012, 02, 08), Name = "Web Conetent Development", Progress = 10 });
person.InLineItems.Add(new Item() { StartDate = new DateTime(2012, 02, 08, 12, 0, 0), FinishDate = new DateTime(2012, 02, 12), Name = "Publishing Web Conetent", Progress = 10 });
teams[3].SubItems.Add(person);
teams.Add(new Item() { Name = "Sales Team" });
person = new Item() { Name = "Steven" };
person.InLineItems.Add(new Item() { StartDate = new DateTime(2012, 01, 13), FinishDate = new DateTime(2012, 01, 17), Name = "Defining Target", Progress = 80 });
person.InLineItems.Add(new Item() { StartDate = new DateTime(2012, 01, 18), FinishDate = new DateTime(2012, 01, 22), Name = "Defining Startegy", Progress = 50 });
teams[4].SubItems.Add(person);
person = new Item() { Name = "Janet" };
person.InLineItems.Add(new Item() { StartDate = new DateTime(2012, 01, 21), FinishDate = new DateTime(2012, 01, 26), Name = "Collect Customers list", Progress = 50 });
person.InLineItems.Add(new Item() { StartDate = new DateTime(2012, 02, 09), FinishDate = new DateTime(2012, 02, 14), Name = "Contacting Customer" });
teams[4].SubItems.Add(person);
return teams;
}
}Output
The following image shows the resultant output:
Data Structure
The following is the data structure used to build a Resource view Gantt:
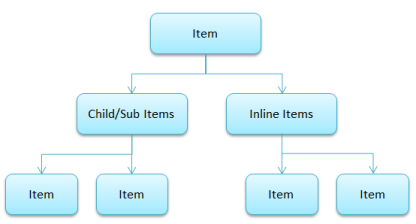
- team holds information about the team.
- SubItems of Team will hold the list of Resources in that particular team.
- InLineItems of each Resource will hold the tasks assigned to the particular resource.
Information Displayed in Gantt
Grid Region:The grid will display only the information about the team and its resources (SubItems). It will not display the information about assigned tasks (InLineItems).
Chart Region: The chart will display only the information about the team and the tasks assigned to each resource in the team (InLineItems). It will not display the information about resources (SubItems).
Sample Link
To view samples:
- Go to the Syncfusion Essential Studio installed location.
Location: Installed Location\Syncfusion\Essential Studio\34.1.29\Infrastructure\Launcher\Syncfusion Control Panel - Open the Syncfusion Control Panel in the above location (or) Double click on the Syncfusion Control Panel desktop shortcut menu.
- Click Run Samples for WPF under User Interface Edition panel.
- Select Gantt.
- Expand the Data Binding item in the Sample Browser.
- Choose the Resource View Gantt sample to launch.