How can I help you?
Swimlane in WPF Diagram (SfDiagram)
29 Jan 202514 minutes to read
A Swimlane is a type of diagram nodes, which is typically used to visualize the relationship between a business process and the department responsible for it by focusing on the logical relationships between activities.
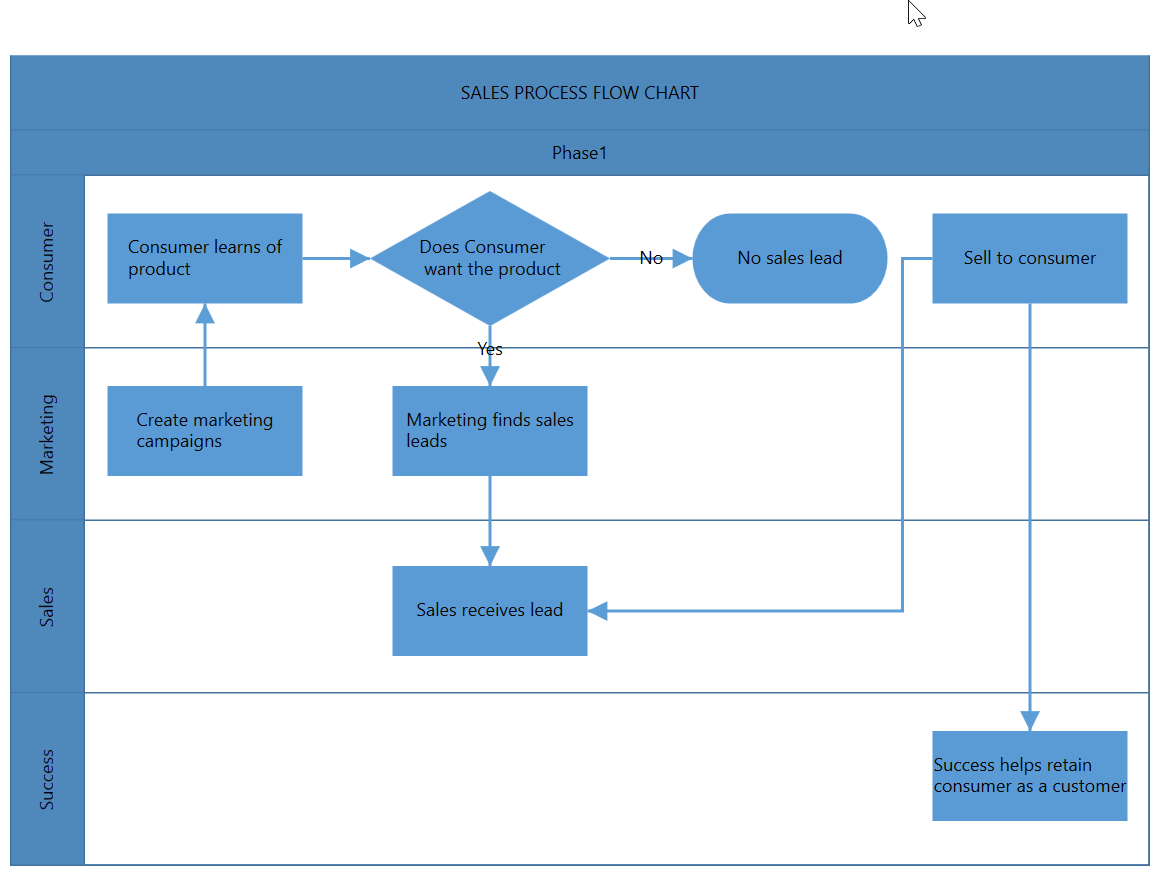
Create a swimlane
A swimlane can be created and added to the diagram, either programmatically or interactively.
Add Swimlane through the Swimlanes collection
To create a swimlane, you have to define the swimlane object and add that to the Swimlanes collection of the diagram.
NOTE
By default, if you create a swimlane, one lane and phase will be added.
<!-- Initialize the Sfdiagram -->
 <syncfusion:SfDiagram x:Name="diagram">
    <syncfusion:SfDiagram.Swimlanes>
        <!-- Initialize the SwimlaneCollection -->
         <syncfusion:SwimlaneCollection>
          <!--Initialize the Swimlane-->
            <syncfusion:SwimlaneViewModel OffsetX="300" OffsetY="150"
                UnitHeight="120" UnitWidth="450"/>
         </syncfusion:SwimlaneCollection>
    </syncfusion:SfDiagram.Swimlanes>
</syncfusion:SfDiagram>
//Initialize the SfDiagram
SfDiagram diagram = new SfDiagram();
//Initialize the SwimlaneCollection to SfDiagram
diagram.Swimlanes = new SwimlaneCollection();
//Creating the SwimlaneViewModel
SwimlaneViewModel swimlane = new SwimlaneViewModel()
{
UnitWidth = 450,
UnitHeight = 120,
OffsetX = 300,
OffsetY = 150,
};
//Add Swimlane to the Swimlanes property of the Diagram
(diagram.Swimlanes as SwimlaneCollection).Add(swimlane);Now, the swimlane will be as follows.
Swimlane Header
The Swimlane Header was the primary element for swimlanes. The Header property of swimlane allows you to define its textual description and to customize its appearance.
NOTE
By using this header,the swimlane interaction will be performed,like selection, dragging,and more.
The following code example explains how to define the swimlane header.
<!-- Initialize the Sfdiagram -->
<syncfusion:SfDiagram x:Name="diagram">
            <syncfusion:SfDiagram.Swimlanes>
                <!-- Initialize the SwimlaneCollection -->
                <syncfusion:SwimlaneCollection>
                    <!--Initialize the Swimlane-->
                    <syncfusion:SwimlaneViewModel OffsetX="300" OffsetY="150"
                UnitHeight="120" UnitWidth="450">
                  <!--Initialize the Swimlane Header-->
                        <syncfusion:SwimlaneViewModel.Header>
                            <syncfusion:SwimlaneHeaderViewModel UnitHeight="32" >
                                <syncfusion:SwimlaneHeaderViewModel.Annotation>
                                    <syncfusion:AnnotationEditorViewModel Content="SALES PROCESS FLOW CHART"></syncfusion:AnnotationEditorViewModel>
                                </syncfusion:SwimlaneHeaderViewModel.Annotation>
                            </syncfusion:SwimlaneHeaderViewModel>
                        </syncfusion:SwimlaneViewModel.Header>
                    </syncfusion:SwimlaneViewModel>
                </syncfusion:SwimlaneCollection>
            </syncfusion:SfDiagram.Swimlanes>
</syncfusion:SfDiagram>
//Initialize the SfDiagram
SfDiagram diagram = new SfDiagram();
//Initialize the SwimlaneCollection to SfDiagram
diagram.Swimlanes = new SwimlaneCollection();
//Creating the SwimlaneViewModel
SwimlaneViewModel swimlane = new SwimlaneViewModel()
{
UnitWidth = 450,
UnitHeight = 120,
OffsetX = 300,
OffsetY = 150,
};
//Creating header for SwimlaneViewModel
swimlane.Header = new SwimlaneHeaderViewModel()
{
UnitHeight = 32,
Annotation = new AnnotationEditorViewModel()
{
Content = "SALES PROCESS FLOW CHART"
}
};
//Add Swimlane to the Swimlanes property of the diagram
(diagram.Swimlanes as SwimlaneCollection).Add(swimlane);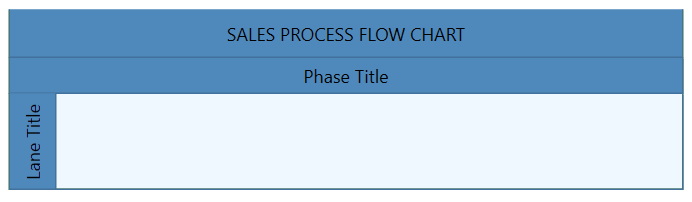
Customization of headers
The height and width of swimlane header can be customized with the UnitWidth and UnitHeight properties of swimlane header. Set fill color of header by using the ShapeStyle property.
The following code example explains how to customize the swimlane header.
<Style x:Key="SwimlaneHeaderStyle" TargetType="Path">
   <Setter Property="Fill" Value="CadetBlue"/>
   <Setter Property="Stretch" Value="Fill"/>
   <Setter Property="Stroke" Value="#41719C"/>
   <Setter Property="StrokeThickness" Value="1"/>
</Style>
  <!--Template overriding for view template-->
 <DataTemplate x:Key="viewTemplate">
   <TextBlock Text="{Binding Path=Content, Mode=TwoWay}"
               FontStyle="Italic" FontSize="12"
               FontFamily="TimesNewRomen"
               TextDecorations="Underline"
               FontWeight="Bold"
               Foreground="AliceBlue"/>
</DataTemplate>

 <!-- Initialize the Sfdiagram -->
 <syncfusion:SfDiagram x:Name="diagram">
            <syncfusion:SfDiagram.Swimlanes>
                <!-- Initialize the SwimlaneCollection -->
                <syncfusion:SwimlaneCollection>
                    <!--Initialize the Swimlane-->
                    <syncfusion:SwimlaneViewModel OffsetX="300" OffsetY="150" Orientation="Horizontal"
                UnitHeight="120" UnitWidth="450">
                        <syncfusion:SwimlaneViewModel.Header>
                         <!--Initialize the Swimlane Header-->
                            <syncfusion:SwimlaneHeaderViewModel UnitHeight="32" ShapeStyle="{StaticResource SwimlaneHeaderStyle}">
                                <syncfusion:SwimlaneHeaderViewModel.Annotation>
                                    <syncfusion:AnnotationEditorViewModel Content="SALES PROCESS FLOW CHART" ViewTemplate="{StaticResource viewTemplate">
                                    </syncfusion:AnnotationEditorViewModel>
                                </syncfusion:SwimlaneHeaderViewModel.Annotation>
                            </syncfusion:SwimlaneHeaderViewModel>
                        </syncfusion:SwimlaneViewModel.Header>
                    </syncfusion:SwimlaneViewModel>
                </syncfusion:SwimlaneCollection>
            </syncfusion:SfDiagram.Swimlanes>
        </syncfusion:SfDiagram>
//Initialize the SfDiagram
SfDiagram diagram = new SfDiagram();
//Initialize the SwimlaneCollection to SfDiagram
diagram.Swimlanes = new SwimlaneCollection();
//Creating the SwimlaneViewModel
SwimlaneViewModel swimlane = new SwimlaneViewModel()
{
UnitWidth = 450,
UnitHeight = 120,
OffsetX = 300,
OffsetY = 150,
Orientation=Orientation.Horizontal,
};
//Creating header for the SwimlaneViewModel
swimlane.Header = new SwimlaneHeaderViewModel()
{
UnitHeight = 32,
Annotation = new AnnotationEditorViewModel()
{
Content = "SALES PROCESS FLOW CHART",
ViewTemplate=this.Resources["viewTemplate"] as DataTemplate
},
ShapeStyle=this.Resources["SwimlaneHeaderStyle"] as Style,
};
//Add Swimlane to the Swimlanes property of the diagram
(diagram.Swimlanes as SwimlaneCollection).Add(swimlane);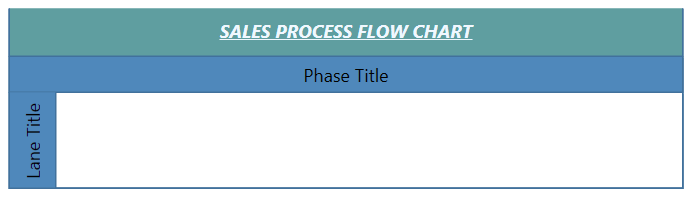
How to customize the Swimlane Background
You can customize the Swimlane background by changing its ShapeStyle property. The following code explains how to customize the Swimlane background.
<Style TargetType="syncfusion:Swimlane">
    <Setter Property="ShapeStyle">
        <Setter.Value>
            <Style TargetType="Path">
                <Setter Property="Fill" Value="SandyBrown"/>
                <Setter Property="Stretch" Value="Fill"/>
                <Setter Property="Stroke" Value="#487ca9"/>
                <Setter Property="StrokeThickness" Value="1"/>
            </Style>
        </Setter.Value>
    </Setter>
</Style>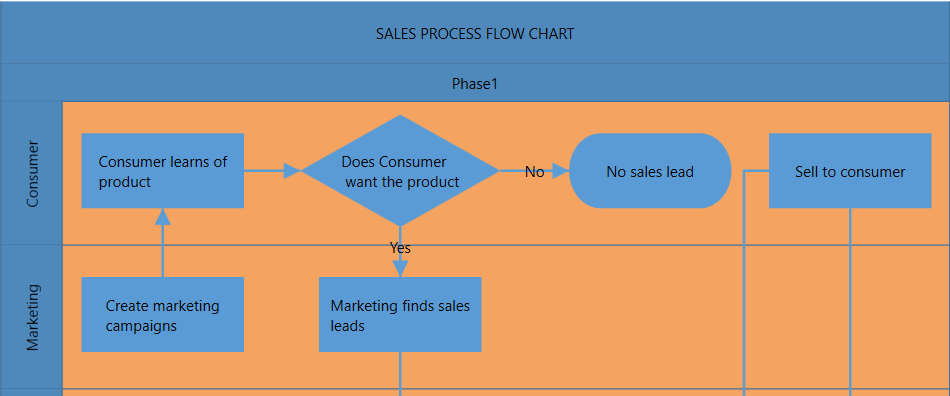
Header editing
The diagram provides the support to edit swimlane headers at runtime. You can achieve the header editing by double clicking on it. Double clicking the header label will enables the editing mode.
The following image shows how to edit the swimlane header.
 .
.
Orientation
The orientation of swimlane can be customized with the Orientation property of the header.
NOTE
By default the swimlane orientation has Horizontal.
The following code example explains how to set the orientation of the swimlane.
<!-- Initialize the Sfdiagram -->
 <syncfusion:SfDiagram x:Name="diagram">
    <syncfusion:SfDiagram.Swimlanes>
        <!-- Initialize the SwimlaneCollection -->
         <syncfusion:SwimlaneCollection>
          <!--Initialize the Swimlane-->
            <syncfusion:SwimlaneViewModel OffsetX="300" OffsetY="150"  Orientation="Horizontal"
                UnitHeight="120" UnitWidth="450"/>
         </syncfusion:SwimlaneCollection>
    </syncfusion:SfDiagram.Swimlanes>
</syncfusion:SfDiagram>
//Initialize the SfDiagram
SfDiagram diagram = new SfDiagram();
//Initialize the SwimlaneCollection to SfDiagram
diagram.Swimlanes = new SwimlaneCollection();
//Creating the SwimlaneViewModel
SwimlaneViewModel swimlane = new SwimlaneViewModel()
{
UnitWidth = 450,
UnitHeight = 120,
OffsetX = 300,
OffsetY = 150,
Orientation=Orientation.Horizontal,
};
//Add Swimlane to the Swimlanes property of the Diagram
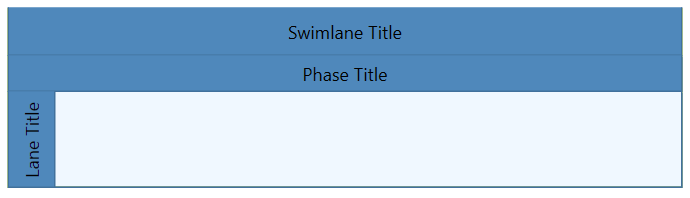
(diagram.Swimlanes as SwimlaneCollection).Add(swimlane);| Orientation | Output |
|---|---|
| Horizontal | 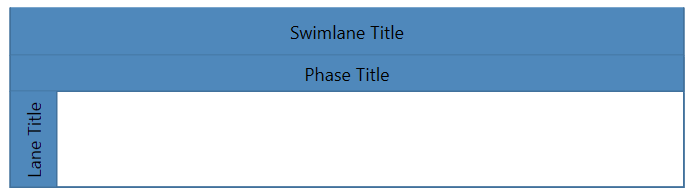 |
| Vertical | 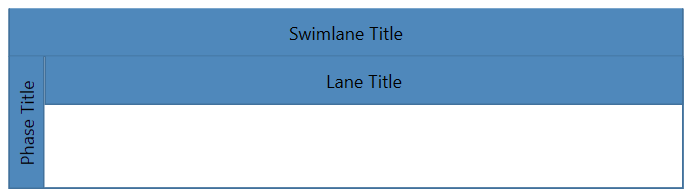 |
Interaction
Select
Swimlane can be selected by clicking (tap) the header of the swimlane.
-
The
IsSelectedProperty is used to select or unselect the swimlane at runtime. -
The
ItemSelectingEventandItemSelectedEventfor selecting an element, will notify you the item and its original source. To explore about arguments, refer to the DiagramPreviewEventArgs and ItemSelectedEventArgs. -
The
ItemUnselectingEventandItemUnselectedEventfor unselecting an element, will notify you the item and its original source. To explore about arguments, refer to the DiagramPreviewEventArgs and DiagramEventArgs.
Drag
-
Selected object can be dragged by clicking and dragging the header of the swimlane.
-
Instead of dragging original object, preview of the node alone can be dragged. For preview dragging, refer to the PreviewSettings.
-
The
NodeChangedEventwill notify theOffsetXandOffsetYchanges with their old and new values. Along with that, this event will give information about interaction state. To explore about arguments, refer to the NodeChangedEventArgs .
Please find the swimlane sample as follows.
View Swimlane sample in GitHub
See Also
How to restrict node’s dragging from native lane to other lanes in WPF diagram(SfDiagram)?
How to render the Swimlane at the top-left corner of the diagram in the WPF Diagram (SfDiagram)?