Lane in WPF Diagram (SfDiagram)
11 Jan 202420 minutes to read
A Lane is a functional unit or a responsible department of a business process that helps to map a process within the functional unit or in between other functional units.
The number of lanes can be added to swimlane and rendered in the diagram. The lanes are automatically stacked inside swimlane based on the order they are added.
Create an empty lane
Note: For the Horizontal Swimlane, you must set the UnitHeight of the Lane. For the Vertical Swimlane, you must set UnitWidth of the Lane.
The following code example explains how to define a swimlane with lane.
<syncfusion:SfDiagram x:Name="diagram" >
                <syncfusion:SfDiagram.Swimlanes>
                     <!--Initialize the SwimlaneCollection-->
                    <syncfusion:SwimlaneCollection>
                        <!--Initialize the Swimlane-->
                        <syncfusion:SwimlaneViewModel OffsetX="300" OffsetY="150"
                UnitHeight="120" UnitWidth="450">
                            <!--Create a header for Swimlane-->
                            <syncfusion:SwimlaneViewModel.Header>
                                <syncfusion:SwimlaneHeaderViewModel UnitHeight="32" >
                                    <syncfusion:SwimlaneHeaderViewModel.Annotation>
                                        <syncfusion:AnnotationEditorViewModel Content="SALES PROCESS FLOW CHART"> </syncfusion:AnnotationEditorViewModel>
                                    </syncfusion:SwimlaneHeaderViewModel.Annotation>
                                </syncfusion:SwimlaneHeaderViewModel>
                            </syncfusion:SwimlaneViewModel.Header>
                            <syncfusion:SwimlaneViewModel.Lanes>
                                <syncfusion:LaneCollection>
                                    <!--Initialize the Lane-->
                                    <syncfusion:LaneViewModel UnitHeight="100">
                                    </syncfusion:LaneViewModel>
                                </syncfusion:LaneCollection>
                            </syncfusion:SwimlaneViewModel.Lanes>
                        </syncfusion:SwimlaneViewModel>
                    </syncfusion:SwimlaneCollection>
                </syncfusion:SfDiagram.Swimlanes>
            </syncfusion:SfDiagram>
//Initialize the SfDiagram
SfDiagram diagram = new SfDiagram();
//Initialize the SwimlaneCollection to SfDiagram
diagram.Swimlanes = new SwimlaneCollection();
//Creating the SwimlaneViewModel
SwimlaneViewModel swimlane = new SwimlaneViewModel()
{
UnitWidth = 450,
UnitHeight = 120,
OffsetX = 300,
OffsetY = 150,
Orientation = Orientation.Horizontal,
};
//Creating the header for SwimlaneViewModel
swimlane.Header = new SwimlaneHeaderViewModel()
{
UnitHeight = 32,
Annotation = new AnnotationEditorViewModel()
{
Content = "SALES PROCESS FLOW CHART"
},
};
swimlane.Lanes = new LaneCollection()
{
new LaneViewModel()
{
UnitHeight=100,
}
};
//Add Swimlane to the Swimlanes property of the Diagram
(diagram.Swimlanes as SwimlaneCollection).Add(swimlane);Create Lane Header and Header customization
- The
Headerproperty of lane allows you to textually describe the lane and to customize the appearance of the description. - The size of lane header can be controlled by using the
UnitWidthandUnitHeightproperties of header. - The appearance of lane header can be set by using the
ShapeStyleproperties.
The following code example explains how to define a lane header and its customization.
<Style x:Key="LaneHeaderStyle" TargetType="Path">
   <Setter Property="Fill" Value="CadetBlue"/>
   <Setter Property="Stretch" Value="Fill"/>
   <Setter Property="Stroke" Value="#41719C"/>
   <Setter Property="StrokeThickness" Value="1"/>
</Style>

 <!--Template overriding for view template-->
<DataTemplate x:Key="viewTemplate">
    <TextBlock Text="{Binding Path=Content, Mode=TwoWay}"
               FontStyle="Italic" FontSize="12"
               FontFamily="TimesNewRomen"
               TextDecorations="Underline"
               FontWeight="Bold"
               Foreground="AliceBlue"/>
</DataTemplate>

 <syncfusion:SfDiagram x:Name="diagram" >
    <syncfusion:SfDiagram.Swimlanes>
       <!--Initialize the SwimlaneCollection-->
        <syncfusion:SwimlaneCollection>
        <!--Initialize the Swimlane-->
        <syncfusion:SwimlaneViewModel OffsetX="300" OffsetY="150"  UnitHeight="120" UnitWidth="450">
       <!--Create a header for Swimlane-->
        <syncfusion:SwimlaneViewModel.Header>
           <syncfusion:SwimlaneHeaderViewModel UnitHeight="32" >
             <syncfusion:SwimlaneHeaderViewModel.Annotation>
               <syncfusion:AnnotationEditorViewModel Content="SALES PROCESS FLOW CHART"> </syncfusion:AnnotationEditorViewModel>
             </syncfusion:SwimlaneHeaderViewModel.Annotation>
        </syncfusion:SwimlaneHeaderViewModel>
        </syncfusion:SwimlaneViewModel.Header>
        <syncfusion:SwimlaneViewModel.Lanes>
         <syncfusion:LaneCollection>
          <!--Initialize the Lane-->
           <syncfusion:LaneViewModel UnitHeight="100">
             <syncfusion:LaneViewModel.Header>
              <!--Create a header for Lane-->
             <syncfusion:SwimlaneHeaderViewModel UnitWidth="30" ShapeStyle="{StaticResource LaneHeaderStyle}" >
              <syncfusion:SwimlaneHeaderViewModel.Annotation>
               <syncfusion:AnnotationEditorViewModel Content="Consumer" ViewTemplate="{StaticResource viewTemplate}"></syncfusion:AnnotationEditorViewModel>
               </syncfusion:SwimlaneHeaderViewModel.Annotation>
               </syncfusion:SwimlaneHeaderViewModel>
             </syncfusion:LaneViewModel.Header>
           </syncfusion:LaneViewModel>
         </syncfusion:LaneCollection>
      </syncfusion:SwimlaneViewModel.Lanes>
   </syncfusion:SwimlaneViewModel>
 </syncfusion:SwimlaneCollection>
</syncfusion:SfDiagram.Swimlanes>
</syncfusion:SfDiagram>
//Initialize the SfDiagram
SfDiagram diagram = new SfDiagram();
//Initialize the SwimlaneCollection to SfDiagram
diagram.Swimlanes = new SwimlaneCollection();
//Creating the SwimlaneViewModel
SwimlaneViewModel swimlane = new SwimlaneViewModel()
{
UnitWidth = 450,
UnitHeight = 120,
OffsetX = 300,
OffsetY = 150,
Orientation = Orientation.Horizontal,
};
//Creating the header for SwimlaneViewModel
swimlane.Header = new SwimlaneHeaderViewModel()
{
UnitHeight = 32,
Annotation = new AnnotationEditorViewModel()
{
Content = "SALES PROCESS FLOW CHART"
},
};
swimlane.Lanes = new LaneCollection()
{
new LaneViewModel()
{
UnitHeight=100,
Header=new SwimlaneHeaderViewModel()
{
UnitHeight=30,
Annotation=new AnnotationEditorViewModel(){Content="Consumer", ViewTemplate = this.Resources["viewTemplate"] as DataTemplate},
ShapeStyle=this.Resources["LaneHeaderStyle"] as Style,
}
}
};
//Add Swimlane to the Swimlanes property of the Diagram
(diagram.Swimlanes as SwimlaneCollection).Add(swimlane);.
NOTE
Default RotateAngle value of LaneHeader’s Annotation is 270 degrees. If you want to place the Annotation in the Horizontal direction, you have to set the RotateAngle of LaneHeader’s Annotation as 360 degrees.
Add and Remove the lane at runtime
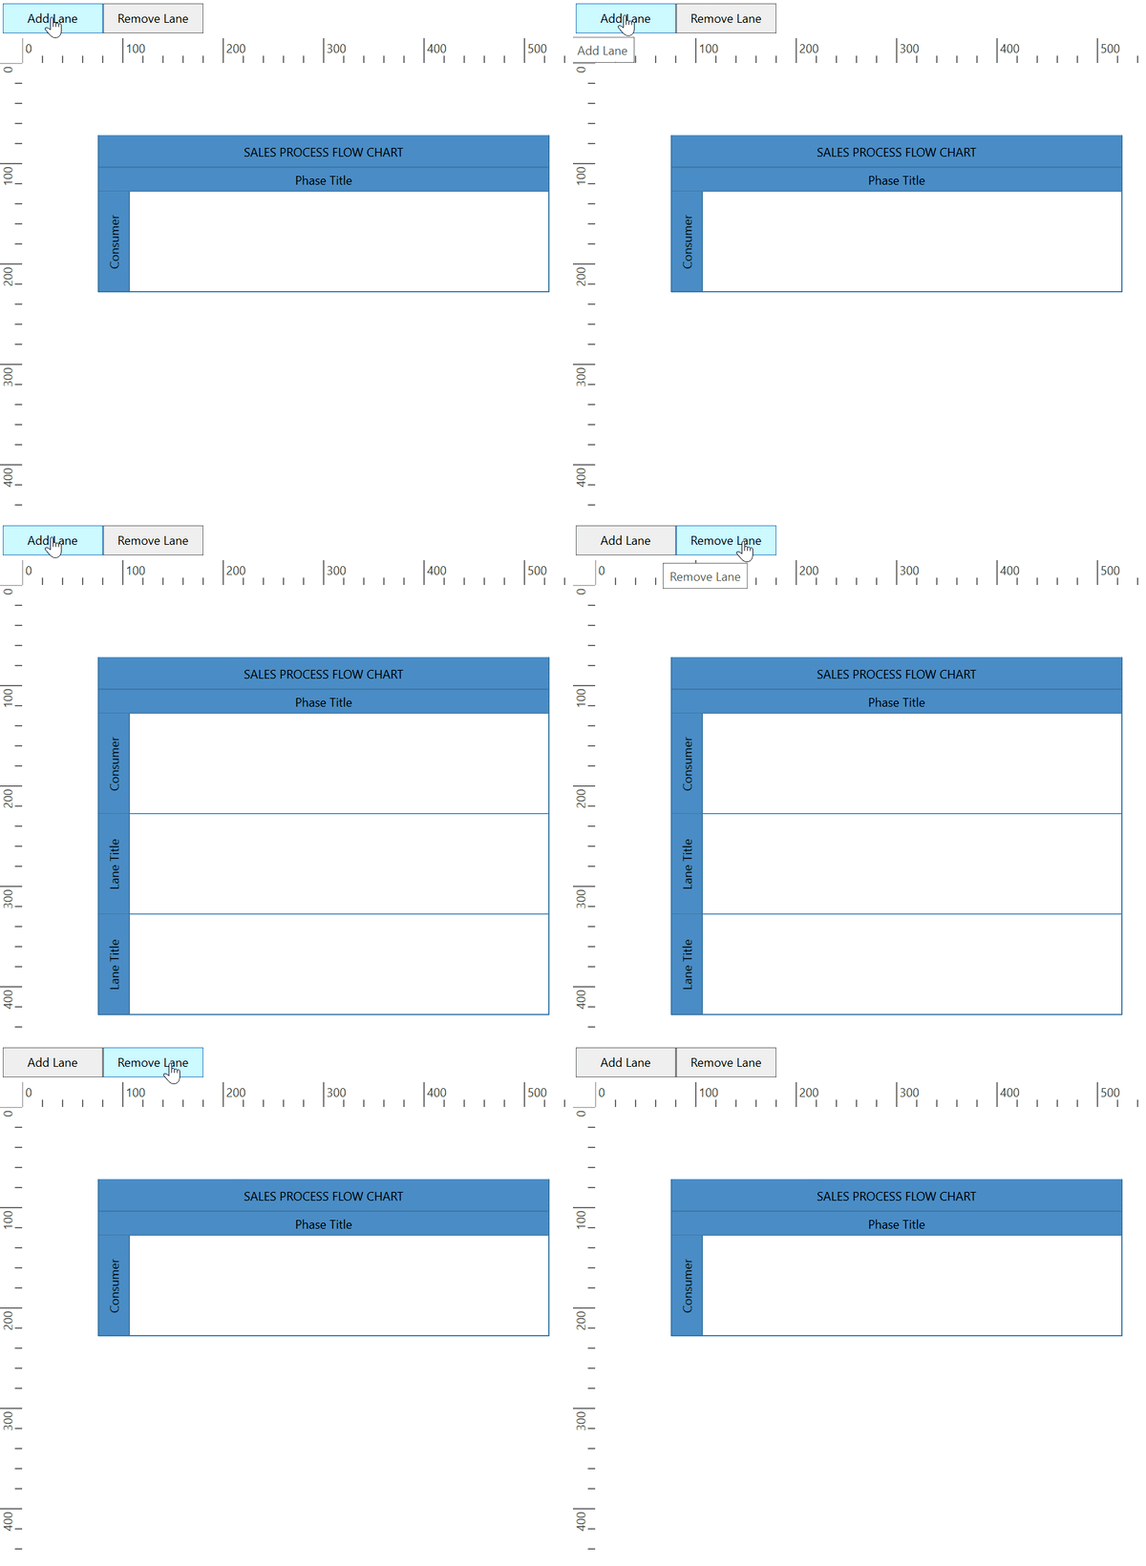
You can add and remove the lane at runtime by using the Add and Remove method of the SfDiagram.Lanes Collection. The following code explains how to dynamically add and remove lane to swimlane.
<Button Name="AddButton" Width="100"  Height="30" IsEnabled="True" Content="Add Lane" ToolTip="Add Lane" Command="{Binding AddCommand}" Cursor="Hand"></Button>
<Button Name="RemoveButton" Width="100"  Height="30" IsEnabled="True" Content="Remove Lane" ToolTip="Remove Lane" Command="{Binding RemoveCommand}" Cursor="Hand">
</Button>
 <syncfusion:SfDiagram x:Name="diagram" Nodes="{Binding Nodes}"
    Swimlanes="{Binding Swimlanes}" Connectors="{Binding Connectors}" SelectedItems="{Binding SelectedItems}"         SnapSettings="{Binding SnapSettings}"                        HorizontalRuler="{Binding HorizontalRuler}"                  VerticalRuler="{Binding VerticalRuler}"/>
public class DiagramVM : DiagramViewModel
{
#region Fields
private ICommand _AddCommand;
private ICommand _RemoveCommand;
#endregion
public DiagramVM()
{
SnapSettings = new SnapSettings()
{
SnapConstraints = SnapConstraints.None,
};
SelectedItems = new SelectorViewModel();
HorizontalRuler = new Ruler() { Orientation = Orientation.Horizontal };
VerticalRuler = new Ruler() { Orientation = Orientation.Vertical };
InitializeDiagram();
AddCommand = new Command(OnAdd);
RemoveCommand = new Command(OnRemove);
}
private void InitializeDiagram()
{
//Initialize the SwimlaneCollection to SfDiagram
this.Swimlanes = new SwimlaneCollection();
//Creating the SwimlaneViewModel
SwimlaneViewModel swimlane = new SwimlaneViewModel()
{
UnitWidth = 450,
UnitHeight = 120,
OffsetX = 300,
OffsetY = 150,
Orientation = Orientation.Horizontal,
};
//Creating the header for SwimlaneViewModel
swimlane.Header = new SwimlaneHeaderViewModel()
{
UnitHeight = 32,
Annotation = new AnnotationEditorViewModel()
{
Content = "SALES PROCESS FLOW CHART"
},
};
swimlane.Lanes = new LaneCollection()
{
new LaneViewModel()
{
UnitHeight=100,
Header=new SwimlaneHeaderViewModel()
{
UnitHeight=30,
Annotation=new AnnotationEditorViewModel(){Content="Consumer"}
}
}
};
//Add Swimlane to the Swimlanes property of the Diagram
(this.Swimlanes as SwimlaneCollection).Add(swimlane);
}
#region Commands
public ICommand AddCommand
{
get { return _AddCommand; }
set { _AddCommand = value; }
}
public ICommand RemoveCommand
{
get { return _RemoveCommand; }
set { _RemoveCommand = value; }
}
#endregion
#region Helper Methods
//Add Lane into the Lanes collection
private void OnAdd(object obj)
{
var swimlane = (this.Swimlanes as SwimlaneCollection).FirstOrDefault() as SwimlaneViewModel;
if (swimlane != null)
{
(swimlane.Lanes as LaneCollection).Add(new LaneViewModel() { UnitHeight = 100 });
}
}
//Remove Lane from the Lanes collection
private void OnRemove(object obj)
{
var swimlane = (this.Swimlanes as SwimlaneCollection).FirstOrDefault() as SwimlaneViewModel;
if (swimlane != null && (swimlane.Lanes as LaneCollection).Count>1)
{
(swimlane.Lanes as LaneCollection).Remove((swimlane.Lanes as LaneCollection).LastOrDefault());
}
}
#endregion
}
Add children to lane
To add nodes to the lane, you should add the Nodes collection of diagram and reference should add the Children collection of the lane.
The LaneOffsetX and LaneOffsetY property of the node will position the element in the lane canvas.
The following code example explains how to add nodes to lane.
<!--Style for Node-->
<Style TargetType="syncfusion:Node">
 <Setter Property="Shape">
  <Setter.Value>
   <RectangleGeometry Rect="0,0,100,100"></RectangleGeometry>
  </Setter.Value>
  </Setter>
 <Setter Property="ShapeStyle">
  <Setter.Value>
    <Style TargetType="Path">
      <Setter Property="Fill" Value="#5b9bd5"/>
      <Setter Property="Stretch" Value="Fill"/>
    </Style>
</Setter.Value>
</Setter>
</Style>

 <syncfusion:SfDiagram x:Name="diagram" Nodes="{Binding Nodes}"
    Swimlanes="{Binding Swimlanes}" Connectors="{Binding Connectors}"         SelectedItems="{Binding SelectedItems}"                              SnapSettings="{Binding SnapSettings}"                              HorizontalRuler="{Binding HorizontalRuler}"                              VerticalRuler="{Binding VerticalRuler}"/>
public class DiagramVM : DiagramViewModel
{
public DiagramVM()
{
SnapSettings = new SnapSettings()
{
SnapConstraints = SnapConstraints.None,
};
SelectedItems = new SelectorViewModel();
HorizontalRuler = new Ruler() { Orientation = Orientation.Horizontal };
VerticalRuler = new Ruler() { Orientation = Orientation.Vertical };
InitializeDiagram();
}
private void InitializeDiagram()
{
//Initialize the SwimlaneCollection to SfDiagram
this.Swimlanes = new SwimlaneCollection();
//Creating the SwimlaneViewModel
SwimlaneViewModel swimlane = new SwimlaneViewModel()
{
UnitWidth = 450,
UnitHeight = 120,
OffsetX = 300,
OffsetY = 150,
Orientation = Orientation.Horizontal,
};
//Creating the header for SwimlaneViewModel
swimlane.Header = new SwimlaneHeaderViewModel()
{
UnitHeight = 32,
Annotation = new AnnotationEditorViewModel()
{
Content = "SALES PROCESS FLOW CHART"
},
};
LaneViewModel lane1 = new LaneViewModel()
{
UnitHeight = 100,
Header = new SwimlaneHeaderViewModel()
{
UnitHeight = 30,
Annotation = new AnnotationEditorViewModel() { Content = "Consumer" }
}
};
swimlane.Lanes = new LaneCollection()
{
lane1
};
NodeViewModel node = new NodeViewModel() { UnitHeight = 50, UnitWidth = 50, LaneOffsetX = 100, LaneOffsetY = 30 };
NodeViewModel node1 = new NodeViewModel() { UnitHeight = 50, UnitWidth = 50, LaneOffsetX = 250, LaneOffsetY = 30 };
(this.Nodes as NodeCollection).Add(node);
(this.Nodes as NodeCollection).Add(node1);
(lane1.Children as LaneChildren).Add(node);
(lane1.Children as LaneChildren).Add(node1);
//Add Swimlane to the Swimlanes property of the Diagram
(this.Swimlanes as SwimlaneCollection).Add(swimlane);
}
}.
Header Selection and Resize
-
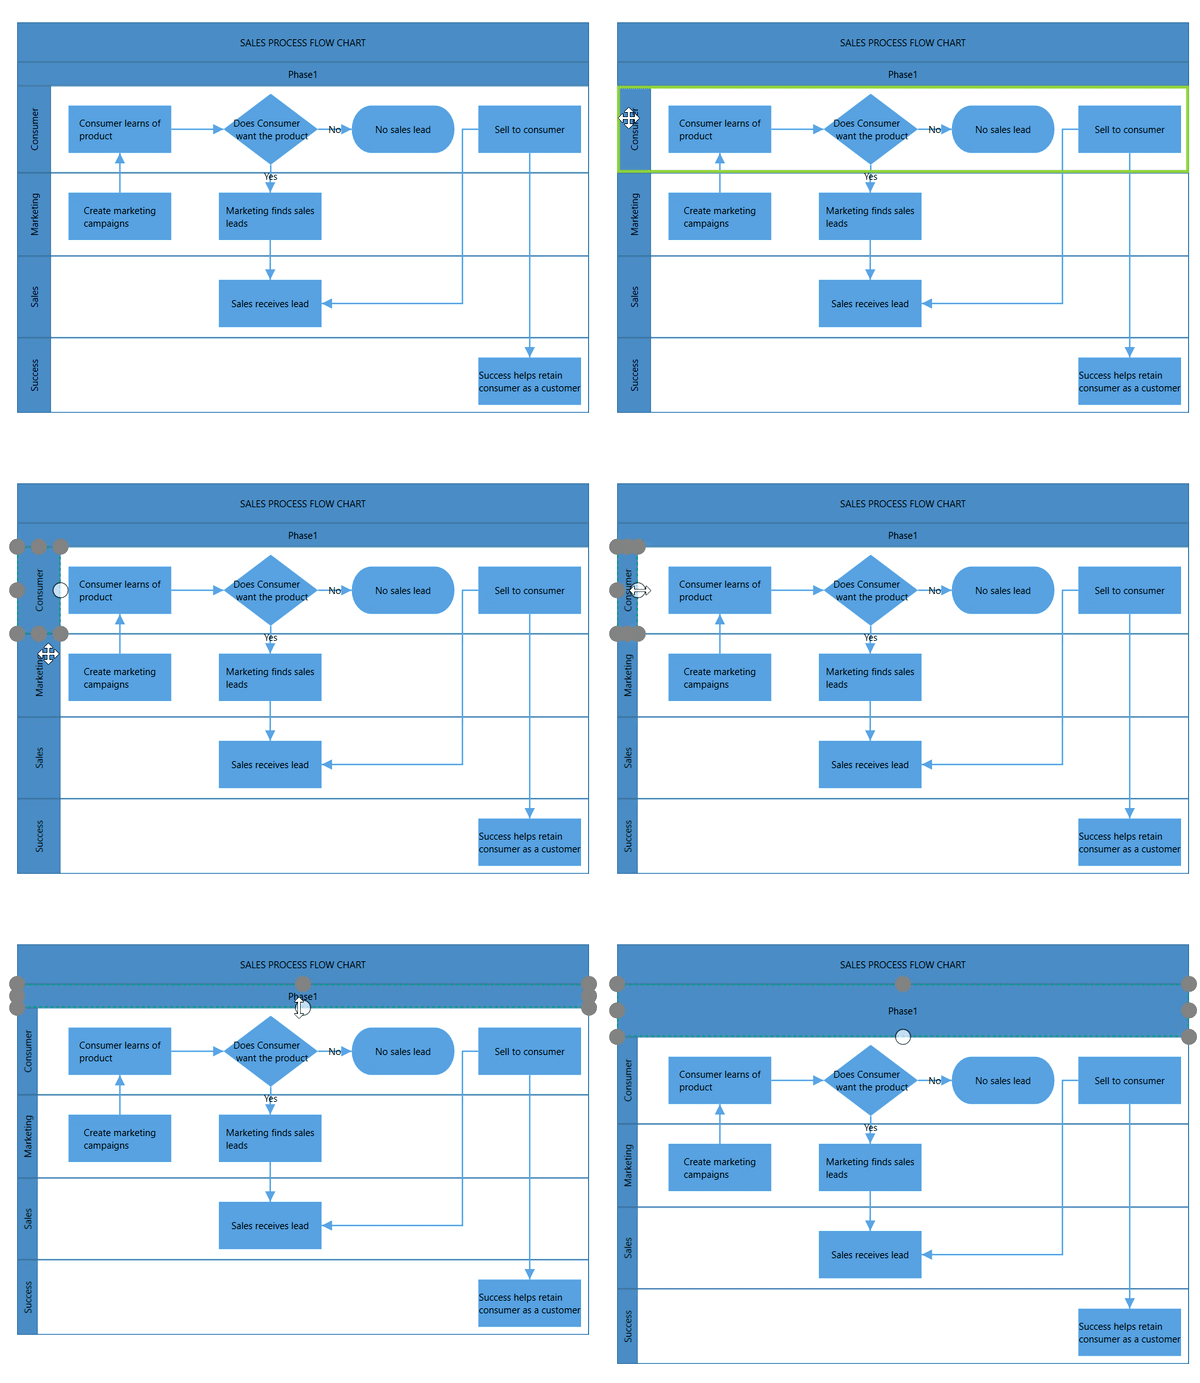
You can select the individual lane header by clicking on the header twice. For first click, the respective lane can select.
- You can support to resize the individual lane header. While resizing lane, it has maintain 20px distances from the Lane children.
- The
NodeChangedEventwill notify theUnitHeightandUnitWidthchanges with their old and new values. Along with that, this event will give information about interaction state. To explore about arguments, refer to the NodeChangedEventArgs
The following image shows how to select and resize the lane header.
 .
.
Lane header editing
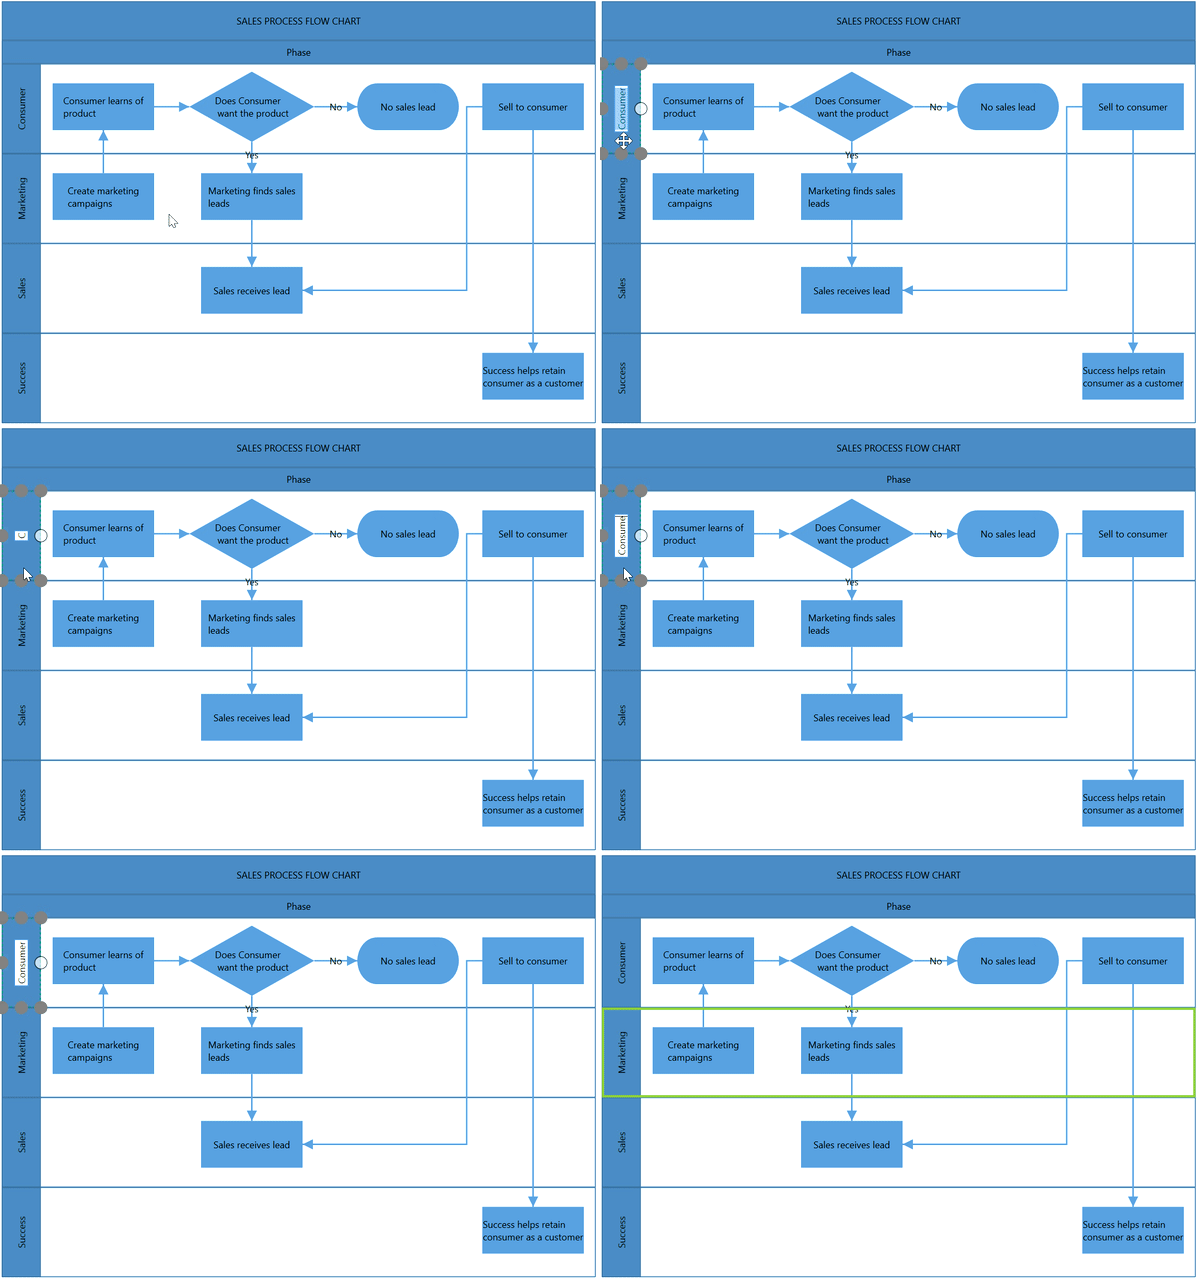
Diagram provides the support to edit Lane headers at runtime. You can achieve the header editing by double click event. Double clicking the header label will enables the editing of that.
The following image shows how to edit the lane header.
