Date-Selection in WPF Calendar (CalendarEdit)
18 Feb 202523 minutes to read
This section explains how to select a date and custom UI of the WPF CalendarEdit control.
Select a date
You can select a date in the CalendarEdit control by mouse click on the specific date. You can get the selected date by using the Date property.
<!-- Selecting date -->
<syncfusion:CalendarEdit Name="calendarEdit" />
CalendarEdit calendarEdit = new CalendarEdit();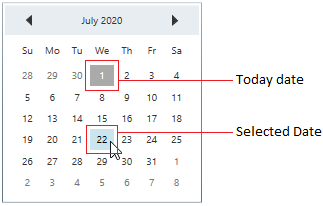
NOTE
Select a date programmatically
You can set selected date programmatically by setting the date value to the Date property.
<!-- Selecting date programmatically -->
<syncfusion:CalendarEdit Date="25/08/2020"
                         Name="calendarEdit"/>
//Selecting date programmatically
calendarEdit.Date = new DateTime(2020, 08, 25);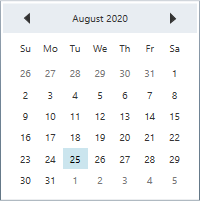
NOTE
Select multiple dates
You can select a multiple dates by drag and move the mouse from required start date to end date.
You can get the selected dates from the SelectedDates property. You can restrict the multiple date selection by setting AllowMultiplySelection property as false. The default value of AllowMultiplySelection property is true.
<!-- Selecting multiple dates-->
<syncfusion:CalendarEdit Name="calendarEdit"
                         AllowMultiplySelection="True"/>
//Selecting multiple dates
calendarEdit.AllowMultiplySelection = true;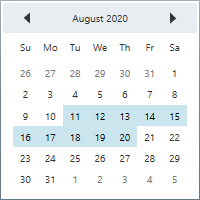
NOTE
Select specific multiple dates
You can select a specific multiple dates by pressing the Ctrl key and select required dates using mouse click.
<!-- Selecting multiple dates-->
<syncfusion:CalendarEdit Name="calendarEdit"
                         AllowMultiplySelection="True"/>
//Selecting multiple dates
calendarEdit.AllowMultiplySelection = true;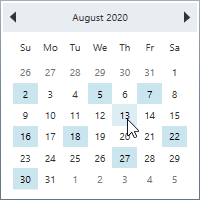
NOTE
Select a multiple dates programmatically
You can select a multiple dates programmatically by setting the dates to the SelectedDatesList property.
<!-- Selecting date -->
<syncfusion:CalendarEdit Date="08/25/2020"
                         AllowMultiplySelection="True"
                         Name="calendarEdit"/>
//Selecting multiple date programmatically
calendarEdit.AllowMultiplySelection = true;
calendarEdit.SelectedDatesList = new List<Date>();
calendarEdit.SelectedDatesList.Add(new Date(2020, 08, 01));
calendarEdit.SelectedDatesList.Add(new Date(2020, 08, 05));
calendarEdit.SelectedDatesList.Add(new Date(2020, 08, 10));
calendarEdit.SelectedDatesList.Add(new Date(2020, 08, 15));
calendarEdit.SelectedDatesList.Add(new Date(2020, 08, 20));
calendarEdit.SelectedDatesList.Add(new Date(2020, 08, 29));
Select multiple dates using key navigation
You can select a multiple dates by pressing the Shift with Arrow keys. If you want to select multiple dates in forward direction, press the Shift + Down or Shift + Right keys. If you want to select a date in backward direction, press the Shift + UP or Shift + Left keys. You can get the selected dates from the SelectedDates property.
For example, if you start selecting the date from 18 Nov 2020 using key navigation, it will be select the dates as follows,
<!-- Selecting multiple dates-->
<syncfusion:CalendarEdit Name="calendarEdit"
                         AllowMultiplySelection="True"/>
//Selecting multiple dates
calendarEdit.AllowMultiplySelection = true;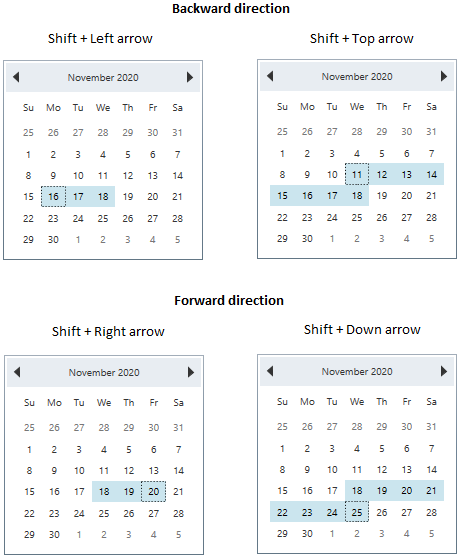
Select specific multiple dates using key navigation
You can select or unselect the specific multiple dates by using the Ctrl, Arrow keys and Space bar.
-
Ctrl + Arrowkeys → To move the focus to the top, left, bottom and right cells with maintaining the old selection. -
Spacebar → To select the currently focused item. -
Ctrl + Spacebar → To remove an item from multiple selection that is already selected.
<!-- Selecting multiple dates-->
<syncfusion:CalendarEdit Name="calendarEdit"
                         AllowMultiplySelection="True"/>
//Selecting multiple dates
calendarEdit.AllowMultiplySelection = true;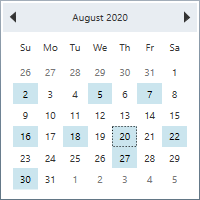
NOTE
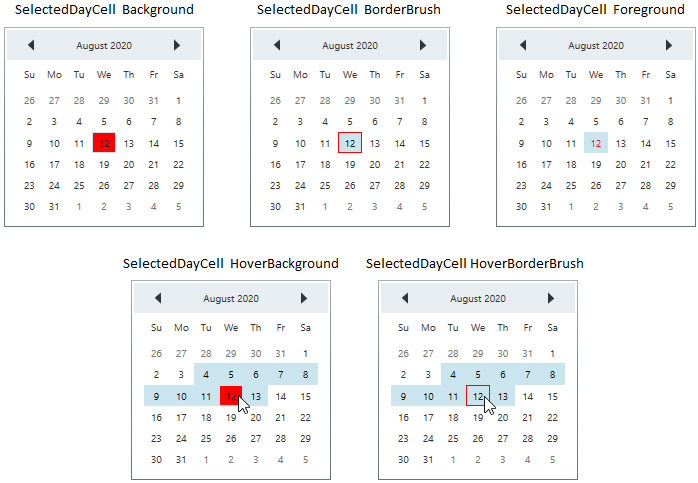
Highlight selected date
If you want to highlight the selected date, change it’s foreground, background or border brush by using the SelectionForeground, SelectedDayCellBackground and SelectedDayCellBorderBrush and properties. You can also change the mouse hover background and border brush for the selected day cell by using the SelectedDayCellHoverBackground and SelectionBorderBrush properties.
<syncfusion:CalendarEdit SelectedDayCellBackground="Yellow"
                         SelectedDayCellBorderBrush="Blue"
                         SelectionForeground="Red"
                         SelectedDayCellHoverBackground="Green"
                         SelectionBorderBrush="Red"
Name="calendarEdit" />calendarEdit.SelectedDayCellBackground = Brushes.Yellow;
calendarEdit.SelectedDayCellBorderBrush = Brushes.Blue;
calendarEdit.SelectionForeground = Brushes.Red;
calendarEdit.SelectedDayCellHoverBackground = Brushes.Green;
calendarEdit.SelectionBorderBrush = Brushes.Red;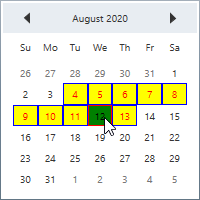
NOTE
Get today date
If you want to know the today date, use the TodayDate property. It contains the today date of the CalendarEdit control.
CalendarEdit calendarEdit = new calendarEdit();

//get the today date
 var today_Date= calendarEdit.TodayDate;
Display today date
If you want to display the today date in the CalendarEdit control, use the TodayRowIsVisible property value as true. It will display the today date in the bottom-left corner of the CalendarEdit control. The default value of TodayRowIsVisible property is false.
<syncfusion:CalendarEdit TodayRowIsVisible="True"
                         Name="calendarEdit" />
//Enable the today row
calendarEdit.TodayRowIsVisible = true;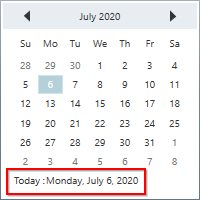
NOTE
Highlight today date
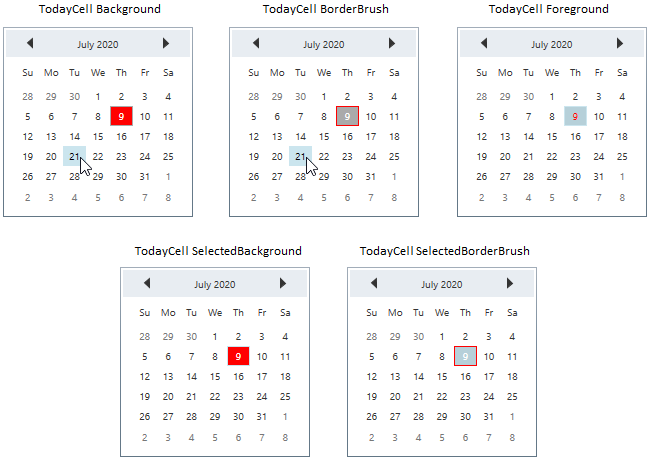
If you want to highlight the today date, change it’s foreground, background or border brush by using TodayCellForeground, TodayCellBackground and TodayCellBorderBrush properties. You can also change the selected border brush and background of the today date by using the TodayCellSelectedBorderBrush and TodayCellSelectedBackground properties.
<syncfusion:CalendarEdit TodayCellSelectedBorderBrush="Red"
                         TodayCellSelectedBackground="Green"
                         TodayCellForeground="Yellow"
Name="calendarEdit" />calendarEdit.TodayCellSelectedBorderBrush = Brushes.Red;
calendarEdit.TodayCellSelectedBackground = Brushes.Green;
calendarEdit.TodayCellForeground = Brushes.Yellow;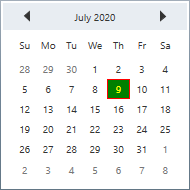
NOTE
Differentiate current month days from other days
If you want to differentiate currently selected month days from previous or next month days, change the previous and next month days foreground by using the NotCurrentMonthForeground property. The default value of NotCurrentMonthForeground property is Gray.
<syncfusion:CalendarEdit NotCurrentMonthForeground="Red"
Name="calendarEdit" />calendarEdit.NotCurrentMonthForeground = Brushes.Red;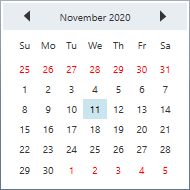
NOTE
Change default view (Month, Year, Decade)
By default, the days are displayed in the CalendarEdit.
You can change the default calendar view as week numbers, month, years or years range mode by setting the respective value to the VisualMode property. The default value of VisualMode property is Days.
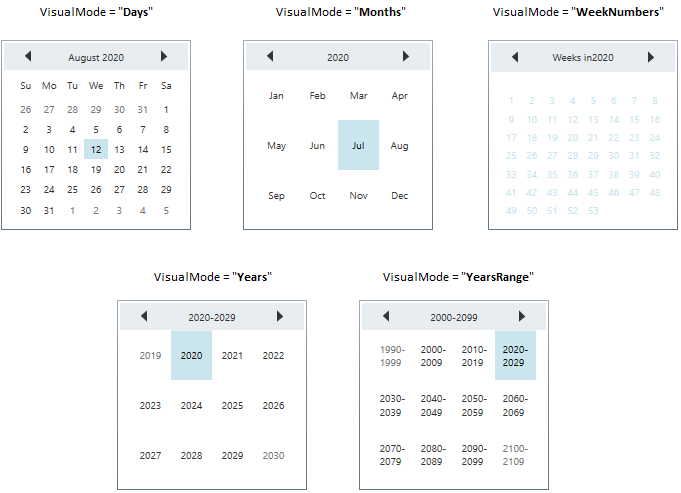
<syncfusion:CalendarEdit Name="calendarEdit"
VisualMode="YearsRange"/>calendarEdit.VisualMode = CalendarVisualMode.YearsRange;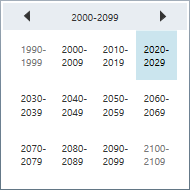
NOTE
Display week numbers
If you want to know the week number of the currently displayed dates, use the ShowWeekNumbers property as true. It will display the respective week numbers in the left side of the CalendarEdit control.The default value of ShowWeekNumbers property is false.
<!--Showing Week number-->
<syncfusion:CalendarEdit Name="calendarEdit"
                         ShowWeekNumbers="True"/>
//Shows week numbers
calendarEdit.ShowWeekNumbers = true;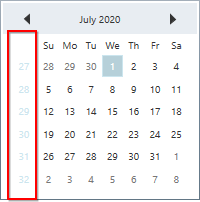
NOTE
Highlight week numbers
If you want to highlight the week numbers, change it’s foreground, background or border brush by using the WeekNumberBackground, WeekNumberForeground and WeekNumberBorderBrush properties. You can also change the mouse hover background, foreground and border brush for the selected day cell by using the WeekNumberHoverBackground, WeekNumberHoverForeground and WeekNumberHoverBorderBrush properties.
<syncfusion:CalendarEdit WeekNumberBackground="Green"
                         WeekNumberBorderBrush="Red"
                         WeekNumberForeground="Yellow"
                         WeekNumberHoverBackground="Yellow"
                         WeekNumberHoverBorderBrush="Blue"
                         WeekNumberHoverForeground="Green"
                         ShowWeekNumbers="True"
VisualMode="WeekNumbers" />calendarEdit.WeekNumberBackground = Brushes.Green;
calendarEdit.WeekNumberBorderBrush = Brushes.Red;
calendarEdit.WeekNumberForeground = Brushes.Yellow;
calendarEdit.WeekNumberHoverBackground = Brushes.Yellow;
calendarEdit.WeekNumberHoverBorderBrush = Brushes.Blue;
calendarEdit.WeekNumberHoverForeground = Brushes.Green;
calendarEdit.ShowWeekNumbers = true;
calendarEdit.VisualMode = CalendarVisualMode.WeekNumbers;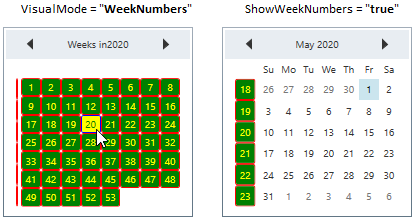
NOTE
Special days
You can differentiate the special day from other days by setting that date value to the SpecialDate.Date property and adding SpecialDate.Date into the SpecialDates collection. You can use the SpecialDate.CellTemplate property to customize the SpecialDate day cell appearance.
//ViewModel.cs
public class ViewModel {
	private SpecialDatesCollection specialDates;
	public SpecialDatesCollection SpecialDates {
		get { return specialDates; }
		set { specialDates = value; }
	}
	public ViewModel() {
		SpecialDates = new SpecialDatesCollection();
	}
}<Window.Resources>
<DataTemplate x:Key="WorldEnvironmentDay" >
<Image Source="Resources\Icon_Environmental day.png" />
</DataTemplate>
<DataTemplate x:Key="EngineersDay" >
<Image Source="Resources\Icon_Engineer day.png" />
</DataTemplate>
<DataTemplate x:Key="PollutionPreventionDay" >
<Image Source="Resources\Icon_Pollution day.png" />
</DataTemplate>
<DataTemplate x:Key="NationalMathematicsDay" >
<Image Source="Resources\Icon_Mathematics day.png" />
</DataTemplate>
<DataTemplate x:Key="Christmas" >
<Image Source="Resources\Christmas.png" />
</DataTemplate>
<local:ViewModel x:Key="viewModel">
<local:ViewModel.SpecialDates>
<syncfusion:SpecialDate Date="06/05/2020" CellTemplate="{StaticResource WorldEnvironmentDay }"/>
<syncfusion:SpecialDate Date="09/15/2020" CellTemplate="{StaticResource EngineersDay }"/>
<syncfusion:SpecialDate Date="12/02/2020" CellTemplate="{StaticResource PollutionPreventionDay }"/>
<syncfusion:SpecialDate Date="12/22/2020" CellTemplate="{StaticResource NationalMathematicsDay }"/>
<syncfusion:SpecialDate Date="12/25/2020" CellTemplate="{StaticResource Christmas }"/>
</local:ViewModel.SpecialDates>
</local:ViewModel>
</Window.Resources>
<Grid>
<syncfusion:CalendarEdit DataContext="{StaticResource viewModel}"
SpecialDates="{Binding SpecialDates}"
Name="calendarEdit" />
</Grid>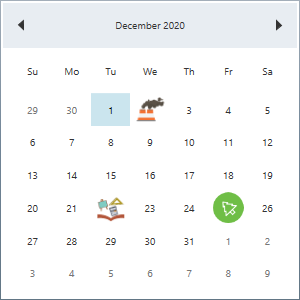
NOTE
Setting Culture
You can change the culture for CalendarEdit control by setting the required culture to the Culture property.
<!--Setting french culture-->
<syncfusion:CalendarEdit Name="calendarEdit"
                         Culture="fr-FR"/>
//Setting french culture
calendarEdit.Culture = new CultureInfo("fr-FR");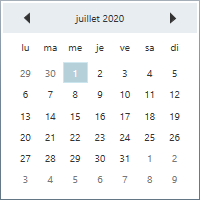
Show full month and week name
You can display full month names and week day names by setting the ShowAbbreviatedDayNames and ShowAbbreviatedDayNames properties as false. The default value of ShowAbbreviatedDayNames and ShowAbbreviatedDayNames property is true.
<syncfusion:CalendarEdit ShowAbbreviatedDayNames="False"
                         ShowAbbreviatedMonthNames="False"
                         Name="calendarEdit"/>
CalendarEdit calendarEdit = new CalendarEdit();
calendarEdit.ShowAbbreviatedDayNames = false;
calendarEdit.ShowAbbreviatedMonthNames = false;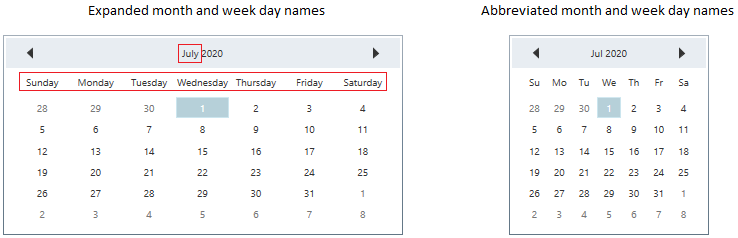
NOTE
Tooltip for particular days
You can set tooltip for particular days in the CalendarEdit control by using the SetToolTip(Date,ToolTip) method. You can pass the specific date and tooltip to the SetToolTip(Date,ToolTip) method.
Date yesterday = new Date(DateTime.Now.Year, DateTime.Now.Month, DateTime.Now.Day-1);
Date today = new Date(DateTime.Now.Year, DateTime.Now.Month, DateTime.Now.Day);
CalendarEdit calendarEdit = new CalendarEdit();

//Setting tooltip for yesterday and today dates
calendarEdit.SetToolTip(yesterday, new ToolTip() { Content = "Yesterday" });
calendarEdit.SetToolTip(today, new ToolTip() { Content = "Today" });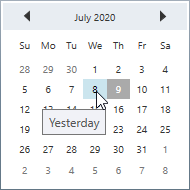
Custom appearance of day cell
You can customize the appearance of day cell by using styles and templates in the CalendarEdit control.
Custom UI for day cell using style
You can customize the appearance of day cell by using the DayCellsStyle property. The DataContext of the DayCellsStyle is DayCell.
<Window.Resources>
    <!-- day cell style -->
    <Style x:Key="dayCell"
           TargetType="{x:Type syncfusion:DayCell}">
        <Setter Property="CornerRadius" Value="0"/>
        <Setter Property="Background" Value="Pink"/>
    </Style>
</Window.Resources>
<Grid>
    <syncfusion:CalendarEdit DayCellsStyle="{StaticResource dayCell}"
                             Name="calendarEdit" />
</Grid>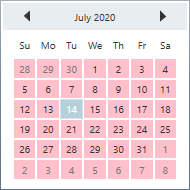
NOTE
Custom UI for day cell using template
You can customize the appearance of day cell by using the DayCellsDataTemplate property. The DataContext of the DayCellsDataTemplate is DayCell.
<Window.Resources>
    <!-- day cell template -->
    <DataTemplate x:Key="dayCelltemplate"
                  DataType="syncfusion:DayCell">
        <TextBlock TextAlignment="Center"
                   Foreground="Yellow"
                   Background="Green"
                   FontFamily="Tahoma"
                   FontStyle="Normal"
                   Text="{Binding Day}"/>
    </DataTemplate>
</Window.Resources>
<Grid>
    <syncfusion:CalendarEdit DayCellsDataTemplate="{StaticResource dayCelltemplate}"
                             Name="calendarEdit" />
</Grid>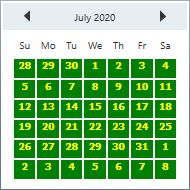
NOTE
Custom UI for day name cell using style
You can customize the appearance of day name cell by using the DayNameCellsStyle property. The DataContext of the DayNameCellsStyle is DayNameCell.
<Window.Resources>
    <!-- day name cell style -->
    <Style x:Key="daynameCellStyle"
           TargetType="{x:Type syncfusion:DayNameCell}">
        <Setter Property="Background" Value="Yellow"/>
        <Setter Property="Foreground" Value="Yellow"/>
    </Style>
</Window.Resources>
<Grid>
    <syncfusion:CalendarEdit DayNameCellsStyle="{StaticResource daynameCellStyle}"
                             Name="calendarEdit" />
</Grid>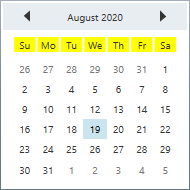
NOTE
Selected date changed notification
The selected date changed in CalendarEdit can be examined using DateChanged event. The DateChanged event contains the old and newly selected date time values in the OldValue and NewValue properties.
<syncfusion:CalendarEdit DateChanged="CalendarEdit_DateChanged"
                          Name="calendarEdit"/>
CalendarEdit calendarEdit = new CalendarEdit();
calendarEdit.DateChanged += CalendarEdit_DateChanged;You can handle the event as follows,
private void CalendarEdit_DateChanged(DependencyObject d, DependencyPropertyChangedEventArgs e) {
    //Get old and new selected date values
    var oldValue = e.OldValue;
    var newValue = e.NewValue;
}