Getting Started with WinUI Masked TextBox
7 Feb 20244 minutes to read
This section explains the steps required to add the WinUI Masked TextBox control to get started with SfMaskedTextBox control.
Creating an application with WinUI Masked TextBox control
- Create a WinUI 3 desktop app for C# and .NET 5.
- Add reference to Syncfusion.Editors.WinUI NuGet.
- Import the control namespace
Syncfusion.UI.Xaml.Editorsin XAML or C# code. - Initialize the SfMaskedTextBox control.
Initialize Masked TextBox control using simple mask
<Page
    x:Class="GettingStarted.MainPage"
    xmlns="http://schemas.microsoft.com/winfx/2006/xaml/presentation"
    xmlns:x="http://schemas.microsoft.com/winfx/2006/xaml"
    xmlns:local="using:GettingStarted"
    xmlns:d="http://schemas.microsoft.com/expression/blend/2008"
    xmlns:mc="http://schemas.openxmlformats.org/markup-compatibility/2006"
    xmlns:syncfusion="using:Syncfusion.UI.Xaml.Editors"
    mc:Ignorable="d"
    Background="{ThemeResource ApplicationPageBackgroundThemeBrush}">
    <Grid>
        <!--Adding SfMaskedTextBox control for date mask.-->
        <syncfusion:SfMaskedTextBox Width="200"
                                    MaskType="Simple"
                                    Mask="00/00/0000" />
    </Grid>
</Page>
// Creating an instance of the Masked TextBox control.
SfMaskedTextBox maskedTextBox = new SfMaskedTextBox();
maskedTextBox.Width = "200";
maskedTextBox.MaskType = MaskedTextBoxMaskType.Simple;
maskedTextBox.Mask = "00/00/0000";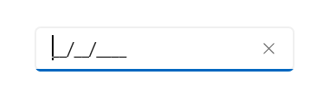
Initialize Masked TextBox control using RegEx mask
<Page
x:Class="GettingStarted.MainPage"
xmlns="http://schemas.microsoft.com/winfx/2006/xaml/presentation"
xmlns:x="http://schemas.microsoft.com/winfx/2006/xaml"
xmlns:local="using:GettingStarted"
xmlns:d="http://schemas.microsoft.com/expression/blend/2008"
xmlns:mc="http://schemas.openxmlformats.org/markup-compatibility/2006"
xmlns:syncfusion="using:Syncfusion.UI.Xaml.Editors"
mc:Ignorable="d"
Background="{ThemeResource ApplicationPageBackgroundThemeBrush}">
<Grid>
<!--Adding SfMaskedTextBox control for email mask.-->
<syncfusion:SfMaskedTextBox Width="200"
MaskType="RegEx"
Mask="[A-Za-z0-9._%-]+@[A-Za-z0-9]+\.[A-Za-z]{2,3}" />
</Grid>
</Page>// Creating an instance of the Masked TextBox control.
SfMaskedTextBox maskedTextBox = new SfMaskedTextBox();
maskedTextBox.Width = "200";
maskedTextBox.MaskType = MaskedTextBoxMaskType.RegEx;
maskedTextBox.Mask = "[A-Za-z0-9._%-]+@[A-Za-z0-9]+\\.[A-Za-z]{2,3}";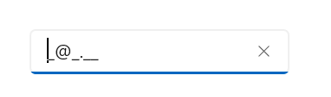
Setting the prompt character
Every single mask displays a prompt character (‘_’) in the absence of your input. You can customize this prompt character by using the PromptChar property.
// Creating an instance of the Masked TextBox control.
SfMaskedTextBox maskedTextBox = new SfMaskedTextBox();
maskedTextBox.Width = "200";
maskedTextBox.MaskType = MaskedTextBoxMaskType.Simple;
maskedTextBox.Mask = "00/00/0000";
maskedTextBox.PromptChar = '#';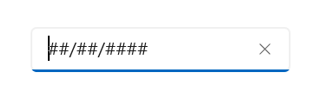
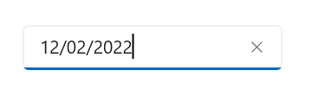
Setting the value
The Value property is used to set the input value for Masked TextBox control.
<syncfusion:SfMaskedTextBox Width="200"
                            MaskType="Simple"
                            Mask="00/00/0000"
                            Value="12/02/2022" />
SfMaskedTextBox maskedTextBox = new SfMaskedTextBox();
maskedTextBox.Width = "200";
maskedTextBox.MaskType = MaskedTextBoxMaskType.Simple;
maskedTextBox.Mask = "00/00/0000";
maskedTextBox.Value = "12/02/2022";