Getting Started with WinUI AutoComplete
18 Nov 201810 minutes to read
This section explains how to add the AutoComplete control and bind data to it. It covers only the basic features needed to get started with the Syncfusion® AutoComplete control.
Creating an application with WinUI AutoComplete
- Create a WinUI 3 desktop application using C# and .NET 8 or later.
-
Install the following NuGet package in the project (latest stable version):
- Import the control namespace
Syncfusion.UI.Xaml.Editorsin XAML (viaxmlns:editors) and in C# (viausing Syncfusion.UI.Xaml.Editors;). -
Initialize the
SfAutoCompletecontrol.<Window x:Class="GettingStarted.MainWindow" xmlns="http://schemas.microsoft.com/winfx/2006/xaml/presentation" xmlns:x="http://schemas.microsoft.com/winfx/2006/xaml" xmlns:local="using:GettingStarted" xmlns:d="http://schemas.microsoft.com/expression/blend/2008" xmlns:mc="http://schemas.openxmlformats.org/markup-compatibility/2006" xmlns:editors="using:Syncfusion.UI.Xaml.Editors" mc:Ignorable="d"> <Grid Name="grid"> <!--Adding AutoComplete control --> <editors:SfAutoComplete Name="AutoComplete"/> </Grid> </Window>using Syncfusion.UI.Xaml.Editors; namespace GettingStarted { public sealed partial class MainWindow : Window { public MainWindow() { this.InitializeComponent(); // Creating an instance of the AutoComplete control SfAutoComplete autoComplete = new SfAutoComplete(); grid.Children.Add(autoComplete); } } }

Populating items using data binding
The AutoComplete can be bound to an external data source using the ItemsSource property. The following steps create Model and ViewModel classes to populate AutoComplete with social media details.
Step 1: Create a simple model class SocialMedia with properties ID and Name, and then populate social media data in the SocialMediaViewModel.
Add the following using directives to the file:
using System.Collections.ObjectModel;

//Model.cs
public class SocialMedia
{
    public string Name { get; set; }
    public int ID { get; set; }
}

//ViewModel.cs
public class SocialMediaViewModel
{
    public ObservableCollection<SocialMedia> SocialMedias { get; set; }
    public SocialMediaViewModel()
    {
        this.SocialMedias = new ObservableCollection<SocialMedia>();
        this.SocialMedias.Add(new SocialMedia() { Name = "Facebook", ID = 0 });
        this.SocialMedias.Add(new SocialMedia() { Name = "Google Plus", ID = 1 });
        this.SocialMedias.Add(new SocialMedia() { Name = "Instagram", ID = 2 });
        this.SocialMedias.Add(new SocialMedia() { Name = "LinkedIn", ID = 3 });
        this.SocialMedias.Add(new SocialMedia() { Name = "Skype", ID = 4 });
        this.SocialMedias.Add(new SocialMedia() { Name = "Telegram", ID = 5 });
        this.SocialMedias.Add(new SocialMedia() { Name = "Televzr", ID = 6 });
        this.SocialMedias.Add(new SocialMedia() { Name = "Tik Tok", ID = 7 });
        this.SocialMedias.Add(new SocialMedia() { Name = "Tout", ID = 8 });
        this.SocialMedias.Add(new SocialMedia() { Name = "Tumblr", ID = 9 });
        this.SocialMedias.Add(new SocialMedia() { Name = "Twitter", ID = 10 });
        this.SocialMedias.Add(new SocialMedia() { Name = "Vimeo", ID = 11 });
        this.SocialMedias.Add(new SocialMedia() { Name = "WhatsApp", ID = 12 });
        this.SocialMedias.Add(new SocialMedia() { Name = "YouTube", ID = 13 });
    }
}
Step 2: Populate data in AutoComplete.
Now, populate the SocialMediaViewModel data in the AutoComplete control by binding to the ItemsSource property.
<Window
    x:Class="GettingStarted.MainWindow"
    xmlns="http://schemas.microsoft.com/winfx/2006/xaml/presentation"
    xmlns:x="http://schemas.microsoft.com/winfx/2006/xaml"
    xmlns:local="using:GettingStarted"
    xmlns:d="http://schemas.microsoft.com/expression/blend/2008"
    xmlns:mc="http://schemas.openxmlformats.org/markup-compatibility/2006"
    xmlns:editors="using:Syncfusion.UI.Xaml.Editors"
    mc:Ignorable="d">
    <Grid Name="grid">
       <Grid.DataContext>
            <local:SocialMediaViewModel />
       </Grid.DataContext>

        <!--Setting ItemsSource-->
        <editors:SfAutoComplete x:Name="autoComplete"
                                Width="250"
                                ItemsSource="{Binding SocialMedias}" />
    </Grid>
</Window>autoComplete.DataContext = new SocialMediaViewModel();
SocialMediaViewModel socialMediaViewModel = (autoComplete.DataContext as SocialMediaViewModel);
autoComplete.ItemsSource = socialMediaViewModel.SocialMedias;Set the
SocialMediaViewModelinstance as theDataContextof theAutoCompletecontrol so that theSocialMediasproperty can be resolved through the binding.
Step 3: Set the TextMemberPath and DisplayMemberPath.
The AutoComplete control is populated with the list of social media. However, because the SocialMedia model contains two properties, Name and ID, you must specify which property should be displayed in the selection box and the drop-down suggestion of the AutoComplete control.
TextMemberPath - This property path is used to get the value for displaying in the selection box portion of the AutoComplete control when an item is selected. The default value is String.Empty.
DisplayMemberPath - This property path is used to specify the name or path of the property displayed for each data item in the drop-down list. The default value is String.Empty.
<editors:SfAutoComplete x:Name="autoComplete"
                        DisplayMemberPath = "Name"
                        TextMemberPath = "Name"
ItemsSource="{Binding SocialMedias}" />autoComplete.DisplayMemberPath = "Name";
autoComplete.TextMemberPath = "Name";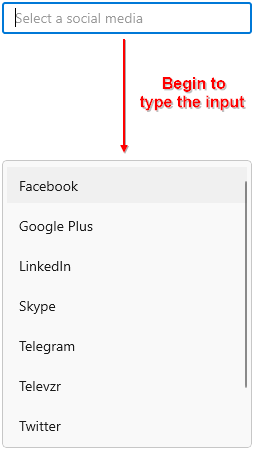
Selection
The AutoComplete allows the user to select a single item or multiple items from the drop-down list by pressing the Enter key or moving focus away from the text box. To change the selection mode between single and multi-selection, set the SelectionMode property to AutoCompleteSelectionMode.Single or Multiple.
<editors:SfAutoComplete x:Name="autoComplete"
SelectionMode="Multiple"
DisplayMemberPath = "Name"
TextMemberPath = "Name"
ItemsSource="{Binding SocialMedias}" />autoComplete.SelectionMode = AutoCompleteSelectionMode.Multiple;
autoComplete.DisplayMemberPath = "Name";
autoComplete.TextMemberPath = "Name";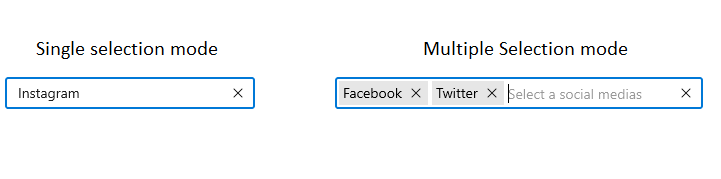
Filtering
The AutoComplete control allows you to filter the data items based on whether they start with the text entered in the text box or whether they contain that text. The string comparison for filtering suggestions can be changed using the TextSearchMode property. It also supports a custom filtering option. Supported modes include StartsWith and Contains.
<editors:SfAutoComplete x:Name="autoComplete"
                        TextSearchMode="Contains"
                        DisplayMemberPath = "Name"
                        TextMemberPath = "Name"
ItemsSource="{Binding SocialMedias}" />autoComplete.TextSearchMode = AutoCompleteTextSearchMode.Contains;
autoComplete.DisplayMemberPath = "Name";
autoComplete.TextMemberPath = "Name";TextSearchMode=”StartsWith”

TextSearchMode=”Contains”