Getting Started with Windows Forms Sparkline
10 Jul 20263 minutes to read
This section provides the details that you need to know about getting started with our Sparkline control.
Assembly deployment
Refer to the control dependencies section to get the list of assemblies or the NuGet package that needs to be added as reference to use the control in any application.
Find more details on how to install the NuGet packages in the Windows Forms application in the following link:
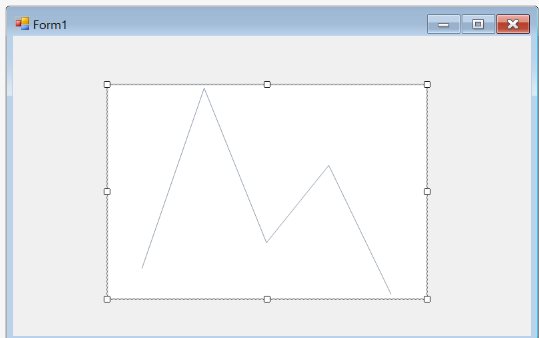
Adding sparkline to the form
To add the sparkline to your form, follow these steps:
-
Open your form in the designer. Add the Syncfusion® controls to your Visual Studio toolbox if you have not done it already (the installation would have automatically done this unless you selected not to complete the toolbox integration during installation).
-
Drag the sparkline control from the toolbox and drop it into the form. The default appearance of the sparkline will be rendered.
Customizing sparkline appearance
The appearance of the sparkline can be customized by using the LineStyle property.
this.sparkLine1.LineStyle.LineColor = System.Drawing.Color.Maroon;Me.sparkLine1.LineStyle.LineColor = System.Drawing.Color.Maroon
Adding marker to sparkline
The markers are visual indicators; they are used to represent the location of data points in the sparkline graph by using the Markers property. This customization is applicable for all sparklines. To enable the markers, set the ShowMarker property to true.
this.sparkLine1.Markers.ShowMarker = true;Me.sparkLine1.Markers.ShowMarker = true
Highlighting high/low values
The marker feature supports HighPoint, LowPoint, StartPoint, EndPoint, and NegativePoint of Sparkline. The colors for these points can be customized by using the HighPointColor, LowPointColor, StartPointColor, EndPointColor, and NegativePointColor properties.
this.sparkLine1.Markers.ShowHighPoint = true;

this.sparkLine1.Markers.ShowLowPoint = true;

this.sparkLine1.Markers.ShowStartPoint = true;

this.sparkLine1.Markers.ShowEndPoint = true;

this.sparkLine1.Markers.ShowNegativePoint = true;

this.sparkLine1.Markers.HighPointColor = new BrushInfo(Color.Blue);

this.sparkLine1.Markers.LowPointColor = new BrushInfo(Color.Green);

this.sparkLine1.Markers.StartPointColor = new BrushInfo(Color.Maroon);

this.sparkLine1.Markers.EndPointColor = new BrushInfo(Color.Purple);

this.sparkLine1.Markers.NegativePointColor = new BrushInfo(Color.Red);Me.sparkLine1.Markers.ShowHighPoint = true
Me.sparkLine1.Markers.ShowLowPoint = true
Me.sparkLine1.Markers.ShowStartPoint = true
Me.sparkLine1.Markers.ShowEndPoint = true
Me.sparkLine1.Markers.ShowNegativePoint = true
Me.sparkLine1.Markers.HighPointColor = New BrushInfo(Color.Blue)
Me.sparkLine1.Markers.LowPointColor = New BrushInfo(Color.Green)
Me.sparkLine1.Markers.StartPointColor = New BrushInfo(Color.Maroon)
Me.sparkLine1.Markers.EndPointColor = New BrushInfo(Color.Purple)
Me.sparkLine1.Markers.NegativePointColor = New BrushInfo(Color.Red)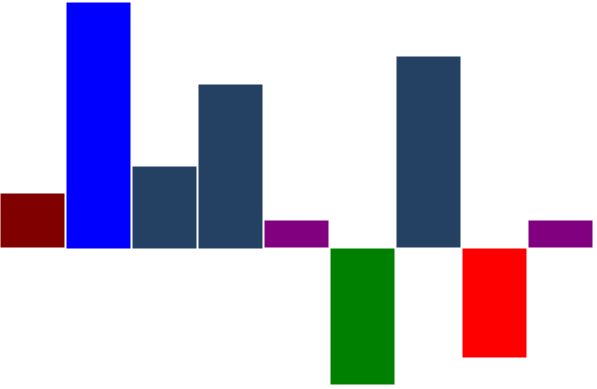
You can find the complete getting started sample from this link.