How can I help you?
How to layout non-control based Child components
4 Feb 202513 minutes to read
The Layout Manager architecture seamlessly lets you use non-control derived Child-instances as the layout’s Child controls. You can easily accomplish this by deriving your Child-types from the LayoutItemBase type and implementing methods. These instances can be used in any of the Layout Manager methods in the place of a Child control (for ex: SetConstraints, SetPreferredSize). This is feasible because the LayoutItemBase class has an implicit type-conversion operator that can convert itself to a control (use LayoutItemBase.ToControl method in VB.NET).
The following step by step procedure helps you to layout non-control based Child components.
Drag and drop the Panel (Container control) and GridBagLayout control to the form.
Use Step 1 to Step 5 in Form_Load event,
-
Declare variables representing the Child control (non-control based components).
private MyRectangle myRect1;

		private MyRectangle myRect2;

		private MyRectangle myRect3;

		private Syncfusion.Windows.Forms.Tools.GridBagLayout gridBagLayout1;

		private MyPanel panel1;
Private WithEvents myRect1 As MyRectangle Private WithEvents myRect2 As MyRectangle Private WithEvents myRect3 As MyRectangle Private gridBagLayout1 As Syncfusion.Windows.Forms.Tools.GridBagLayout ; Private panel1 As MyPanel ; -
Set the Container control, color, and text for the above variables (non-control based components).
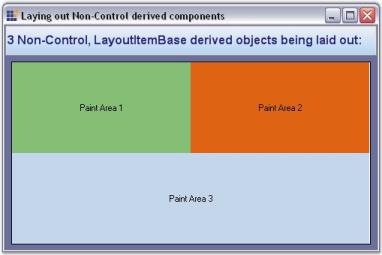
// Layout Component 1

			this.myRect1 = new MyRectangle(this.gridBagLayout1.ContainerControl, Color.FromArgb(133, 191, 117), "Paint Area 1");

			this.myRect1.Bounds = new Rectangle(10, 10, 80, 20);

			this.myRect1.Visible = true;


			// Layout Component 2

			this.myRect2 = new MyRectangle(this.gridBagLayout1.ContainerControl, Color.FromArgb(222, 100, 19), "Paint Area 2");

			this.myRect2.Bounds = new Rectangle(10, 40, 80, 20);

			this.myRect2.Visible = true;


			// Layout Component 3

			this.myRect3 = new MyRectangle(this.gridBagLayout1.ContainerControl, Color.FromArgb(196, 214, 233), "Paint Area 3");

			this.myRect3.Bounds = new Rectangle(10, 70, 80, 20);

			this.myRect3.Visible = true;
' Layout Component 1 Me.myRect1 = New MyRectangle(Me.gridBagLayout1.ContainerControl,Color.FromArgb(133, 191, 117), "Paint Area 1") Me.myRect1.Bounds = New Rectangle(10, 10, 80, 20) Me.myRect1.Visible = True ' Layout Component 2 Me.myRect2 = New MyRectangle(Me.gridBagLayout1.ContainerControl,Color.FromArgb(222, 100, 19), "Paint Area 2") Me.myRect2.Bounds = New Rectangle(10, 40, 80, 20) Me.myRect2.Visible = True ' Layout Component 3 Me.myRect3 = New MyRectangle(Me.gridBagLayout1.ContainerControl,Color.FromArgb(196, 214, 233), "Paint Area 3") Me.myRect3.Bounds = New Rectangle(10, 70, 80, 20) Me.myRect3.Visible = True -
Declare instances for the GridBagConstraints which specifies how the components will be positioned inside a Container managed by the GridBagLayout control.
GridBagConstraints gbc1 = new GridBagConstraints();

		GridBagConstraints gbc2 = new GridBagConstraints();

		GridBagConstraints gbc3 = new GridBagConstraints();
Dim gbc1 As GridBagConstraints gbc1 = New GridBagConstraints() Dim gbc2 As GridBagConstraints gbc2 = New GridBagConstraints() Dim gbc3 As GridBagConstraints gbc3 = New GridBagConstraints() -
Set the FillType, WeightX, WeightY, GridPostX and GridPostY properties for the components.
gbc1.Fill = FillType.Both; gbc1.WeightX = 0.2; gbc1.WeightY = 0.5; gbc1.GridPosX = 0; gbc1.GridPosY = 0; gbc2.Fill = FillType.Both; gbc2.WeightX = 0.2; gbc2.WeightY = 0.5; gbc2.GridPosX = 1; gbc2.GridPosY = 0; gbc3.Fill = FillType.Both; gbc3.WeightX = 0.4; gbc3.WeightY = 0.5; gbc3.GridPosX = 0; gbc3.GridPosY = 1; gbc3.CellSpanX = 2;gbc1.Fill = FillType.Both gbc1.WeightX = 0.2 gbc1.WeightY = 0.5 gbc1.GridPosX = 0 gbc1.GridPosY = 0 gbc2.Fill = FillType.Both gbc2.WeightX = 0.2 gbc2.WeightY = 0.5 gbc2.GridPosX = 1 gbc2.GridPosY = 0 gbc3.Fill = FillType.Both gbc3.WeightX = 0.4 gbc3.WeightY = 0.5 gbc3.GridPosX = 0 gbc3.GridPosY = 1 gbc3.CellSpanX = 2 -
Associate non-control based components with the constraints.
this.gridBagLayout1.SetConstraints(this.myRect1.ToControl(), gbc1); this.gridBagLayout1.SetConstraints(this.myRect2.ToControl(), gbc2); this.gridBagLayout1.SetConstraints(this.myRect3.ToControl(), gbc3);Me.gridBagLayout1.SetConstraints(Me.myRect1.ToControl, gbc1) Me.gridBagLayout1.SetConstraints(Me.myRect2.ToControl, gbc2) Me.gridBagLayout1.SetConstraints(Me.myRect3.ToControl, gbc3) - Define the class for ‘MyRectangle’ that implements the LayoutItemBase.
- Use Step 6 to Step 9 inside the MyRectangle class that implements the LayoutItemBase.
-
Declare variables for the size, color and base class of the control.
public class MyRectangle : LayoutItemBase

			{

				public static Size PrefSize = new Size(0, 0);

				protected Control parent;

				protected Color color;

				protected string text;

			}
Public Class MyRectangle Inherits LayoutItemBase Protected WithEvents parent As Control Protected color As color Protected [text] As String Public Shared PrefSize As System.Drawing.Size -
Set the variables declared in step 6 in the constructor.
public MyRectangle(Control parent, Color color, string text)

				{

					this.parent = parent;

					this.color = color;

					this.text = text;

				}
Public Sub New(ByVal parent As Control, ByVal color As color, ByVal [text] As String) MyBase.New() Me.parent = parent Me.color = color Me.text = [text] End Sub - Fill the interior of the rectangle specified by a pair of coordinates, width and a height using OnPaint event of LayoutItemBase.
e.Graphics.FillRectangle(new SolidBrush(color), this.Bounds);e.Graphics.FillRectangle(new SolidBrush(color), this.Bounds)- Invalidate the Child controls assigned to the control in the OnBoundsChanged event of the LayoutItemBase.
protected override void OnBoundsChanged()

   				{

   				parent.Invalidate(new Rectangle(0, 0, this.parent.Width, this.parent.Height));

   				}
Protected Overloads Overrides Sub OnBoundsChanged()
parent.Invalidate(New Rectangle(0, 0, Me.parent.Width, Me.parent.Height))
End Sub