Getting Started with UWP Spreadsheet
14 Aug 20269 minutes to read
This section briefly explains how to include the UWP Spreadsheet Editor component in UWP App using Visual Studio
Prerequisites
Create a new UWP App in Visual Studio
- Open Visual Studio and click Create a new project.
- Select Blank App (Universal Windows) from the project templates and click Next.
- Enter a Project name (for example,
SpreadsheetApp), choose a Location, and click Create. - In the New Universal Windows Platform Project dialog, select the required Target version and Minimum version (Windows 10, version 1903 or later is recommended) and click OK.
For more information, see Microsoft templates or Syncfusion® UWP project creation.
Assemblies Deployment
You can add a UWP spreadsheet component to your application by installing it via NuGet packages (recommended) or by manually adding the required assemblies to the project.
Install Syncfusion® UWP Spreadsheet NuGet Package
To add the UWP Spreadsheet component to the application, open the NuGet package manager in Visual Studio (Tools → NuGet Package Manager → Manage NuGet Packages for Solution), search and install:
• Syncfusion.SfSpreadsheet.UWP
The following table lists the optional NuGet packages that enable additional features in the SfSpreadsheet control.
| Optional NuGet Packages | Description |
|---|---|
| Contains the classes responsible for importing charts and sparklines into SfSpreadsheet. | |
| Contains the classes responsible for converting charts to images. | |
| Contains the classes responsible for importing chart types such as line charts, pie charts, and sparklines. |
Add Syncfusion® UWP Spreadsheet Assemblies
To manually add the assemblies:
The table below lists the assemblies required to be added to the project when the UWP Spreadsheet control is used in your application.
| Assembly | Description |
|---|---|
| Syncfusion.SfCellGrid.UWP.dll | Contains the base classes that provide the virtualized cell-display architecture and cell selection/interaction behavior. |
| Syncfusion.SfGridCommon.UWP.dll | Contains the classes that expose the scroll viewer properties and disposable elements. |
| Syncfusion.SfSpreadsheet.UWP.dll | Contains the classes that handle the UI operations of SfSpreadsheet, such as importing sheets and applying formulas and styles. |
| Syncfusion.SfShared.UWP.dll | Contains the classes that hold the properties and operations of controls such as SfUpDown, SfNavigator, and the Looping control. |
| Syncfusion.SfInput.UWP.dll | Contains the input control classes such as SfDropDownButton, SfTextBoxExt, and SfMaskedEdit. |
| Syncfusion.SfRibbon.UWP.dll | Contains the Ribbon control classes such as SfRibbon, SfRibbonMenu, and SfRibbonGalleryItem. |
| Syncfusion.SfTabControl.UWP.dll | Contains the tab control classes such as SfTabControl and SfTabItem. |
| Syncfusion.XlsIO.UWP.dll | Contains the base classes responsible for reading and writing Excel files, worksheet manipulation, and formula calculation. |
The following optional assemblies enable additional features such as charts and sparklines:
| Optional Assemblies | Description |
|---|---|
| Syncfusion.SfSpreadsheetHelper.UWP.dll | Contains the classes responsible for importing charts and sparklines into SfSpreadsheet. |
| Syncfusion.ExcelChartToImageConverter.UWP.dll | Contains the classes responsible for converting charts to images. |
| Syncfusion.SfChart.UWP.dll | Contains the classes responsible for importing chart types such as line charts, pie charts, and sparklines. |
Add UWP Spreadsheet component
UWP Spreadsheet control can be added to an application either through the designer (XAML) or programmatically using code.
In all of the XAML snippets below, replace
YourNamespace(inxmlns:local="using:YourNamespace"andx:Class="YourNamespace.MainPage") with the actual namespace of your project (for example,App1).
-
Open the MainPage.xaml file.
-
Open the Visual Studio Toolbox. Navigate to the Syncfusion® Controls for UWP tab and find the SfSpreadsheet / SfSpreadsheetRibbon toolbox items.
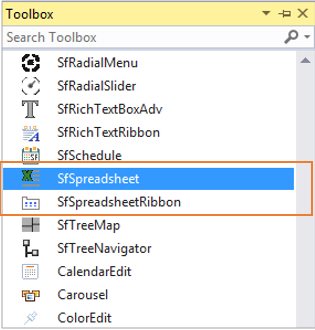
3.Drag SfSpreadsheet from the Toolbox and drop it into the Designer area.
For Spreadsheet:
<Page
           xmlns="http://schemas.microsoft.com/winfx/2006/xaml/presentation"
           xmlns:x="http://schemas.microsoft.com/winfx/2006/xaml"
           xmlns:local="using:YourNamespace"
           xmlns:d="http://schemas.microsoft.com/expression/blend/2008"
           xmlns:mc="http://schemas.openxmlformats.org/markup-compatibility/2006"
           xmlns:Spreadsheet="using:Syncfusion.UI.Xaml.Spreadsheet"
           x:Class="YourNamespace.MainPage"
           mc:Ignorable="d"
           Background="{ThemeResource ApplicationPageBackgroundThemeBrush}">

           <Grid>
               <Spreadsheet:SfSpreadsheet  x:Name="spreadsheet" />
           </Grid>
       </Page>
Assign a name (for example,
spreadsheet) so you can reference the control from code-behind.
4.Drag SfSpreadsheetRibbon from the Toolbox and drop it into the Designer area.
For Ribbon:
<Page
           xmlns="http://schemas.microsoft.com/winfx/2006/xaml/presentation"
           xmlns:x="http://schemas.microsoft.com/winfx/2006/xaml"
           xmlns:local="using:YourNamespace"
           xmlns:d="http://schemas.microsoft.com/expression/blend/2008"
           xmlns:mc="http://schemas.openxmlformats.org/markup-compatibility/2006"
           xmlns:Spreadsheet="using:Syncfusion.UI.Xaml.Spreadsheet"
           x:Class="YourNamespace.MainPage"
           mc:Ignorable="d"
           Background="{ThemeResource ApplicationPageBackgroundThemeBrush}">

           <Grid>
               <Spreadsheet:SfSpreadsheetRibbon />
           </Grid>
       </Page>
5.To make an interaction between Ribbon items and SfSpreadsheet, need to bind the SfSpreadsheet as DataContext to the SfSpreadsheetRibbon.
<Page
           xmlns="http://schemas.microsoft.com/winfx/2006/xaml/presentation"
           xmlns:x="http://schemas.microsoft.com/winfx/2006/xaml"
           xmlns:local="using:YourNamespace"
           xmlns:d="http://schemas.microsoft.com/expression/blend/2008"
           xmlns:mc="http://schemas.openxmlformats.org/markup-compatibility/2006"
           xmlns:Spreadsheet="using:Syncfusion.UI.Xaml.Spreadsheet"
           x:Class="YourNamespace.MainPage"
           mc:Ignorable="d"
           Background="{ThemeResource ApplicationPageBackgroundThemeBrush}">

           <Grid>
               <Spreadsheet:SfSpreadsheet  x:Name="spreadsheet" />
               <Spreadsheet:SfSpreadsheetRibbon DataContext="{Binding ElementName=spreadsheet}" />
           </Grid>
       </Page>
Spreadsheet is available in the following namespace Syncfusion.UI.Xaml.Spreadsheet and it can be created programmatically either by using XAML or C# code.
<Page
        xmlns="http://schemas.microsoft.com/winfx/2006/xaml/presentation"
        xmlns:x="http://schemas.microsoft.com/winfx/2006/xaml"
        xmlns:local="using:App1"
        xmlns:d="http://schemas.microsoft.com/expression/blend/2008"
        xmlns:mc="http://schemas.openxmlformats.org/markup-compatibility/2006"
        xmlns:Spreadsheet="using:Syncfusion.UI.Xaml.Spreadsheet"
        x:Class="App1.MainPage"
        mc:Ignorable="d"
        Background="{ThemeResource ApplicationPageBackgroundThemeBrush}">

        <Grid>
            <Grid.RowDefinitions>
                <RowDefinition Height="Auto"/>
                <RowDefinition Height="*"/>
            </Grid.RowDefinitions>
            <Spreadsheet:SfSpreadsheet Name="spreadsheet" Grid.Row="1" />
            <Spreadsheet:SfSpreadsheetRibbon DataContext="{Binding ElementName=spreadsheet}" Grid.Row="0" />
        </Grid>
    </Page>
....
using Syncfusion.UI.Xaml.Spreadsheet;
....
public MainPage()
{
this.InitializeComponent();
Grid grid = new Grid();
grid.RowDefinitions.Add(new RowDefinition { Height = GridLength.Auto });
grid.RowDefinitions.Add(new RowDefinition { Height = new GridLength(1, GridUnitType.Star) });
SfSpreadsheet spreadsheet = new SfSpreadsheet();
SfSpreadsheetRibbon ribbon = new SfSpreadsheetRibbon() { SfSpreadsheet = spreadsheet };
Grid.SetRow(ribbon, 0);
Grid.SetRow(spreadsheet, 1);
grid.Children.Add(ribbon);
grid.Children.Add(spreadsheet);
this.Content = grid;
}To load the SfSpreadsheet in Windows Mobile, add the above code in MainPage.xaml file in DeviceFamily-Mobile folder.
Build and run the application
- Build the solution by pressing Ctrl+Shift+B (or Build → Build Solution). Resolve any missing-reference errors that appear in the Error List.
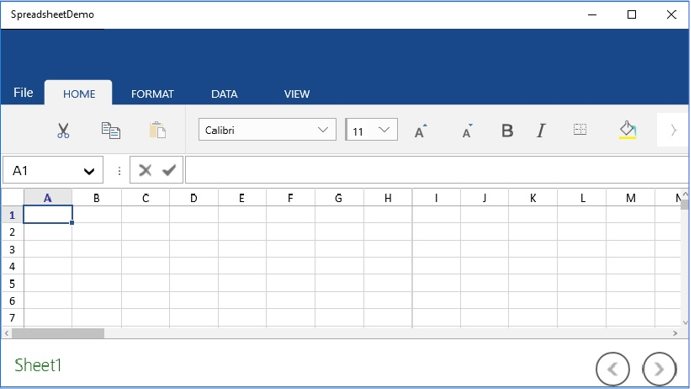
- To launch the application without the debugger, press Ctrl+F5. The output will appear as follows:
To learn how to create, open, and save files in the UWP Spreadsheet Component, see Workbook Operations.