How can I help you?
How To Section in Typescript Tooltip
Use AJAX to generate the Tooltip’s content
Use jQuery’s built-in AJAX functionality to retrieve remote content and set the content to the Tooltip as follows.
Define three employee’s JSON Array as given below(an array of 3 employees records)
[
    {
        "EmployeeID": 1,
        "LastName": "Davolio",
        "Title": "Sales Representative",
        "TitleOfCourtesy": "Dr.",
        "Address": "507 - 20th Ave. E.Apt. 2A",
        "City": "Seattle",
        "Region": "WA",
        "PostalCode": "98122",

    },
    {
        "EmployeeID": 2,
        "LastName": "Buchanan",
        "Title": "Sales Representative",
        "TitleOfCourtesy": "Dr.",
        "Address": "908 W. Capital Way",
        "City": "Tacoma",
        "Region": "WA",
        "PostalCode": "98401",

    },
    {
        "EmployeeID": 3,
        "LastName": "Leverling",
        "Title": "Sales Representative",
        "TitleOfCourtesy": "Dr.",
        "Address": "722 Moss Bay Blvd.",
        "City": "Kirkland",
        "Region": "WA",
        "PostalCode": "98033",

    }
]
Render the employees table and create the tooltip. Once the tooltip created, the data will be fetched using AJAX method as follows.
<div class="frame">
<table id="details">
<tr>
<th>EmployeeID</th>
<th>Name</th>
<th>Designation</th>
</tr>
<tr>
<td>SF6089</td>
<td><a href="#" class="e-info" title="Davolio">Davolio</a></td>
<td>Software Engineer</td>
</tr>
<tr>
<td>SF6073</td>
<td> <a href="#" class="e-info" title="Leverling">Leverling </a> </td>
<td>Tester</td>
</tr>
<tr>
<td>SF6073</td>
<td> <a href="#" class="e-info" title="Suyama"> Suyama </a> </td>
<td>Content Writer</td>
</tr>
<tr>
<td>SF7896</td>
<td> <a href="#" class="e-info" title="Buchanan"> Buchanan </a> </td>
<td>Graphics Designer</td>
</tr>
</table>
</div>
<script type="text/javascript">
var content;
var target = new ej.Tooltip($("#details"),{
target: ".e-info",
content: " ",
beforeOpen: "onOpen",
width : "350px",
height: "128px",
position :{
target : {horizontal :"right", vertical :"bottom"},
stem :{horizontal:"left", vertical:"top"}
}
}).data("ejTooltip");
function onOpen(args) {
proxy = args;
$.ajax({
dataType: "json",
url: "tooltipData.js",
success: function (result) {
var employee = [
{ photo: "http://js.syncfusion.com/demos/web/content/images/grid/Employees/2.png" },
{ photo: "http://js.syncfusion.com/demos/web/content/images/grid/Employees/4.png" },
{ photo: "http://js.syncfusion.com/demos/web/content/images/grid/Employees/8.png" },
{ photo: "http://js.syncfusion.com/demos/web/content/images/grid/Employees/3.png" },
{ photo: "http://js.syncfusion.com/demos/web/content/images/grid/Employees/1.png" },
{ photo: "http://js.syncfusion.com/demos/web/content/images/grid/Employees/6.png" },
];
for (i = 0; i < result.length ; i++) {
if (result[i].LastName == $(proxy.event.target).attr("data-content"))
content = '<div class="main"> <img src=' + employee[i].photo + ' class="logo"/><div class="des"><table> <tr> <th> ' + result[i].TitleOfCourtesy + ' ' + result[i].LastName + '</th> </tr> <tr> <td> Title </td> <td> : ' + result[i].Title + '</td> </tr> <tr><td> Address</td><td> : ' + result[i].Address + '</td> </tr><tr> <td> City </td> <td> : ' + result[i].City + '</td> </tr> <tr> <td> PostalCode </td> <td> : ' + result[i].PostalCode + '</td> </tr> </table></div></div>';
}
target.setModel({ content: content });
}
});
target.show(args.event.target);
args.cancel = true;
}
</script>Defines the style for the tooltip layout and table as follows.
<style>
    .frame {
        width: 100%;
        box-sizing: border-box;
    }

    .frame table {
        border-collapse: collapse;
        width: 100%;
    }

    .frame th, .frame td {
        text-align: left;
        padding: 8px;
    }

    .logo {
        float: left;
        width: 100px;
        height: 114px;
    }

    .frame tr:nth-child(even) {
        background-color: #f2f2f2;
    }

    .frame th {
        background-color: #4CAF50;
        color: white;
    }

    .des {
        width: 230px;
        float: right;
        line-height: 24px;
    }
</style>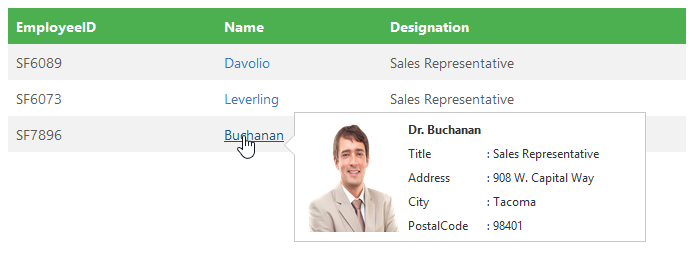
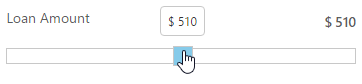
Integration with the Slider control
Tooltip can also be integrated with various other jQuery plugin. Tooltip shows the slider value above the handle.
Render the slider control and finds its handle to render the Tooltip as follows
<div class="frame">
    <div id="loanheading">
        Details of Loan
    </div>

    <span class="ColumnLeft">
        <span class="loan">Loan Amount</span>
    </span>
    <span class="ColumnRight">
        <span class="value">1000</span><span id="loantext">$ </span>
    </span>
    <div id="loanSlider">
    </div>
</div>

<script>

    $(function () {
        var loan = 100;
         var sample1 = new ej.Slider($("#loanSlider"),{
            height: 16,
            value: loan,
            showTooltip : false,
            minValue: 10,
            maxValue: 1000,
            incrementStep: 10,
            change: "onSlide",
            slide: "onSlide",
            stop : "onStop"
        });
        //Create the Tooltip
        var loadTip = $($('#loanSlider').find(".e-handle")).ejTooltip({
            content: "$ " + loanObj.getValue().toString(),
            showRoundedCorner: true,
            isBalloon : false
        }).data("ejTooltip");
    });

</script>
Once the handler in the slider, start its sliding the below function will be triggered
function onSlide(args) {

    this.wrapper.prev().children('span.value').html(args.value);
    var target = "#" + args.id, value = args.value.toString();
    if(args.id == "loanSlider")
        value =  "$ " +value;
    var tipWidth = (value < 10) ? "13px" : (10 <= value >= 100) ? "25px" : "auto";
    var tipObj = $($("div" + target).find(".e-handle")).data("ejTooltip");
    tipObj.setModel({content : value, width : tipWidth});
    tipObj.show($("div" + target).find(".e-handle"));
}
Once the sliding is stopped, the Tooltip will be shown for the particular period of time then it will be closed.
function onStop(args){
    setTimeout( function(){
        var target = "#" + args.id;
        var tipObj = $($("div" + target).find(".e-handle")).data("ejTooltip");
        tipObj.hide();
    }, 1000);
}
Tip(arrow) customization
Styling the Tip’s background and border colors is done using “cssClass” API of Tooltip. Change the size of the tip using the property name called “Tip” and CSS as follows.
<div class="frame">
    <div class="img" id="custom">
        <img src="http://js.syncfusion.com/demos/web/images/tooltip/template-04.png" alt="Roslyn Succinctly" >
        <div class="desc">Roslyn Succinctly</div>
    </div>
</div>
<script type="text/javascript">
    $(function () {
        target =  new ej.Tooltip($("#custom"),{
            content : "Learn to use the Python language to create programs of all kinds to creating practical applications.",
            width: "200px",
            tip :{
                size : { width : 25, height : 12}
            },
            position :{
                stem: {	horizontal: "left", vertical: "center" },
                target: { horizontal : "right", vertical : "center"}
            }
        }).data("ejTooltip");
    });
</script>
Defines the style for the tip as follow as
<style>
    div.img {
        border: 1px solid #ccc;
        width: 159px;
        height: 213px;
        left: 35%;
        position: relative;
        top: 20%;
    }
    div.img img{
        width: 159px;
        height: 179px;
    }
    div.desc {
        padding: 8px;
        text-align: center;
    }
</style>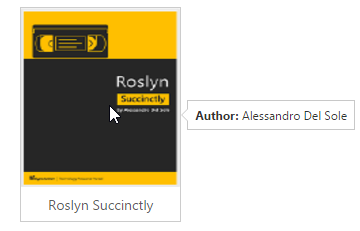
Initialize Tooltip for the target element
Tooltips are also useful for form elements, to show some additional information in the context of each field.
Rather than using multiple Tooltips, a single Tooltip can be used to show the information of each and every field of the form/table element. This can be achieved using “target” API. Target property Specifies a selector for elements, within the container, for which the Tooltip will be displayed.
The example below demonstrates how to create a Tooltip for multiple targets element.
<form id="details" role="form">
    <fieldset>
        <table>
            <tr>
                <td class="info"> User Name:</td>
                <td> <input type="text" class="e-info" name="firstname" title="Please enter your name"> </td>
            </tr>
            <tr>
                <td class="info"> Email Address:</td>
                <td> <input type="text" class="e-info" name="email" title="Enter a valid email address"></td>
            </tr>

            <tr>
                <td class="info"> Password:</td>
                <td> <input type="password" class="e-info" name="password" title="Be at least 8 characters length"></td>
            </tr>
            <tr>
                <td class="info"> Confirm Password:</td>
                <td> <input type="password" class="e-info" name="Cpwd" title="Re-enter your password"></td>
            </tr>
        </table>
        <input id="sample" type="submit" value="Submit">
        <input id="clear" type="reset" value="Reset">
    </fieldset>
</form>

<script type="text/javascript">
     var sample1 = new ej.Tooltip($("#details"),{
        width: "180px",
        height: "30px",
        position: {
            stem: { horizontal: "left", vertical: "center"},
            target:{ horizontal: "right", vertical: "center"}
        },
        target: ".e-info"
    });
   var buttoninstance = new ej.Button($("#sample"),{
        showRoundedCorner: true,
        size: "medium"
    });
  var buttoninstance1 = new ej.Button($("#clear"),{
        showRoundedCorner: true,
        size: "medium"
    });
</script>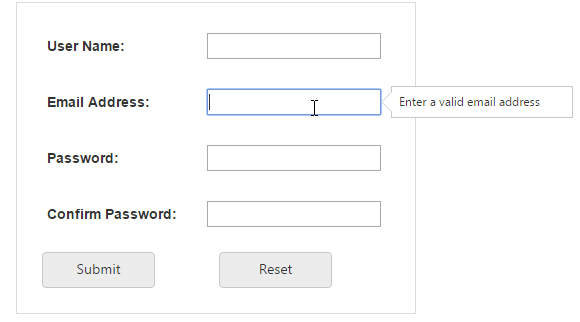
Apply the following styles to the form element.
<style>

    th, td {
        padding: 15px;
        text-align: left;
    }
    #form {
        position: absolute;
        left: 200px;
    }
    fieldset {
        border: 1px solid #D9DEDD;
        padding: 15px;
        width: 400px;
    }
    .info {
        font-weight: bold;
    }
    #sample {
        margin-right: 50px;
    }
    .e-button {
        margin: 10px;
    }

</style>
Interact with the Tooltip
Give users, the possibility to interact with the tooltip. If the tooltip is interactive and activated by a hover event, set the amount of time (milliseconds)allowed for a user to hover off of the tooltip activator on to the tooltip itself – keeping the tooltip from closing using “autoCloseTimeout” property.
Using this property, Links can be provided in Tooltip content where user can navigate to some other page. This is handy for situations where you need to grab the user attention.
<div class="control">
    TypeScript lets you write <a id="test"><u> JavaScript</u> </a>the way you really want to.
</div>

// Creates the Tooltip
<script>
  var sample1 = new ej.Tooltip($("#sample"),{
        content: "JavaScript is the programming language of HTML and the Web.",
        closeMode : "auto",
        autoCloseTimeout: 2000
    });
</script>