How can I help you?
Working with Tables
The editor provides tools that make to work with tables in your content. You can add, edit, and remove the table as well as perform other table related tasks.
Create a Table
By default, Insert Table tool is enabled in the editor’s toolbar. There are two ways to insert a table into the editor’s content.
<textarea id="rteSample"></textarea>

/// <reference path="tsfiles/jquery.d.ts" />
/// <reference path="tsfiles/ej.web.all.d.ts" />

module RTEComponent {
    $(function () {
        var sample = new ej.RTE($("#rteSample"),{
                value: "The RichTextEditor (RTE) control enables you to edit the contents with insert table and images," +
                " it also provides a toolbar that helps to apply rich text formats to the content entered in the TextArea.",
                toolsList: ["tables"],
                tools: {
                    tables: ["createTable", "addRowAbove", "addRowBelow", "addColumnLeft", "addColumnRight", "deleteRow", "deleteColumn", "deleteTable"]
                }
           });
      });
  }
Insert a Table
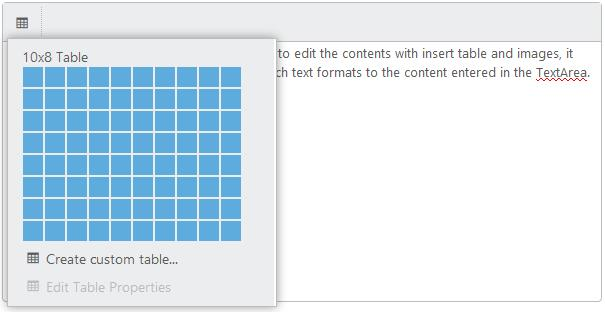
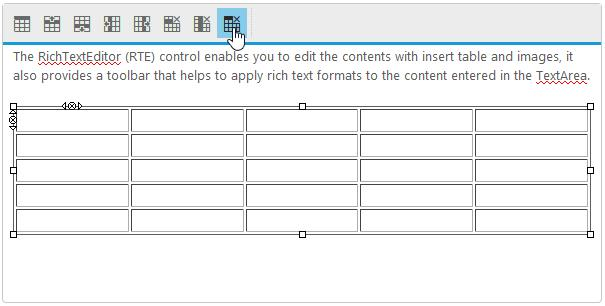
You can insert a basic table by select the “Insert Table” tool from toolbar and drag the cursor over the grid until you highlight the number of columns and rows you want. A table can be inserted as large as with ten columns and eight rows (10 * 8 cells). When you finish inserting tables, click in a cell and start typing or insert an image.
NOTE
If you want to make any adjustment with drawn table, you can add/remove rows and columns.
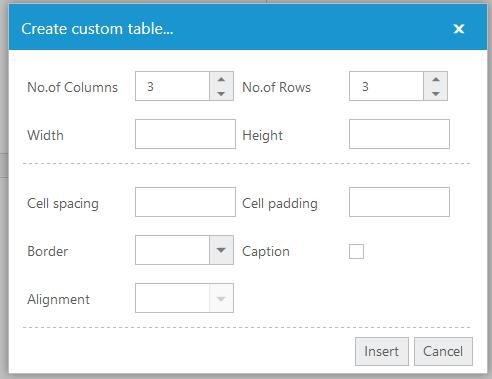
Custom Table
You can use custom table tools to insert tables with custom behaviors. You can create a table with more than ten columns and eight rows, as well as set the table related attributes (such as width, height, cell spacing/padding, and more) using the custom table dialog.
Insert and Delete a Row or Column
You can choose the following options to modify the inserted table from the toolbar, it will be enabled when you’re in table cell.
- Add a row above
- Insert row below
- Insert column left
- Insert column right
- Delete a column
- Delete a row
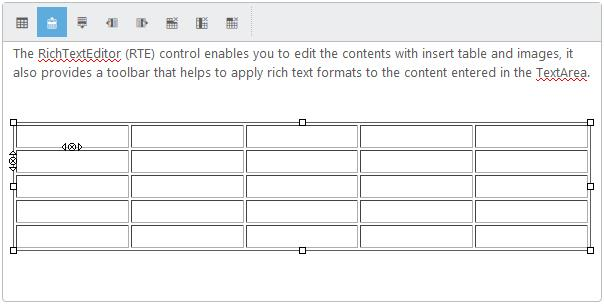
NOTE
You can also quickly add a new row by clicking on the lower-right cell of the table and pressing the Tab key.
Format a Table
After you create a table, you can format the entire table by using Table Properties dialog. In the Table Properties dialog, set or modify each table styles to apply the styles to table elements.
- Table - width, height, style, border, and alignment.
- Cell - border, spacing, and padding.
- Row - height, border, and text align.
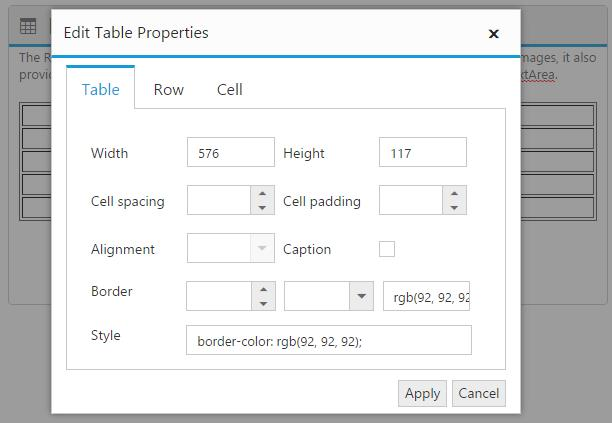
NOTE
When you click in a table cell, the Table Properties option will be enabled under Table tool on the editor’s toolbar.
Delete a table
To delete a table from your content, focus on the table and select “Delete a Table” tool from toolbar. It will delete the entire table with all formatting content.
NOTE
To delete the table contents alone, select the required content of the table which you want to delete and press Delete key. All the content disappears but the rows and columns remain along with its formatting.