Getting Started with Typescript RadioButton
23 Aug 20214 minutes to read
This section discloses the details on how to render and configure a RadioButton component in a TypeScript application.
Create your first Radio Button
-
Create a TypeScript application and refer the dependent modules, script and CSS with the help of given Getting started document.
-
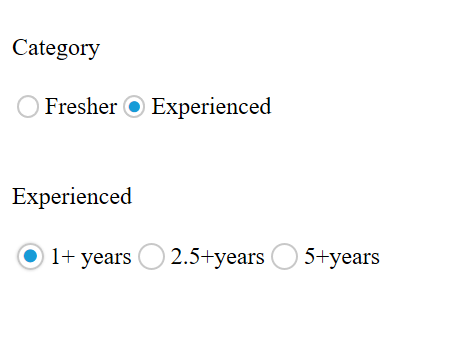
In the index.HTML file, add the input element for rendering RadioButton component as given below.
<div>
        <br />
        Category
        <br />
        <br />
        <table >
        <tr>
        <td>
        <input type="radio" id="Radio1" />
        <label for="Radio1">Fresher</label>
        </td>
        <td  colspan="2">
        <input type="radio" id="Radio2" />
        <label for="Radio2">Experienced</label>
        </td>
        </tr>
        </table>
        <br />
        <br />
        Experienced
        <br />
        <br />
        <table>
        <tr>
        <td>
        <input type="radio" id="Radio3" />
        <label for="Radio3">1+ years</label>
        </td>
        <td colspan="2">
        <input type="radio" id="Radio4" />
        <label for="Radio4">2.5+years</label>
        </td>
        <td colspan="2">
        <input type="radio" id="Radio5" />
        <label for="Radio5">5+years</label>
        </td>
        </tr>
        </table>
</div>- Create a TypeScript file named “app.ts” file and refer the required definition files as given below.
/// <reference path="tsfiles/jquery.d.ts" />
/// <reference path="tsfiles/ej.web.all.d.ts" />- Now, initialize the RadioButton component by using ej.RadioButton method.
/// <reference path="tsfiles/jquery.d.ts" />
        /// <reference path="tsfiles/ej.web.all.d.ts" />

        module AppComponent {
        $(function () {
        new ej.RadioButton($("#Radio1"),{value:"Fresher", name:"Category", size:"small" });
        new ej.RadioButton($("#Radio2"),{value:"Experienced", name:"Category", size: "small", checked:true });
        new ej.RadioButton($("#Radio3"),{value:"1+ years", name:"Experienced", size:"medium", checked: true });
        new ej.RadioButton($("#Radio4"),{value:"2.5+ years", name:"Experienced",size:"medium" });
        new ej.RadioButton($("#Radio5"), {value:"5+ years", name:"Experienced", size:"medium"});
        }
Run the application
To run the application, navigate the project folder and open command prompt window and execute the following command.
tscThis command compiles the app.ts file to generate a JS file named app.js file.
Refer the app.js file in index.html and browse the HTML file to see the following output.