Insert Audio in Vue Rich Text Editor
The Rich Text Editor allows you to insert audio from online sources and local computers and then insert them into your content. You can insert audio with the following options using the insertAudioSettings property.
Configuring the audio tool in the toolbar
You can add an Audio tool in the Rich Text Editor toolbar using the toolbarSettings items property.
Rich Text Editor features are segregated into individual feature-wise modules. To use audio, inject the
Audiomodule inprovidessection.
To configure the Audio toolbar item, refer to the below code.
<template>
<div>
<div class="control-section">
<div class="sample-container">
<div class="default-section">
<ejs-richtexteditor ref="rteObj" :height="340" :value="rteValue" :toolbarSettings = "toolbarSettings" ></ejs-richtexteditor>
</div>
</div>
</div>
</div>
</template>
<script setup>
import { provide } from 'vue';
import { RichTextEditorComponent as EjsRichtexteditor, Toolbar, Link, Audio, HtmlEditor, QuickToolbar } from "@syncfusion/ej2-vue-richtexteditor";
const toolbarSettings = {
items: ['Audio']
};
const rteValue= `<p>The Syncfusion Rich Text Editor, a WYSIWYG (what you see is what you get) editor, is a user interface that allows you to create, edit, and format rich text content. You can try out a demo of this editor here.</p><p><b>Key features:</b></p><ul><li><p>Provides <IFRAME> and <DIV> modes.</p></li><li><p>Bulleted and numbered lists.</p></li><li><p>Handles images, hyperlinks, videos, hyperlinks, uploads, etc.</p></li><li><p>Contains undo/redo manager. </p></li></ul><div style='display: inline-block; width: 60%; vertical-align: top; cursor: auto;'><img alt='Sky with sun' src='https://cdn.syncfusion.com/ej2/richtexteditor-resources/RTE-Overview.png' width='309' style='min-width: 10px; min-height: 10px; width: 309px; height: 174px;' class='e-rte-image e-imginline e-rte-drag-image' height='174' /></div>`,
provide('richtexteditor', [Toolbar, Link, Audio, HtmlEditor, QuickToolbar]);
</script>
<style>
@import '../node_modules/@syncfusion/ej2-tailwind3-theme/styles/rich-text-editor/index.css';
</style><template>
<div>
<div class="control-section">
<div class="sample-container">
<div class="default-section">
<ejs-richtexteditor ref="rteObj" :height="340" :value="rteValue" :toolbarSettings = "toolbarSettings" ></ejs-richtexteditor>
</div>
</div>
</div>
</div>
</template>
<script>
import { RichTextEditorComponent, Toolbar, Link, Audio, HtmlEditor, QuickToolbar } from "@syncfusion/ej2-vue-richtexteditor";
export default {
name: "App",
components: {
"ejs-richtexteditor":RichTextEditorComponent
},
data: function() {
return {
rteValue: `<p>The Syncfusion Rich Text Editor, a WYSIWYG (what you see is what you get) editor, is a user interface that allows you to create, edit, and format rich text content. You can try out a demo of this editor here.</p><p><b>Key features:</b></p><ul><li><p>Provides <IFRAME> and <DIV> modes.</p></li><li><p>Bulleted and numbered lists.</p></li><li><p>Handles images, hyperlinks, videos, hyperlinks, uploads, etc.</p></li><li><p>Contains undo/redo manager. </p></li></ul><div style='display: inline-block; width: 60%; vertical-align: top; cursor: auto;'><img alt='Sky with sun' src='https://cdn.syncfusion.com/ej2/richtexteditor-resources/RTE-Overview.png' width='309' style='min-width: 10px; min-height: 10px; width: 309px; height: 174px;' class='e-rte-image e-imginline e-rte-drag-image' height='174' /></div>`,
toolbarSettings: {
items: ['Audio']
},
};
},
provide:{
richtexteditor:[Toolbar, Link, Audio, HtmlEditor, QuickToolbar]
}
}
</script>
<style>
@import '../node_modules/@syncfusion/ej2-tailwind3-theme/styles/rich-text-editor/index.css';
</style>Audio save formats
The audio files can be saved as Blob or Base64 URL by using the insertAudioSettings.saveFormat property, which is of enum type, and the generated URL will be set to the src attribute of the <source> tag.
By default,
saveFormatis set toBlob.
<audio>
    <source src="blob:http://ej2.syncfusion.com/3ab56a6e-ec0d-490f-85a5-f0aeb0ad8879" type="audio/mp3" >
</audio>

<audio>
    <source src="data:audio/mp3;base64,iVBORw0KGgoAAAANSUhEUgAAADAAAAAwCAYAAABXAvmHA" type="audio/mp3" >
</audio>
Insert audio from the Web
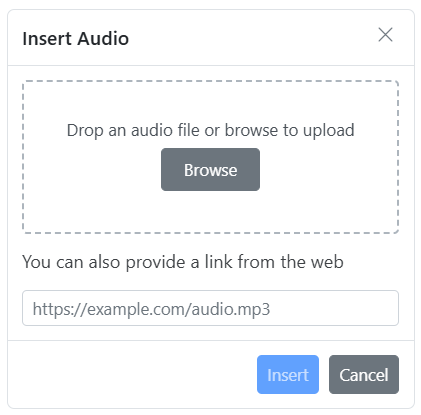
You can insert audio from either a hosted link or a local machine by clicking the audio button in the editor’s toolbar. A dialog opens allowing you to insert audio from a web URL or upload from your device.
Inserting audio from web URLs
By default, the audio tool opens the audio dialog, allowing you to insert audio from an online source. Inserting a valid URL adds it to the src attribute of the <source> tag.
Uploading audio from local machine
You can use the browse option on the audio dialog, to select the audio from the local machine and insert it into the Rich Text Editor content.
If the path field is not specified in the insertAudioSettings, the audio will be converted into the Blob URL or Base64 and inserted inside the Rich Text Editor.
Maximum file size restriction
You can restrict audio uploads from your local machine using the insertAudioSettings.maxFileSize property. By default, the maximum file size is 30000000 bytes (approximately 30 MB).
In the following illustration, the audio size has been validated before uploading, and it is determined whether the audio has been uploaded or not.
<template>
    <div>
        <div class="control-section">
            <div class="sample-container">
                <div class="default-section">
                    <ejs-richtexteditor ref="rteObj" :height="340" :insertAudioSettings="insertAudioSettings"
                        :toolbarSettings="toolbarSettings">
                    </ejs-richtexteditor>
                </div>
            </div>
        </div>
    </div>
</template>

<script setup>
import { provide } from 'vue';
import { RichTextEditorComponent as EjsRichtexteditor,Toolbar, Link, Image, QuickToolbar, HtmlEditor, Table, Audio, PasteCleanup } from "@syncfusion/ej2-vue-richtexteditor";

const toolbarSettings = {
    items: ['Audio', 'Bold', 'Italic', 'Underline', '|', 'Formats', 'Alignments', 'Blockquote', 'OrderedList', 'UnorderedList', '|', 'CreateLink', 'CreateTable', 'Image', '|', 'SourceCode', '|', 'Undo', 'Redo']
};
const insertAudioSettings = {
    maxFileSize: 30000000
};
provide('richtexteditor', [Toolbar, Link, Image, QuickToolbar, HtmlEditor, Table, Audio, PasteCleanup]);
</script>

<style>
@import '../node_modules/@syncfusion/ej2-base/styles/material.css';
@import '../node_modules/@syncfusion/ej2-buttons/styles/material.css';
@import '../node_modules/@syncfusion/ej2-calendars/styles/material.css';
@import '../node_modules/@syncfusion/ej2-dropdowns/styles/material.css';
@import '../node_modules/@syncfusion/ej2-inputs/styles/material.css';
@import '../node_modules/@syncfusion/ej2-navigations/styles/material.css';
@import '../node_modules/@syncfusion/ej2-lists/styles/material.css';
@import '../node_modules/@syncfusion/ej2-layouts/styles/material.css';
@import '../node_modules/@syncfusion/ej2-popups/styles/material.css';
@import '../node_modules/@syncfusion/ej2-splitbuttons/styles/material.css';
@import '../node_modules/@syncfusion/ej2-richtexteditor/styles/material.css';
</style>
Saving audio to the server
Configuration properties
| Property | Description |
|---|---|
| saveFormat | Sets the default save format when audio is inserted (Blob or Base64) |
| saveUrl | URL endpoint that receives the audio file for server-side processing |
| removeUrl | URL endpoint for deleting audio files from the server |
| path | Destination path on server where audio files are stored |
Server-side action
The selected audio can be uploaded to the required destination using the controller action below. Map this method name in insertAudioSettings.saveUrl and provide the required destination path through insertAudioSettings.path properties.
If you want to insert lower-sized audio files in the editor and don’t want a specific physical location for saving the audio, you can opt to save the format as
Base64.
In the following code blocks, the audio module has been injected and can insert the audio files saved in the specified path.
<template>
    <div>
        <div class="control-section">
            <div class="sample-container">
                <div class="default-section">
                    <ejs-richtexteditor ref="rteObj" :height="340" :toolbarSettings="toolbarSettings"
                        :insertAudioSettings="insertAudioSettings">
                    </ejs-richtexteditor>
                </div>
            </div>
        </div>
    </div>
</template>

<script setup>
import { provide } from 'vue';
import { RichTextEditorComponent as EjsRichtexteditor, Toolbar, Link, Audio, HtmlEditor, QuickToolbar } from "@syncfusion/ej2-vue-richtexteditor";

const toolbarSettings = {
    items: ['Audio']
};
const insertAudioSettings = {
    saveUrl: "[SERVICE_HOSTED_PATH]/api/uploadbox/SaveFiles",
    path: "[SERVICE_HOSTED_PATH]/Files/"
};
provide('richtexteditor', [Toolbar, Link, Audio, HtmlEditor, QuickToolbar]);
</script>

<style>
@import '../node_modules/@syncfusion/ej2-base/styles/material.css';
@import '../node_modules/@syncfusion/ej2-buttons/styles/material.css';
@import '../node_modules/@syncfusion/ej2-calendars/styles/material.css';
@import '../node_modules/@syncfusion/ej2-dropdowns/styles/material.css';
@import '../node_modules/@syncfusion/ej2-inputs/styles/material.css';
@import '../node_modules/@syncfusion/ej2-navigations/styles/material.css';
@import '../node_modules/@syncfusion/ej2-lists/styles/material.css';
@import '../node_modules/@syncfusion/ej2-layouts/styles/material.css';
@import '../node_modules/@syncfusion/ej2-popups/styles/material.css';
@import '../node_modules/@syncfusion/ej2-splitbuttons/styles/material.css';
@import '../node_modules/@syncfusion/ej2-richtexteditor/styles/material.css';
</style>
using System;
using System.IO;
using FileUpload.Models;
using System.Diagnostics;
using System.Net.Http.Headers;
using Microsoft.AspNetCore.Mvc;
using Microsoft.AspNetCore.Http;
using System.Collections.Generic;
using Microsoft.AspNetCore.Hosting;

namespace FileUpload.Controllers
{
    public class HomeController : Controller
    {
        private IHostingEnvironment hostingEnv;

        public HomeController(IHostingEnvironment env)
        {
            hostingEnv = env;
        }

        public IActionResult Index()
        {
            return View();
        }

        [AcceptVerbs("Post")]
        public void SaveFiles(IList<IFormFile> UploadFiles)
        {
            try
            {
                foreach (IFormFile file in UploadFiles)
                {
                    if (UploadFiles != null)
                    {
                        string filename = ContentDispositionHeaderValue.Parse(file.ContentDisposition).FileName.Trim('"');
                        filename = hostingEnv.WebRootPath + "\\Files" + $@"\{filename}";

                        // Create a new directory, if it does not exists
                        if (!Directory.Exists(hostingEnv.WebRootPath + "\\Files"))
                        {
                            Directory.CreateDirectory(hostingEnv.WebRootPath + "\\Files");
                        }

                        if (!System.IO.File.Exists(filename))
                        {
                            using (FileStream fs = System.IO.File.Create(filename))
                            {
                                file.CopyTo(fs);
                                fs.Flush();
                            }
                            Response.StatusCode = 200;
                        }
                    }
                }
            }
            catch (Exception)
            {
                Response.StatusCode = 204;
            }
        }

        [ResponseCache(Duration = 0, Location = ResponseCacheLocation.None, NoStore = true)]
        public IActionResult Error()
        {
            return View(new ErrorViewModel { RequestId = Activity.Current?.Id ?? HttpContext.TraceIdentifier });
        }
    }
}
Renaming audio before inserting
You can use the insertAudioSettings property, to specify the server handler to upload the selected audio. Then by binding the fileUploadSuccess event, you can receive the modified file name from the server and update it in the Rich Text Editor’s insert audio dialog.
<template>
<div>
<div class="control-section">
<div class="sample-container">
<div class="default-section">
<ejs-richtexteditor ref="rteObj" :height="340" :insertAudioSettings="insertAudioSettings"
:toolbarSettings="toolbarSettings" :fileUploadSuccess="onFileUploadSuccess" :value="rteValue">
</ejs-richtexteditor>
</div>
</div>
</div>
</div>
</template>
<script setup>
import { provide } from 'vue';
import { RichTextEditorComponent as EjsRichtexteditor, Toolbar, Link, Audio, HtmlEditor, QuickToolbar } from "@syncfusion/ej2-vue-richtexteditor";
const rteValue= `<p>The Syncfudion Rich Text Editor, a WYSIWYG (what you see is what you get) editor, is a user interface that allows you to create, edit, and format rich text content. You can try out a demo of this editor here.</p><p><b>Key features:</b></p><ul><li><p>Provides <IFRAME> and <DIV> modes.</p></li><li><p>Bulleted and numbered lists.</p></li><li><p>Handles images, hyperlinks, videos, hyperlinks, uploads, etc.</p></li><li><p>Contains undo/redo manager. </p></li></ul><div style='display: inline-block; width: 60%; vertical-align: top; cursor: auto;'><img alt='Sky with sun' src='https://cdn.syncfusion.com/ej2/richtexteditor-resources/RTE-Overview.png' width='309' style='min-width: 10px; min-height: 10px; width: 309px; height: 174px;' class='e-rte-image e-imginline e-rte-drag-image' height='174' /></div>`,
const toolbarSettings = {
items: ['Audio']
};
const insertAudioSettings = {
saveUrl: "[SERVICE_HOSTED_PATH]/api/uploadbox/Rename",
path: "[SERVICE_HOSTED_PATH]/Files/"
};
const onFileUploadSuccess = (args) => {
alert("Get the new file name here");
if (args.e.currentTarget.getResponseHeader('name') != null) {
args.file.name = args.e.currentTarget.getResponseHeader('name');
let filename = document.querySelectorAll(".e-file-name")[0];
filename.innerHTML = args.file.name.replace(document.querySelectorAll(".e-file-type")[0].innerHTML, '');
filename.title = args.file.name;
}
}
provide('richtexteditor', [Toolbar, Link, Audio, HtmlEditor, QuickToolbar]);
</script>
<style>
@import '../node_modules/@syncfusion/ej2-base/styles/material.css';
@import '../node_modules/@syncfusion/ej2-buttons/styles/material.css';
@import '../node_modules/@syncfusion/ej2-calendars/styles/material.css';
@import '../node_modules/@syncfusion/ej2-dropdowns/styles/material.css';
@import '../node_modules/@syncfusion/ej2-inputs/styles/material.css';
@import '../node_modules/@syncfusion/ej2-navigations/styles/material.css';
@import '../node_modules/@syncfusion/ej2-lists/styles/material.css';
@import '../node_modules/@syncfusion/ej2-layouts/styles/material.css';
@import '../node_modules/@syncfusion/ej2-popups/styles/material.css';
@import '../node_modules/@syncfusion/ej2-splitbuttons/styles/material.css';
@import '../node_modules/@syncfusion/ej2-richtexteditor/styles/material.css';
</style>
To configure the server-side handler, refer to the below code.
int x = 0;
string file;
[AcceptVerbs("Post")]
public void Rename()
{
    try
    {
        var httpPostedFile = System.Web.HttpContext.Current.Request.Files["UploadFiles"];
        fileName = httpPostedFile.FileName;
        if (httpPostedFile != null)
        {
            var fileSave = System.Web.HttpContext.Current.Server.MapPath("~/Files");
            if (!Directory.Exists(fileSave))
            {
                Directory.CreateDirectory(fileSave);
            }
            var fileName = Path.GetFileName(httpPostedFile.FileName);
            var fileSavePath = Path.Combine(fileSave, fileName);
            while (System.IO.File.Exists(fileSavePath))
            {
                fileName = "rteFiles" + x + "-" + fileName;
                fileSavePath = Path.Combine(fileSave, fileName);
                x++;
            }
            if (!System.IO.File.Exists(fileSavePath))
            {
                httpPostedFile.SaveAs(fileSavePath);
                HttpResponse Response = System.Web.HttpContext.Current.Response;
                Response.Clear();
                Response.Headers.Add("name", fileName);
                Response.ContentType = "application/json; charset=utf-8";
                Response.StatusDescription = "File uploaded succesfully";
                Response.End();
            }
        }
    }
    catch (Exception e)
    {
        HttpResponse Response = System.Web.HttpContext.Current.Response;
        Response.Clear();
        Response.ContentType = "application/json; charset=utf-8";
        Response.StatusCode = 204;
        Response.Status = "204 No Content";
        Response.StatusDescription = e.Message;
        Response.End();
    }
}
Uploading audio with authentication
You can add additional data with the audio uploaded from the Rich Text Editor on the client side, which can even be received on the server side by using the fileUploading event and its customFormData argument, you can pass parameters to the controller action. On the server side, you can fetch the custom headers by accessing the form collection from the current request, which retrieves the values sent using the POST method.
By default, it doesn’t support the
UseDefaultCredentialsproperty; we need to manually append the default credentials with the upload request.
<template>
    <div>
        <div class="control-section">
            <div class="sample-container">
                <div class="default-section">
                    <ejs-richtexteditor ref="rteObj" :height="340" :insertAudioSettings="insertAudioSettings"
                        :toolbarSettings="toolbarSettings" :fileUploading="onFileUpload">
                    </ejs-richtexteditor>
                </div>
            </div>
        </div>
    </div>
</template>

<script setup>
import { provide } from 'vue';
import { RichTextEditorComponent as EjsRichtexteditor, Toolbar, Link, Audio, HtmlEditor, QuickToolbar } from "@syncfusion/ej2-vue-richtexteditor";

const toolbarSettings = {
    items: ['Audio']
};
const insertAudioSettings = {
    saveUrl: "[SERVICE_HOSTED_PATH]/api/uploadbox/SaveFiles",
    path: "[SERVICE_HOSTED_PATH]/Files/"
};
const onFileUpload = (args) => {
    alert("Get the new file name here");
    var accessToken = "Authorization_token";
    // adding custom Form Data
    args.customFormData = [{ 'Authorization': accessToken }];
};
provide('richtexteditor', [Toolbar, Link, Audio, HtmlEditor, QuickToolbar]);
</script>

<style>
@import '../node_modules/@syncfusion/ej2-base/styles/material.css';
@import '../node_modules/@syncfusion/ej2-buttons/styles/material.css';
@import '../node_modules/@syncfusion/ej2-calendars/styles/material.css';
@import '../node_modules/@syncfusion/ej2-dropdowns/styles/material.css';
@import '../node_modules/@syncfusion/ej2-inputs/styles/material.css';
@import '../node_modules/@syncfusion/ej2-navigations/styles/material.css';
@import '../node_modules/@syncfusion/ej2-lists/styles/material.css';
@import '../node_modules/@syncfusion/ej2-layouts/styles/material.css';
@import '../node_modules/@syncfusion/ej2-popups/styles/material.css';
@import '../node_modules/@syncfusion/ej2-splitbuttons/styles/material.css';
@import '../node_modules/@syncfusion/ej2-richtexteditor/styles/material.css';
</style>
public void SaveFiles(IList<IFormFile> UploadFiles)
{
    string currentPath = Request.Form["Authorization"].ToString();
}
Audio replacement functionality
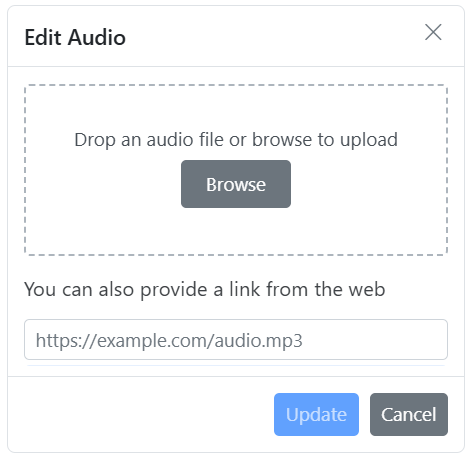
Once an audio file has been inserted, you can change it using the Rich Text Editor quickToolbarSettings audioReplace option. You can replace the audio file using the web URL or the browse option in the audio dialog.
Deleting audios
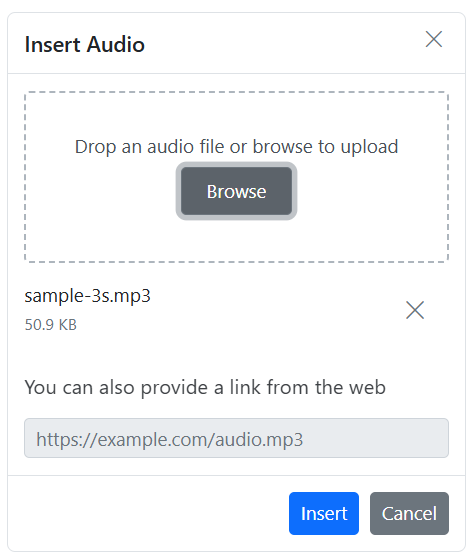
To remove audio from the Rich Text Editor content, select the audio and click the audioRemove button from the quick toolbar. It will delete the audio from the Rich Text Editor content as well as from the service location if the insertAudioSettings.removeUrl is given.
Once you select the audio from the local machine, the URL for the audio will be generated. You can remove the audio from the service location by clicking the cross icon.
Configuring audio display position
Sets the default display property for audio when it is inserted in the Rich Text Editor using the insertAudioSettings.layoutOption property. It has two possible options: Inline and Break. When updating the display positions, it updates the audio elements’ layout position.
The default
layoutOptionproperty is set toInline.
<template>
    <div>
        <div class="control-section">
            <div class="sample-container">
                <div class="default-section">
                    <ejs-richtexteditor ref="rteObj" :height="340" :insertAudioSettings="insertAudioSettings"
                        :toolbarSettings="toolbarSettings">
                    </ejs-richtexteditor>
                </div>
            </div>
        </div>

    </div>
</template>

<script setup>
import { provide } from 'vue';
import { RichTextEditorComponent as EjsRichtexteditor, Toolbar, Link, Audio, HtmlEditor, QuickToolbar } from "@syncfusion/ej2-vue-richtexteditor";

const toolbarSettings = {
    items: ['Audio']
};
const insertAudioSettings = {
    layoutOption: 'Inline'
};
provide('richtexteditor', [Toolbar, Link, Audio, HtmlEditor, QuickToolbar]);
</script>

<style>
@import 'https://ej2.syncfusion.com/vue/documentation/node_modules/@syncfusion/ej2-base/styles/material.css';
@import '../node_modules/@syncfusion/ej2-buttons/styles/material.css';
@import '../node_modules/@syncfusion/ej2-calendars/styles/material.css';
@import '../node_modules/@syncfusion/ej2-dropdowns/styles/material.css';
@import '../node_modules/@syncfusion/ej2-inputs/styles/material.css';
@import '../node_modules/@syncfusion/ej2-navigations/styles/material.css';
@import '../node_modules/@syncfusion/ej2-lists/styles/material.css';
@import '../node_modules/@syncfusion/ej2-layouts/styles/material.css';
@import '../node_modules/@syncfusion/ej2-popups/styles/material.css';
@import '../node_modules/@syncfusion/ej2-splitbuttons/styles/material.css';
@import '../node_modules/@syncfusion/ej2-richtexteditor/styles/material.css';
</style>
Drag and drop audio insertion
By default, the Rich Text Editor allows you to insert audios by drag-and-drop from the local file system such as Windows Explorer into the content editor area. And, you can upload the audios to the server before inserting into the editor by configuring the saveUrl property.
In the following sample, you can see feature demo.
html
<template>
<div>
<div class="control-section">
<div class="sample-container">
<div class="default-section">
<ejs-richtexteditor ref="rteObj" :value="rteValue" :insertAudioSettings="insertAudioSettings">
</ejs-richtexteditor>
</div>
</div>
</div>
</div>
</template>
<script setup>
import { provide } from "vue";
import { RichTextEditorComponent as EjsRichtexteditor, Toolbar, Audio, Link, HtmlEditor, QuickToolbar} from "@syncfusion/ej2-vue-richtexteditor";
const rteValue= `<p>The Syncfusion Rich Text Editor, a WYSIWYG (what you see is what you get) editor, is a user interface that allows you to create, edit, and format rich text content. You can try out a demo of this editor here.</p><p><b>Key features:</b></p><ul><li><p>Provides <IFRAME> and <DIV> modes.</p></li><li><p>Bulleted and numbered lists.</p></li><li><p>Handles images, hyperlinks, videos, hyperlinks, uploads, etc.</p></li><li><p>Contains undo/redo manager. </p></li></ul><div style='display: inline-block; width: 60%; vertical-align: top; cursor: auto;'><img alt='Sky with sun' src='https://cdn.syncfusion.com/ej2/richtexteditor-resources/RTE-Overview.png' width='309' style='min-width: 10px; min-height: 10px; width: 309px; height: 174px;' class='e-rte-image e-imginline e-rte-drag-image' height='174' /></div>`,
const insertAudioSettings = {
saveUrl: 'https://services.syncfusion.com/vue/production/api/RichTextEditor/SaveFile',
};
provide('richtexteditor', [Toolbar, Audio, Link, HtmlEditor, QuickToolbar]);
</script>
<style>@import "../../node_modules/@syncfusion/ej2-base/styles/tailwind3.css";
@import "../../node_modules/@syncfusion/ej2-inputs/styles/tailwind3.css";
@import "../../node_modules/@syncfusion/ej2-lists/styles/tailwind3.css";
@import "../../node_modules/@syncfusion/ej2-popups/styles/tailwind3.css";
@import "../../node_modules/@syncfusion/ej2-buttons/styles/tailwind3.css";
@import "../../node_modules/@syncfusion/ej2-navigations/styles/tailwind3.css";
@import "../../node_modules/@syncfusion/ej2-splitbuttons/styles/tailwind3.css";
@import "../../node_modules/@syncfusion/ej2-vue-richtexteditor/styles/tailwind3.css";
</style>html
<template>
<div>
<div class="control-section">
<div class="sample-container">
<div class="default-section">
<ejs-richtexteditor ref="rteObj" :value="rteValue" :insertAudioSettings="insertAudioSettings">
</ejs-richtexteditor>
</div>
</div>
</div>
</div>
</template>
<script>
import { RichTextEditorComponent as EjsRichtexteditor, Toolbar, Audio, Link, HtmlEditor, QuickToolbar} from "@syncfusion/ej2-vue-richtexteditor";
export default {
name: "App",
components: {
"ejs-richtexteditor": RichTextEditorComponent
},
data: function () {
return {
insertAudioSettings: {
saveUrl: 'https://services.syncfusion.com/vue/production/api/RichTextEditor/SaveFile'
},
rteValue: `<p>The Syncfusion Rich Text Editor, a WYSIWYG (what you see is what you get) editor, is a user interface that allows you to create, edit, and format rich text content. You can try out a demo of this editor here.</p><p><b>Key features:</b></p><ul><li><p>Provides <IFRAME> and <DIV> modes.</p></li><li><p>Bulleted and numbered lists.</p></li><li><p>Handles images, hyperlinks, videos, hyperlinks, uploads, etc.</p></li><li><p>Contains undo/redo manager. </p></li></ul><div style='display: inline-block; width: 60%; vertical-align: top; cursor: auto;'><img alt='Sky with sun' src='https://cdn.syncfusion.com/ej2/richtexteditor-resources/RTE-Overview.png' width='309' style='min-width: 10px; min-height: 10px; width: 309px; height: 174px;' class='e-rte-image e-imginline e-rte-drag-image' height='174' /></div>`,
};
},
provide: {
richtexteditor: [Toolbar, Audio, Link, HtmlEditor, QuickToolbar]
}
}
</script>
<style>@import "../../node_modules/@syncfusion/ej2-base/styles/tailwind3.css";
@import "../../node_modules/@syncfusion/ej2-inputs/styles/tailwind3.css";
@import "../../node_modules/@syncfusion/ej2-lists/styles/tailwind3.css";
@import "../../node_modules/@syncfusion/ej2-popups/styles/tailwind3.css";
@import "../../node_modules/@syncfusion/ej2-buttons/styles/tailwind3.css";
@import "../../node_modules/@syncfusion/ej2-navigations/styles/tailwind3.css";
@import "../../node_modules/@syncfusion/ej2-splitbuttons/styles/tailwind3.css";
@import "../../node_modules/@syncfusion/ej2-vue-richtexteditor/styles/tailwind3.css";
</style>Disabling audio drag and drop
You can prevent drag-and-drop action by setting the actionBegin argument cancel value to true. The following code shows how to prevent the drag-and-drop.
    actionBegin: function (args) {
        if(args.type === 'drop' || args.tpe === 'dragstart') {
            args.cancel =true;
        }
    }