Getting Started with the Block Editor component in Vue 3
18 Nov 20183 minutes to read
This article provides a step-by-step guide for setting up a Vite project with a JavaScript environment and integrating the Syncfusion® Vue Block Editor component using the Composition API / Options API.
The Composition API is a new feature introduced in Vue.js 3 that provides an alternative way to organize and reuse component logic. It allows developers to write components as functions that use smaller, reusable functions called composition functions to manage their properties and behavior.
The Options API is the traditional way of writing Vue.js components, where the component logic is organized into a series of options that define the component’s properties and behavior. These options include data, methods, computed properties, watchers, life cycle hooks, and more.
Prerequisites
This guide uses Vite as the bundler and development environment. Install Node.js 24.13.0 or higher before proceeding. For detailed information about Vite’s capabilities and configuration options, refer to the Vite documentation.
Create a Vue Application
To set up a Vue application, run the following command.
npm create vite@latest my-app -- --template vueThis command prompts you to install the required packages and start the application. Select the options shown in the prompt, and confirm that the my-app folder is created before continuing.
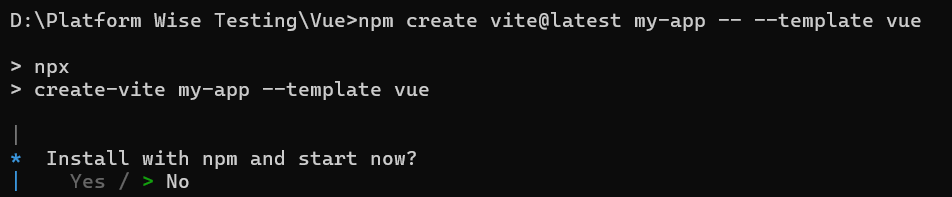
As Syncfusion packages are not installed yet, the No option is selected by default. Then, navigate to the project directory and install the dependencies using the following commands:
cd my-app
npm install
After installation completes, confirm that the dependencies were installed successfully before moving to the next step.
Adding Syncfusion® Vue packages
All available Essential JS 2 packages are published in the npmjs.com registry. Install the Vue Block Editor component with the following command:
npm install @syncfusion/ej2-vue-blockeditor --saveAdding CSS reference
Syncfusion provides multiple themes for the Block Editor component. For a complete list of available themes, refer to the themes topic.
To apply the Tailwind 3 theme, install the corresponding theme package by using the following command:
npm install @syncfusion/ej2-tailwind3-theme --saveThen add the following CSS reference to the src/App.vue file:
@import "../node_modules/@syncfusion/ej2-tailwind3-theme/styles/blockeditor/index.css";Adding Block Editor component
Now, add the Vue Block Editor component to the src/App.vue file using the following sample.
<template>
    <ejs-blockeditor id="BlockEditor"></ejs-blockeditor>
</template>

<script setup>
    import { BlockEditorComponent as EjsBlockeditor } from "@syncfusion/ej2-vue-blockeditor";
</script>

<style>
@import "../node_modules/@syncfusion/ej2-tailwind3-theme/styles/blockeditor/index.css";
</style><template>
<ejs-blockeditor id="BlockEditor"></ejs-blockeditor>
</template>
<script>
import { BlockEditorComponent } from "@syncfusion/ej2-vue-blockeditor";
export default {
name: "App",
components: {
'ejs-blockeditor': BlockEditorComponent
}
}
</script>
<style>
@import "../node_modules/@syncfusion/ej2-tailwind3-theme/styles/blockeditor/index.css";
</style>Run the application
Use the following command to run the application in the browser.
npm run devSee also
For additional Vue 3 examples and related topics, see the following resources:
- Getting Started with Vue UI Components using Composition API and TypeScript
- Getting Started with Vue UI Components using Options API and TypeScript
For migrating from Vue 2 to Vue 3, refer to the migration documentation.