Application Tab in ReactJS Ribbon
12 May 20228 minutes to read
The Application Tab is used to represent a Menu that do some operations, such as File menu to create, open, and print documents. Application Tab classified by type property with the following:
- menu
- backstage
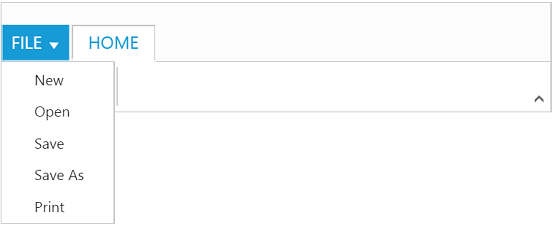
Application Menu
The Application Menu is similar to traditional file menu options and Syncfusion ejMenu control is used internally to render this. To show Application Menu in Ribbon, set the type as menu and menuSettings to customize properties of ejMenu.
Create Using Template
Set the UL element id to menuItemID property to create Application Menu and it will acts as template to render menu.
<div id="ribbon-resize"></div>
    <script src="app/ribbon/resize.js"></script>
    <ul id="ribbonmenu1">
    <li><a>FILE</a>
       <ul>
         <li><a>New</a></li>
         <li><a>Open</a></li>
         <li><a>Save</a></li>
         <li><a>Save As</a></li>
         <li><a>Print</a></li>
	   </ul>
    </li>
</ul>"use strict";
ReactDOM.render(
<EJ.Ribbon width="500px" applicationTab-type="menu" applicationTab-menuItemID="ribbonmenu1" applicationTab-menuSettings-openOnClick={false}>
<tabs>
<tab id="home" text="HOME">
<groups>
<group text="New" alignType="rows">
</group>
</groups>
</tab>
</tabs>
</EJ.Ribbon>,
document.getElementById('ribbon-resize')
);
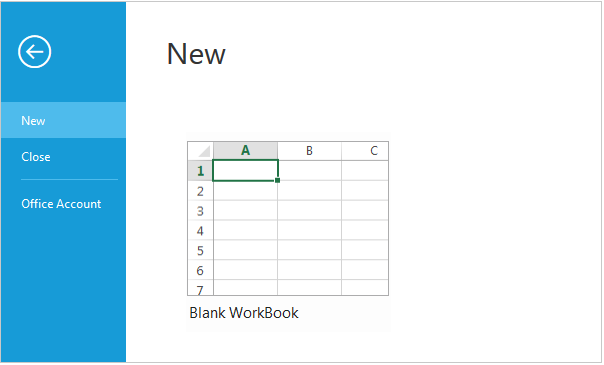
Backstage Page
The Backstage page is where documents and related data of those can be managed, such as Create, Save and other information.
The Backstage page has a feature to add custom Control in left side of the page which contains menu items and the right side contains corresponding user controls.
You can set Application Tab type as backstage and set id , text to backstage items. Backstage pages can be added with required itemType and contentID as template id to render template into Backstage.
Separator between Backstage items can be enabled by setting enableSeparator as true. Width of back stage side header can be customized using headerWidth, If not set based on content given width will be considered.
To render the Ribbon with the Backstage page, refer to the following code snippet.
<div id="ribbon-default"></div>
    <script src="app/ribbon/default.js"></script>
    <style>
    	 .e-blank{
    	  background-image: url("content/ej/themes/common-images/ribbon/blank.png");
    	 }
    	 .e-accuser{
    	  background-image: url("content/ej/themes/common-images/ribbon/User.jpg");
    	 }
        .e-infopageicon {
            background-repeat: no-repeat;
            height: 150px;
            width: 198px;
        }
        .e-newpageicon {
            background-repeat: no-repeat;
            height: 42px;
            width: 42px;
        }
        .e-bspagestyle {
            line-height: 0;
            font-size: 30px;
        }
        .e-ribbon .e-ribbonbackstagepage .e-bsnewbtnstyle {
            color: #212121;
            background: #fdfdfd;
            margin: 20px;
        }
    </style>
	  <div id="newCon">
        <table>
            <tr>
                <td>
                    <button id="btn1" class="e-bsnewbtnstyle">Blank WorkBook</button></td>
            </tr>
        </table>
    </div>
    <div id="accountCon">
        <div class="e-userDiv">
            <span>User Information</span>
            <div>
                <div class="e-accuser e-newpageicon"></div>
                <div class="e-userCon">
                    <div>user</div>
                    <div>[email protected]</div>
                </div>
            </div>
        </div>
        <a href="#">Sign out</a>
</div>"use strict";
var backstage = {
type: ej.Ribbon.ApplicationTabType.Backstage,
backstageSettings: {
text: "FILE", height: 350, width: 1000, headerWidth: 120, pages: [
{id:"new",text:"New",contentID:"newCon"},
{id:"close",text:"Close",enableSeparator:true,itemType:ej.Ribbon.ItemType.Button},
{id:"account",text:"Office Account",contentID:"accountCon"}
]
}
};
function createControl(args) {
$("#btn1").ejButton({
size: "large",
height:200,
width:225,
contentType: "textandimage",
imagePosition: "imagetop",
prefixIcon: "e-blank e-infopageicon"
});
};
ReactDOM.render(
<div>
<EJ.Ribbon width="100%" allowResizing={true} applicationTab={backstage} create={createControl}>
<tabs>
<tab id="home" text="HOME">
<groups>
<group text="New" alignType="rows">
</group>
</groups>
</tab>
</tabs>
</EJ.Ribbon>
</div>,
document.getElementById('ribbon-default')
);
NOTE
Height & width of backstage can be set using
heightandwidth, if these are not set, Ribbon’s height & width will be considered.
You can add/remove/update backStage item to the ribbon control by using addBackStageItem, removeBackStageItem and updateBackStageItem methods. Also you can show/hide the backstage page in ribbon control by using showBackstage and hideBackstage methods.