Behavior Customization
RangeNavigator allows you to customize the control using events. You can change the range for selected data of the RangeNavigator using events.
Deferred update
If you set enableDeferredUpdateto true, the rangeChanged event gets fired after dragging and dropping the slider. By default the enableDeferredUpdateis true. If enableDeferredUpdateis false then the rangeChanged event gets fired while dragging the slider.
"use strict";

ReactDOM.render(
    <EJ.RangeNavigator id="default_rn_sample_0"
	enableDeferredUpdate="true"
    >

    </EJ.RangeNavigator>,
		  document.getElementById('range')
);
Handle Events
loaded: function
This event is handled when the RangeNavigator gets loaded. A parameter sender is passed to the handler. Using sender.model, you can access the RangeNavigator properties.
function loaded(sender){
	sender.model.isResponsive = false;
};
ReactDOM.render(
    <EJ.RangeNavigator id="default_rn_sample_0"
	loaded={loaded}
    >

    </EJ.RangeNavigator>,
		  document.getElementById('range')
);rangeChanged: function
This event gets fired whenever the selected range changes in RangeNavigator. A parameter sender is passed to the handler. Using sender.selectedRangeSettings, you can access the start and end value of range for the selected region.
"use strict";

function rangeChanged(sender){
	console.log(sender.selectedRangeSettings.start);
};
ReactDOM.render(
    <EJ.RangeNavigator id="default_rn_sample_0"
	rangeChanged={rangeChanged}
    >

    </EJ.RangeNavigator>,
		  document.getElementById('range')
);
Use of ZoomCoordinates
RangeNavigator is used along with the controls like chart and grid to view the selected data. To update chart/grid, whenever the selected range changes in RangeNavigator, you can use rangeChanged event of RangeNavigator and then update the chart/grid with the selected data in this event.
You can easily update the data for chart by assigning the zoomFactor and zoomPosition of the RangeNavigator to the chart axis.
"use strict";
// setting zoom factor and position for chart axis in rangeChanged event.
function onChartLoaded(sender){
	var chartObj = $("#container").data("ejChart");
    if (chartObj != null) {
        chartObj.model.axes[0].zoomPosition = sender.zoomPosition;
        chartObj.model.axes[0].zoomFactor = sender.zoomFactor;
    }
    $("#container").ejChart("redraw");
};
ReactDOM.render(
    <EJ.RangeNavigator id="default_rn_sample_0"
	//..
	rangeChanged={onChartLoaded}
	//..
    >

    </EJ.RangeNavigator>,
		  document.getElementById('range')
);
Thumb Template
You can customize Thumb template by using leftThumbTemplate and rightThumbTemplate property. You can add the required template as a “div” element with an “id” to the web page and assign the id or assign the HTML string to this property under navigatorStyleSettings.
<script type="text/x-jsrender" id="left" >
           <svg height="24" width="32" style="fill:#DD4A4A;stroke:black;">
                <path d="M2 2 L2 22 L22 22 L32 12 L22 2 Z" />
           </svg>
</script>
<script type="text/x-jsrender" id="right">
           <svg height="24" width="32" style="fill:#DD4A4A;stroke:black; ">
               <path d="M2 12 L12 22 L32 22 L32 2 L12 2 Z" />
           </svg>
</script>"use strict";
var navigatorStyleSettings={
leftThumbTemplate: 'left',
rightThumbTemplate: 'right',
};
ReactDOM.render(
<EJ.RangeNavigator id="default_rn_sample_0"
//..
navigatorStyleSettings={navigatorStyleSettings}
//..
>
</EJ.RangeNavigator>,
document.getElementById('range')
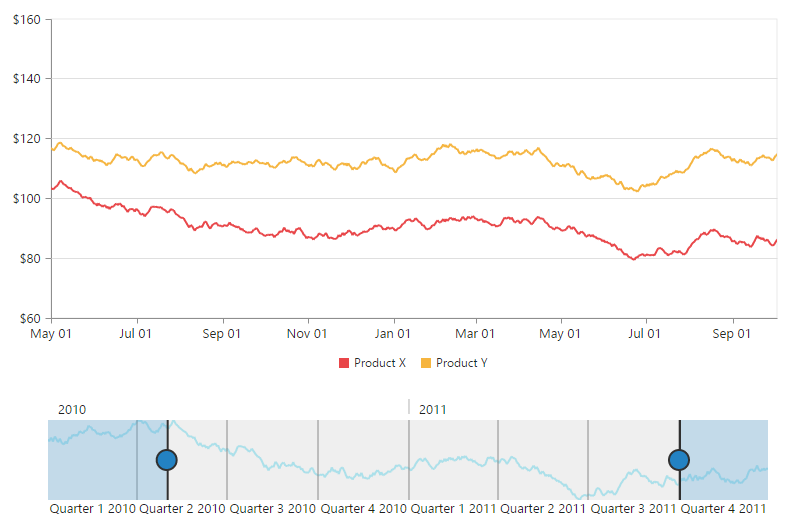
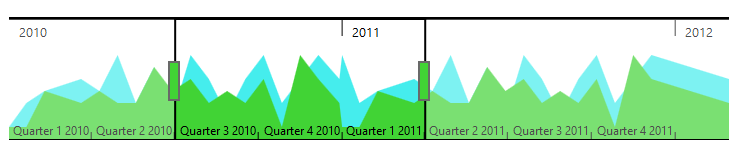
);The following screenshot displays the RangeNavigator using thumb template.
Value Axis Settings
You can customize the line, Font Size, gridline, tickline, range, RangePadding and visibility of RangeNavigator axis.
To enable the visibility of axis line, you need to set Visible property of AxisLine in ValueAxisSettings.
You can customize the axis range by specifying Min, Max and Interval for Range property.
The MajorGridLines can be enabled by specifying Visible property. The Size, Width and Visible property of MajorTickLines is used to customize the axis tick lines.
The visibility of ValueAxisSettings is enabled by setting Visible property as true.
var valueAxisSettings= {
                          Min:10 ,
                          Max: 50 ,
                          Interval: 5,
                          MajorTickLines:{
                              visible:'true'
                          },
                          Size:2,
                          Width:2,
                          MajorGridLines:{
                              visible:'true'
                          },
                    };


ReactDOM.render(
    <EJ.RangeNavigator id="default_rn_sample_0"
	//..
	valueAxisSettings={valueAxisSettings}
	//..
    >

    </EJ.RangeNavigator>,
		  document.getElementById('range')
);
Selected Range Settings
The start and end range values of selected range can be customized using Start and End property of SelectedRangeSettings.
var selectedRangeSettings= {
                          start:'',
                          end:''
                    };


ReactDOM.render(
    <EJ.RangeNavigator id="default_rn_sample_0"
	//..
	selectedRangeSettings={selectedRangeSettings}
	//..
    >

    </EJ.RangeNavigator>,
		  document.getElementById('range')
);