Getting started with ReactJS Grid
6 Jun 202314 minutes to read
##Preparing HTML document
The grid control has the following list of external JavaScript dependencies.
Refer to the internal dependencies in the following table.
| File | Description/Usage |
|---|---|
| ej.core.min.js | It is referred always before using all the JS controls. |
| ej.data.min.js | Used to handle data operation and is used while binding data to the JS controls. |
| ej.touch.min.js | Used to handle touch operations in touch-enabled devices |
| ej.print.min.js | Used to handle print operation in JS controls. |
| ej.draggable.min.js | Used for drag and drop an element in JS controls. |
| ej.grid.min.js | The grid's main file. |
| ej.pager.min.js | It is referred when paging is used in the Grid. |
| ej.scroller.min.js | It is referred when scrolling is used in the Grid. |
| ej.waitingpopup.min.js | It is referred when the remote databinding is used in the Grid. The waiting popup shows while requesting the server for data. |
| ej.gridresize.min.js | It is referred when resizing is used in the Grid. |
| ej.dropdownlist.min.js | These files are used while enable the Editing and Filtering feature in the Grid. |
| ej.dialog.min.js | |
| ej.button.min.js | |
| ej.autocomplete.min.js | |
| ej.datepicker.min.js | |
| ej.datetimepicker.min.js | |
| ej.timepicker.min.js | |
| ej.checkbox.min.js | |
| ej.editor.min.js | |
| ej.tooltip.js | It is referred when toolbar is enabled in Grid. |
| ej.toolbar.min.js | |
| ej.menu.js | It is referred when excel like filter menu or context menu is enabled. |
| ej.radiobutton.js | It is referred when filtering is enabled. |
| ej.excelfilter.js | It is referred when excel like filter menu is enabled. |
| ej.globalize.min.js | It is referred when using localization in Grid. |
The required ReactJS script dependencies as follows. And you can also refer React to know more about react js.
-
react.min.js- https://cdn.syncfusion.com/js/assets/external/react.min.js -
react-dom.min.js- https://cdn.syncfusion.com/js/assets/external/react-dom.min.js -
browser.min.js- http://cdnjs.cloudflare.com/ajax/libs/babel-core/5.8.34/browser.min.js -
ej.web.react.min.js- https://cdn.syncfusion.com/32.1.19/js/common/ej.web.react.min.js
To get started, you can use the ej.web.all.min.js file that encapsulates all the ej controls and frameworks in one single file. So the complete boilerplate code is
<!DOCTYPE html>
      <html>
      <head>
          <meta name="viewport" content="width=device-width, initial-scale=1.0"/>
          <meta name="description" content="Essential Studio for React JS"/>
          <meta name="author" content="Syncfusion"/>
          <title>Getting started for Grid React JS</title>
          <!-- Essential Studio for React JS  theme reference -->
          <link rel="stylesheet" href="http://cdn.syncfusion.com/13.2.0.29/js/web/flat-azure/ej.web.all.min.css" />

          <!-- Essential Studio for React JS  script references -->
          <script src="http://cdn.syncfusion.com/js/assets/external/react.min.js"></script>
          <script src="http://cdn.syncfusion.com/js/assets/external/react-dom.min.js"></script>
          <script src="https://cdnjs.cloudflare.com/ajax/libs/babel-core/5.8.34/browser.min.js"></script>
          <script src="https://code.jquery.com/jquery-1.10.2.min.js"></script>
          <script src="http://cdn.syncfusion.com/js/assets/external/jsrender.min.js"></script>
          <script src="http://cdn.syncfusion.com/13.2.0.29/js/web/ej.web.all.min.js"></script>
          <script src="http://cdn.syncfusion.com/32.1.19/js/common/ej.web.react.min.js"></script>

          <!-- Add your custom scripts here -->
     </head>
     <body>

     </body>
     </html>
NOTE
In production, we highly recommend you to use our custom script generator to create custom script file with required controls and its dependencies only. Also to reduce the file size further please use GZip compression in your server.
For themes, you can use the ej.web.all.min.css CDN link from the code example given. To add the themes in your application, please refer to this link.
Create a Grid
Control can be initialized in two ways.
- Using jsx Template
- Without using jsx Template
Using jsx Template
By using the jsx template, we can create the html file and jsx file. The .jsx file can be convert to .js file and it can be referred in html page.
Please refer to the code of HTML file.
<div id="Grid-default"></div>
       <script type="text/babel" src="app.jsx">
       </script>
Create a JSX file and paste the following content
var shipDetails = [
          { Name: 'Hanari Carnes', City: 'Brazil' },
          { Name: 'Split Rail Beer & Ale', City: 'USA' },
          { Name: 'Ricardo Adocicados', City: 'Brazil' }
        ];
		ReactDOM.render(
		  <EJ.Grid dataSource = {shipDetails} >

          </EJ.Grid>,
          document.getElementById('Grid-default')
        );
Data binding
Data binding in the grid is achieved by assigning an array of JavaScript objects to the dataSource property. Refer to the following code example.
Please refer to the code of HTML file.
<div id="Grid-default"></div>
       <script type="text/babel" src="app.jsx">
       </script>
Create a JSX file and paste the following content
var cols = ["OrderID", "EmployeeID", "CustomerID", "ShipCountry", "Freight"];
        ReactDOM.render(
                //The datasource "window.gridData" is referred from 'http://js.syncfusion.com/demos/web/scripts/jsondata.min.js'
		  <EJ.Grid dataSource = {window.gridData} columns={cols}>

          </EJ.Grid>,
          document.getElementById('Grid-default')
        );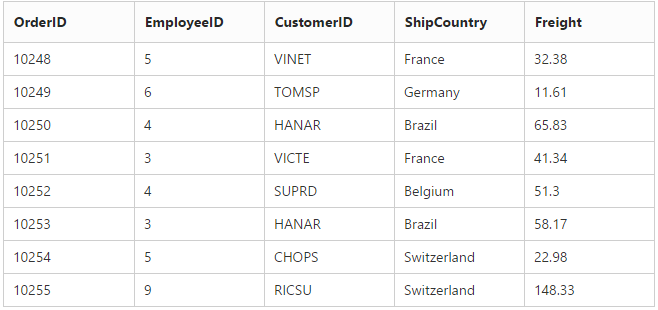
NOTE
ODataAdaptor is the default adaptor for the DataManager. On binding to other web services, proper data adaptor needs to be set on
adaptoroption of the DataManager.
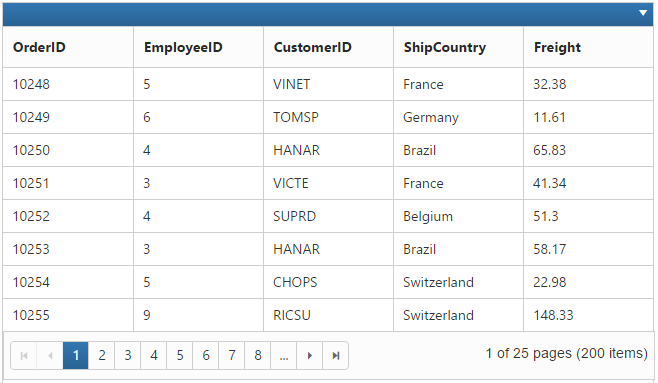
Enable Paging
Paging can be enabled by setting the allowPaging to true. This adds the pager in the bottom of the grid and page size can be customized by using the pageSettings.pageSize property
Please refer to the code of HTML file.
<div id="Grid-default"></div>
       <script type="text/babel" src="app.jsx">
       </script>
Create a JSX file and paste the following content
var pageSettings = { pageSize: 8 };
        var cols = ["OrderID", "EmployeeID", "CustomerID", "ShipCountry", "Freight"];
        ReactDOM.render(
                //The datasource "window.gridData" is referred from 'http://js.syncfusion.com/demos/web/scripts/jsondata.min.js'
		  <EJ.Grid dataSource = {window.gridData} columns={cols} allowPaging = {true} pageSettings={pageSettings} >

          </EJ.Grid>,
          document.getElementById('Grid-default')
        );
NOTE
Pager settings can be customized by using the
pageSettings.pageSizeproperty. When it is not given the default values forpageSizeandpageCountare 12 and 8 respectively.

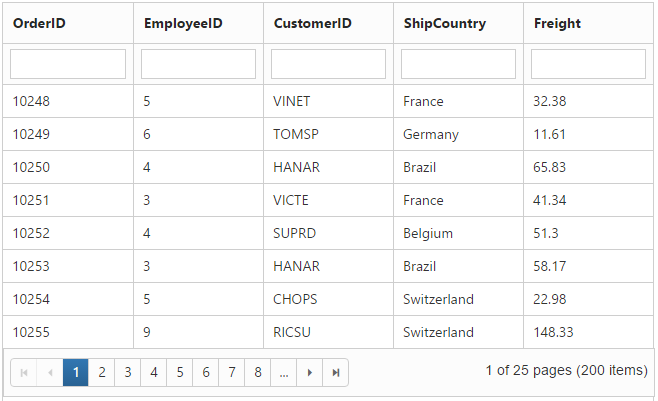
Enable Filtering
Filtering can be enabled by setting the allowFiltering to true. By default, the filter bar row is displayed to perform filtering, you can change the filter type by using the filterSetting.filterType property.
Please refer to the code of HTML file.
<div id="Grid-default"></div>
       <script type="text/babel" src="app.jsx">
       </script>
Create a JSX file and paste the following content
var pageSettings = { pageSize: 8 };
        var cols = ["OrderID", "EmployeeID", "CustomerID", "ShipCountry", "Freight"];
        ReactDOM.render(
                //The datasource "window.gridData" is referred from 'http://js.syncfusion.com/demos/web/scripts/jsondata.min.js'
		  <EJ.Grid dataSource = {window.gridData} columns={cols} allowPaging = {true} pageSettings={pageSettings} allowFiltering={true} >

          </EJ.Grid>,
          document.getElementById('Grid-default')
        );
Enable Grouping
Grouping can be enabled by setting the allowGrouping to true. Columns can be grouped dynamically by drag and drop the grid column header to the group drop area. The initial grouping can be done by adding required column names in the groupSettings.groupedColumns property.
Please refer to the code of HTML file.
<div id="Grid-default"></div>
       <script type="text/babel" src="app.jsx">
       </script>
Create a JSX file and paste the following content
var pageSettings = { pageSize: 8 };
        var cols = ["OrderID", "EmployeeID", "CustomerID", "ShipCountry", "Freight"];
        ReactDOM.render(
                //The datasource "window.gridData" is referred from 'http://js.syncfusion.com/demos/web/scripts/jsondata.min.js'
		  <EJ.Grid dataSource = {window.gridData} columns={cols} allowPaging = {true} pageSettings={pageSettings} allowGrouping={true} >

          </EJ.Grid>,
          document.getElementById('Grid-default')
        );
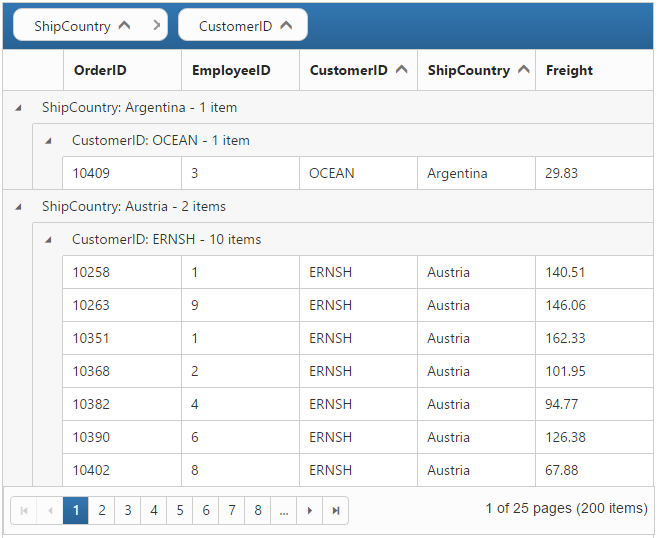
Refer to the following code example for initial grouping.
Please refer to the code of HTML file.
<div id="Grid-default"></div>
       <script type="text/babel" src="app.jsx">
       </script>
Create a JSX file and paste the following content
var pageSettings = { pageSize: 8 };
        var groupSettings = { groupedColumns: ["ShipCountry", "CustomerID"] };
        var cols = ["OrderID", "EmployeeID", "CustomerID", "ShipCountry", "Freight"];
        ReactDOM.render(
                //The datasource "window.gridData" is referred from 'http://js.syncfusion.com/demos/web/scripts/jsondata.min.js'
		  <EJ.Grid dataSource = {window.gridData} columns={cols} allowPaging = {true} pageSettings={pageSettings} allowGrouping={true} groupSettings={groupSettings} >

          </EJ.Grid>,
          document.getElementById('Grid-default')
        );
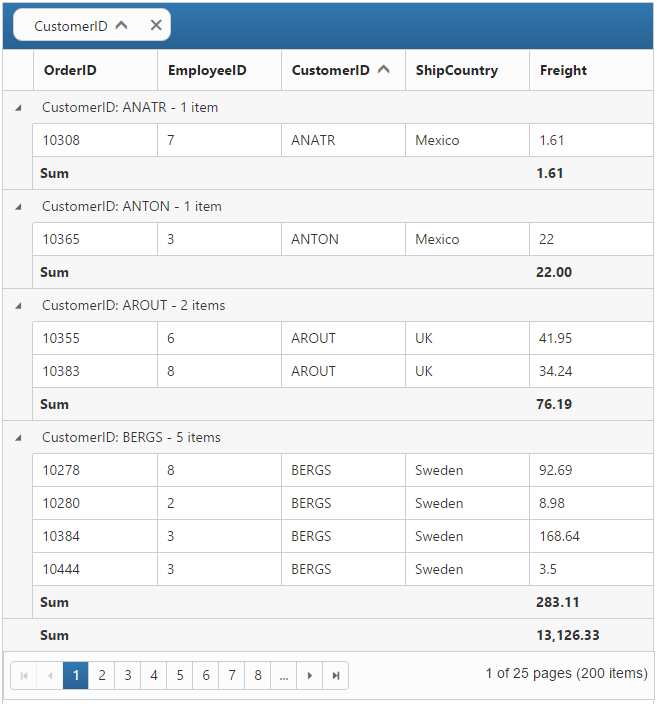
Add Summaries
Summaries can be added by setting the showSummary to true and adding required summary rows and columns in the summaryRows property. For demonstration, Stock column’s sum value is displayed as summary.
var pageSettings = { pageSize: 8 };
        var groupSettings = { groupedColumns: ["CustomerID"] };
        var cols = ["OrderID", "EmployeeID", "CustomerID", "ShipCountry", "Freight"];
        var summaryRows = [
                 {
                  	title: "Sum",
                  	summaryColumns: [{ summaryType: ej.Grid.SummaryType.Sum, displayColumn: "Freight", dataMember: "Freight" }]
              	 }
        ];
        ReactDOM.render(
                //The datasource "window.gridData" is referred from 'http://js.syncfusion.com/demos/web/scripts/jsondata.min.js'
		    <EJ.Grid dataSource = {window.gridData} columns={cols} allowPaging = {true} pageSettings={pageSettings} allowGrouping={true} groupSettings={groupSettings} showSummary={true} summaryRows={summaryRows} >

        </EJ.Grid>,
        document.getElementById('Grid-default')
        );