How can I help you?
Getting Started
This section explains briefly about how to create a Tab Control in your application with PHP. The Tab control is an interface that displays the content in multiple sections. Each TabPanel consists of HeaderText or HeaderTemplate as well as a ContentTemplate. Tab is useful for a dashboard that is having limited space. The following section guides you to on-demand customize the Tab for displaying Hotel menu items, its rating details and ingredients.
The following screenshot illustrates the functionality of a Tab widget.

The external script dependencies of the Tab widget is,
- jQuery 1.7.1 and later versions.
And the internal script dependencies of the Tab widget are:
| File | Description / Usage |
|---|---|
| ej.core.min.js | Must be referred always before using all the JS controls. |
| ej.tab.min.js | The tab’s main file |
For getting started you can use the ‘ej.web.all.min.js’ file, which encapsulates all the ‘ej’ controls and frameworks in one single file.
For themes, you can use the ‘ej.web.all.min.css’ CDN link from the snippet given. To add the themes in your application, please refer this link.
Preparing HTML document
You can create a PHP Project and add necessary scripts and styles with the help of the given PHP Getting Started Documentation.
Create a first PHP file in Xampp and name it appropriately with .php extension and also place it under the newly created sample folder. For example, say Index.php with the initial code as shown below -
Refer the required scripts and CSS files in your PHP page as mentioned below in order to render the Tab control -
<!DOCTYPE html>
       <html>
        <head>
                <title>Getting Started - Tab</title>
                <link href="http://cdn.syncfusion.com/33.1.44/js/web/flat-azure/ej.web.all.min.css" rel="stylesheet" />
                <link href="http://cdn.syncfusion.com/33.1.44/js/web/responsive-css/ej.responsive.css" rel="stylesheet" />
                <script src="http://cdn.syncfusion.com/js/assets/external/jquery-3.0.0.min.js"></script>
                <script src="http://cdn.syncfusion.com/33.1.44/js/web/ej.web.all.min.js"></script>
        </head>
        <body>
           <?php require_once 'EJ/AutoLoad.php'; ?>
        </body>
    </html>
Create Tab Control
The Tab can be created in PHP by using the below given code.
<div id="controls">
	 <div class="cols-sample-area">
    <?php
    require_once '../EJ/AutoLoad.php';
    $tab =new EJ\Tab("defaultTab");
    $tab->templateStart();
	?>
	 <ul>
     <li><a href="#pizza">Pizza Menu</a></li>
     <li><a href="#sandwich">Sandwich Menu</a></li>
     <li><a href="#pasta">Pasta Menu</a></li>
	</ul>
	<?php
    $tab->templateEnd();
    echo $tab->width("500px")->render();
    ?>
</div>
	</div>
The following screen shot illustrates the Tab control with Header.

Configure Content
In this application a detailed description is provided to each item. You can specify the contents in the Tab section within the <div> element.
<div id="controls">
	 <div class="cols-sample-area">
    <?php
    require_once '../EJ/AutoLoad.php';
    $tab =new EJ\Tab("defaultTab");
    $tab->templateStart();
	?>
	 <ul>
     <li><a href="#pizza">Pizza Menu</a></li>
     <li><a href="#sandwich">Sandwich Menu</a></li>
     <li><a href="#pasta">Pasta Menu</a></li>
	</ul>
	<div id="pizza" style="background-color: #F5F5F5">
     <!--Food item description-->
     <p>Pizza cooked to perfection tossed with milk, vegetables, potatoes, poultry, 100% pure mutton, and cheese - and in creating nutritious and tasty meals to maintain good health.</p>
</div>
	<?php
    $tab->templateEnd();
    echo $tab->width("500px")->render();
    ?>
</div>
	</div>
You can provide more customization to the Tab with rating control as content in it for describing the item rating value.
Create the Rating
The Rating control provides you an intuitive rating experience that allows you to select the number of stars that represents the rating.
The following code example explains you the rating control creation.The code example can be placed within the content description <div> element to declare the rating control and description in the Tab section and it can be appended with the header initialization code section <div> element.
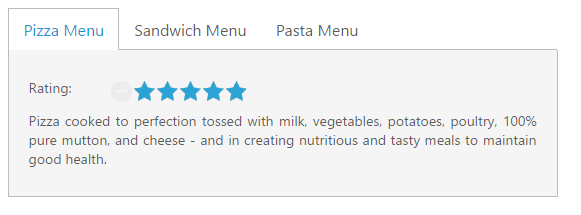
<div id="pizza" style="background-color: #F5F5F5">
     <p>Rating:</p>
     <!--Rating control declaration-->
     <div class="dishRating">
		<?php
		$rating1 =new EJ\Rating('pizzaRating');
		echo $rating1->value(3)->render();
		?>
     </div>
      <!--Food item description-->
     <p>Pizza cooked to perfection tossed with milk, vegetables, potatoes, poultry, 100% pure mutton, and cheese - and in creating nutritious and tasty meals to maintain good health.</p>
</div>
To render the rating controls in the first Tab element refer the styles mentioned in the following code example.
<style type="text/css" class="cssStyles">
    .dishRating {
        position: absolute;
        margin: -31px 0px 0px 80px;
    }
</style>
The following screenshot illustrates the Tab content with rating control.
AJAX Content Load (Load On Demand)
You can change the contents in sub Tab element periodically and you are provided with a support to change the contents without any problems. To achieve the content load, use the Load on Demand concept.
In Load On-Demand, the external HTML file with the necessary details is referred in <href> section during Tab header declaration section. When you click the Tab header, the AJAX automatically calls the content from the external files and displays in a Tab content section.
Sub Tab with AJAX Content
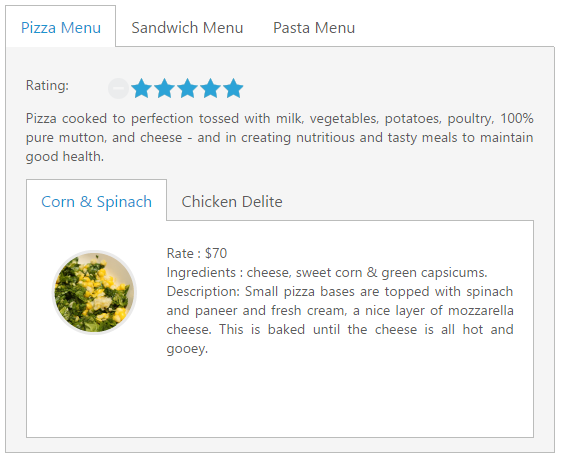
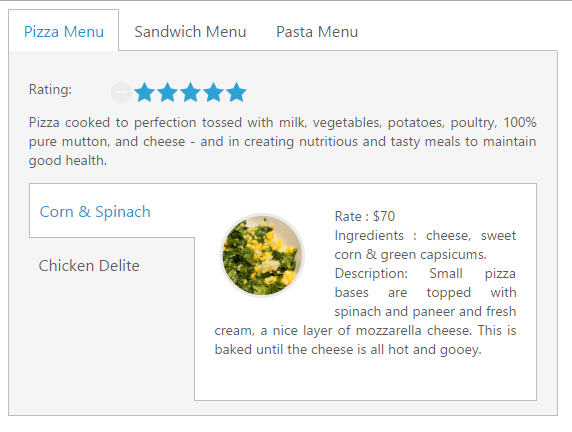
Each item is having a variety of options and these options are also specified in the limited space. So you can choose the Tab control that is used within the root Tab to specify more details.
The following code example illustrates to create the Tab control within the root Tab element. This HTML code is appended within the previous HTML code section. To render the child Tab with its header, add this code example within the first Tab <div> element.
<?php
    $tab1 =new EJ\Tab("pizzaType");
     $tab1->templateStart();
	 ?>
    <ul>
        <li><span class="cornSpinach"></span>
            <a href="http://js.syncfusion.com/UG/Web/Tab-Content/cornSpainach.html">Corn & Spinach </a></li>
        <li><span class="chickenDelite"></span>
            <a href="http://js.syncfusion.com/UG/Web/Tab-Content/ChickenDelite.html">Chicken Delite </a></li>
    </ul>
<?php
    $tab1->templateEnd();
    echo $tab1->width("500px")->render();
    ?>
The Load On-Demand supported HTML file content (cornSpinach.html)
<!DOCTYPE html>
<html xmlns="http://www.w3.org/1999/xhtml">
<body>
<div class="e-content">
<img src=" http://js.syncfusion.com/demos/web/images/accordion/corn-and-spinach-05.png" alt="corn-spinach"/>
<div class="ingredients">
Rate : $70<br />
Ingredients : cheese, sweet corn & green capsicums.
<br />
Description: Small pizza bases are topped with spinach and paneer and fresh cream, a nice layer of mozzarella cheese. This is baked until the cheese is all hot and gooey.
</div>
</div>
</body>
</html>The Load On Demand supported HTML file content (chickenDelite.html)
<!DOCTYPE html>
<html xmlns="http://www.w3.org/1999/xhtml">
<body>
<div class="e-content">
<img src="http://js.syncfusion.com/demos/web/images/accordion/chicken-delite.png" alt="chicken-delite"/>
<div class="ingredients">
Rate : $100<br />
Ingredients : cheese, chicken chunks, onions & pineapple chunks.
<br />
Description: This is a tasty, elegant chicken dish that is easy to prepare.
</div>
</div>
</body>
</html>NOTE
In Load On Demand, when the external files are referred from local the following error occurs.
XMLHttpRequest cannot load [http://js.syncfusion.com/UG/Web/Tab-Content/cornSpainach.html?=1399883825133](http://js.syncfusion.com/UG/Web/Tab-Content/cornSpainach.html?=1399883825133). No ‘Access-Control-Allow-Origin’ header is present on the requested resource.
To avoid these errors, the external files are hosted in the server to run this application.
The following code example is used to position the image and content in Load On Demand.
<style type="text/css" class="cssStyles">
   /*reuse the previous rating control style section code*/
   .ingredients {
        height: 180px;
        margin-top: 8px;
    }
    img {
        float: left;
        margin: 10px 26px 5px 1px;
    }
</style>
At the time of AJAX call, the content fetched from external file referenced location is illustrated in the following screenshot.

The following screenshot illustrates the First Tab with the sub Tab control using Load on Demand.
Orientation Change
In this application, the sub Tab orientation needs to be vertical. By default, Tab control renders in horizontal orientation. Change the orientation to vertical using the “headerPosition” property. The Tab header orientation is set as “left”.
The following code example is used to render the sub Tab element in the vertical orientation.
<?php


    $tab1 =new EJ\Tab("pizzaType");

     $tab1->templateStart();
	 ?>
    <ul>
        <li><span class="cornSpinach"></span>
            <a href="http://js.syncfusion.com/UG/Web/Tab-Content/cornSpainach.html">Corn & Spinach </a></li>
        <li><span class="chickenDelite"></span>
            <a href="http://js.syncfusion.com/UG/Web/Tab-Content/ChickenDelite.html">Chicken Delite </a></li>
    </ul>
<?php
    $tab1->templateEnd();
    echo $tab1->width("500px")->headerPosition("left")->render();
    ?>
The following screenshot illustrates the sub Tab with vertical orientation.
Header Image Customization
In this application, you have to set the Tab header image for each Tab item to specify image in <span> tag element during the Tab header declaration time.
The following code example is used for customizing the header image.
<style type="text/css" class="cssStyles">
    .dish {
        display: inline-block;
        vertical-align: middle;
        margin: 0px -9px 0px 9px;
    }
    .pizzaImg {
        background: url("http://js.syncfusion.com/UG/Web/Content/rsz_chicken-delite.png") no-repeat;
        height: 25px;
        width: 25px;
    }
    /*reuse the previous header orientation code*/
</style>
The following code example is used to add the header image for the root Tab header element.
<div id="dishType" style="width: 550px">
  <ul>
     <li><span class="dish pizzaImg"></span><a href="#pizza">Pizza Menu</a></li>
     <!-- reuse the remaining tab header -->
   </ul>
   <!-- reuse the previously defined first tab html content section-->
</div>
The following screenshot illustrates the Tab with the customized header image.

Configuring Contents to remaining Tab items
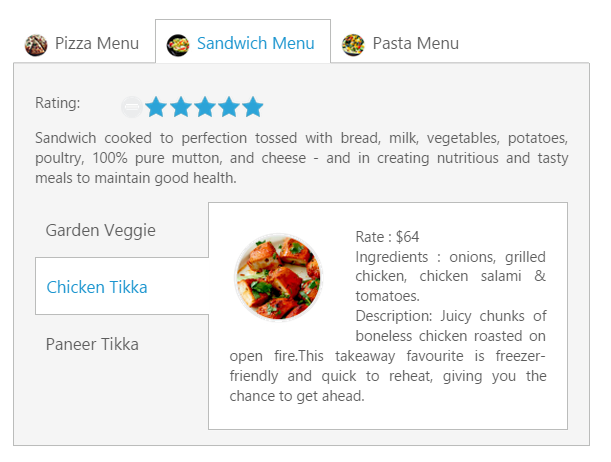
The second and third Tab contents are declared in the same method as of the first Tab content declaration. These Tabs also consist of rating and sub Tab controls. The sub Tab control contents are loaded in Load On Demand support.
The following code example can be placed within the previous image customization HTML code section.
<!--reuse the first tab header defined in previous image customization -->
 <li><span class="dish sandwichImg"></span><a href="#sandwich">Sandwich Menu</a></li>
 <li><span class="dish pastaImg"></span><a href="#pasta">Pasta Menu</a></li>
Add the second Tab contents in <div> element during initialization.
<div id="sandwich" style="background-color: #F5F5F5">
    <p>Rating:</p>
    <!--Rating control declaration-->
    <div class="dishRating">
	<?php
		$rating1 =new EJ\Rating('sandwichRating');
		echo $rating1->value(3)->precision("exact")->render();
		?>
    </div>
    <!--dish description-->
    <p>Sandwich cooked to perfection tossed with bread, milk, vegetables, potatoes, poultry, 100% pure mutton, and cheese - and in creating nutritious and tasty meals to maintain good health.</p>
    <!--sub Tab control, the contents loaded with load on demand-->
    <?php
    $tab2 =new EJ\Tab("sandwichType");
     $tab2->templateStart();
	 ?>
        <ul>
            <li>
                <a href="http://js.syncfusion.com/UG/Web/Tab-Content/gardenVeggie.html">Garden Veggie </a></li>
            <li>
                <a href="http://js.syncfusion.com/UG/Web/Tab-Content/chickenTikka.html">Chicken Tikka </a></li>
            <li>
                <a href="http://js.syncfusion.com/UG/Web/Tab-Content/paneerTikka.html">Paneer Tikka </a></li>
        </ul>
	<?php
    $tab2->templateEnd();
    echo $tab2->width("500px")->headerPosition("left")->render();
    ?>
</div>
Add third Tab contents in <div> element during initialization.
<div id="pasta" style="background-color: #F5F5F5">
    <p>Rating:</p>
    <!--Rating control declaration-->
    <div class="dishRating">
	<?php
		$rating1 =new EJ\Rating('pastaRating');
		echo $rating1->value(3)->precision("exact")->render();
		?>
    </div>
    <!--dish description-->
    <p>Pasta cooked to perfection tossed with milk, vegetables, potatoes, poultry, 100% pure mutton, and cheese - and in creating nutritious and tasty meals to maintain good health.</p>
    <!--sub Tab control, the contents loaded with load on demand-->
        <?php
    $tab3 =new EJ\Tab("pastaType");
     $tab3->templateStart();
	 ?>
        <ul>
            <li>
                <a href="http://js.syncfusion.com/UG/Web/Tab-Content/khemmaPasta.html">Kheema Pasta </a></li>
            <li>
                <a href="http://js.syncfusion.com/UG/Web/Tab-Content/tunaPasta.html">Tuna Pasta</a></li>
            <li>
                <a href="http://js.syncfusion.com/UG/Web/Tab-Content/channaPasta.html">Channa Pasta
                </a></li>
        </ul>
	<?php
    $tab3->templateEnd();
    echo $tab3->width("500px")->headerPosition("left")->render();
    ?>
</div>
Apply the following styles to the Tab.
<style type="text/css" class="cssStyles">
    /*to reuse the previous style section code and following css*/
   .sandwichImg, .pastaImg {
        height: 25px;
        width: 25px;
    }
    .sandwichImg {
        background: url("http://js.syncfusion.com/UG/Web/Content/rsz_garden-fresh.png") no-repeat;
    }
    .pastaImg {
        background: url("http://js.syncfusion.com/UG/Web/Content/rsz_garden-veggie.png") no-repeat;
    }
</style>
The following screenshot illustrates you the second Tab contents in Tab and the final hotel menu with rating, description and ingredients of the item in the Tab interface.