Getting Started
5 Dec 201611 minutes to read
This section explains briefly about the necessary steps required to render and configure EJ CheckBox control using PHP wrapper classes.
Create a PHP Project and add necessary scripts and styles with the help of the given PHP Getting Started Documentation.
CheckBox provides support for multiple selections, within your web page and allows you to specify an option from the list.
Create a CheckBox
Essential PHP CheckBox widget has built-in features like intermediate selections.
Create an PHP file and add the following template to the PHP file.
<div class="frame">
<br />
Hobbies
<br />
<br />
<table>
<tr>
<td class="chkrad">
<?php
$check1=new EJ\CheckBox("check1");
echo $check1->render();
?>
<label for="check1" class="clslab">Games</label>
</td>
<td class="chkrad">
<?php
$check1=new EJ\CheckBox("Checkbox3");
echo $check1->render();
?>
<label for="Checkbox3" class="clslab">Sports</label>
</td>
<td class="chkrad">
<?php
$check1=new EJ\CheckBox("Checkbox4");
echo $check1->render();
?>
<label for="Checkbox4" class="clslab">Bike Riding</label>
</td>
</tr>
</table>
<br />
<br />
Favorite Search Engines
<br />
<br />
<table>
<tr>
<td class="chkrad">
<?php
$check1=new EJ\CheckBox("Checkbox1");
echo $check1->size("medium")->render();
?>
<label for="Checkbox1" class="clslab">Google</label>
</td>
<td class="chkrad">
<?php
$check1=new EJ\CheckBox("Checkbox5");
echo $check1->size("medium")->render();
?>
<label for="Checkbox5" class="clslab">Yahoo</label>
</td>
<td class="chkrad">
<?php
$check1=new EJ\CheckBox("Checkbox6");
echo $check1->size("medium")->render();
?>
<label for="Checkbox6" class="clslab">Bing</label>
</td>
</tr>
</table>
<br />
<br />
Favorite Social networks
<br />
<br />
<table>
<tr>
<td class="chkrad">
<?php
$check1=new EJ\CheckBox("Checkbox2");
echo $check1->size("medium")->enableTriState(true)->render();
?>
<label for="Checkbox2" class="clslab">Facebook</label>
</td>
<td class="chkrad">
<?php
$check1=new EJ\CheckBox("Checkbox7");
echo $check1->size("medium")->enableTriState(true)->render();
?>
<label for="Checkbox7" class="clslab">GPlus</label>
</td>
<td class="chkrad">
<?php
$check1=new EJ\CheckBox("Checkbox8");
echo $check1->size("medium")->enableTriState(true)->render();
?>
<label for="Checkbox8" class="clslab">Twitter</label>
</td>
</tr>
</table>
<br />
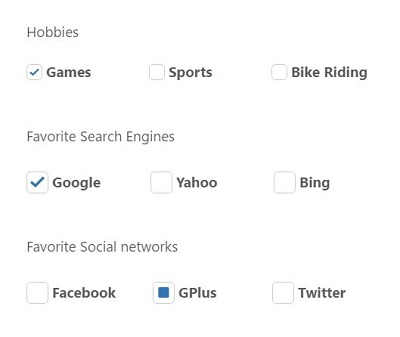
</div>Add the following styles to show the CheckBox control in an order.
 <style>

    .frame
    {
        width: 80%;
    }
    .chkrad
    {
        width: 150px;
    }

</style>
The following screenshot displays a Checkbox control.