Getting started
21 Feb 20177 minutes to read
This section explains briefly about how to create a Mobile Tile in your application with JavaScript. The Tile can be easily configured to the div element in which the tiles are placed. Tapping or selecting a Tile launches the app or other experience that is represented by the Tile. The following screenshot illustrates the functionality of a Tile widget with a list of the apps provided in the mobile device.
Creating basic mobile layout
Create a HTML file and paste the following template for the mobile layout.
   <!DOCTYPE html>
<html>
<head>
    <meta id="viewport" name="viewport" content="width=device-width, initial-scale=1.0,maximum-scale=1.0, user-scalable=no" />
    <title>Tile</title>
<link href="http://cdn.syncfusion.com/13.1.0.21/js/mobile/ej.mobile.all.min.css"rel="stylesheet"/>
<script src="http://cdn.syncfusion.com/js/assets/external/jquery-1.10.2.min.js"></script>
<script src="http://cdn.syncfusion.com/js/assets/external/jsrender.min.js"></script>
<script src="http://cdn.syncfusion.com/14.3.0.49/js/mobile/ej.mobile.all.min.js"></script>
</head>
<body>

        <!-- Adding Header Control Here -->
        <!-- Adding Tile Control here -->

</body>
</html>
Add a NavigationBar control for Tile
Refer to the following code example.
<div id="header" data-role="ejmnavigationbar" data-ej-mode="header" data-ej-title="Tile" data-ej-titlealignment="center" data-ej-position="top">
    </div>
Add a Tile control
Create a div element and set its data-role attribute as ejmtile. Each Tile image can be set by using data-ej-imageurl attribute.
Refer to the following code example.
<div class="tiles" style="top: 45px; position: relative;">
        <div id="tileview1" data-role="ejmtile" data-ej-showroundedcorner="true" data-ej-imageposition="fill" data-ej-caption-position="outer" data-ej-caption-alignment="center" data-ej-tilesize="small" data-ej-caption-text="Settings" data-ej-imageurl="../themes/sampleimages/tileview/ios7/setting.png">
        </div>
    </div>
Run the above code to render the following output.

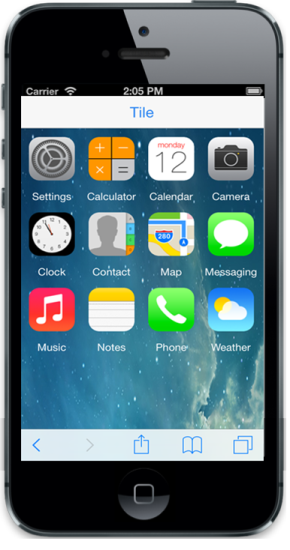
Create Tile as grouped tile
In this scenario, you require different sizes of Tiles aligned in a grid-like manner. Here, you can add Tiles with the desired size to make the exact output. The Tile gets aligned automatically based on the size it gets rendered.
Refer to the following code example.
<!-- Adding multiple tiles -->
<div id="header" data-role="ejmnavigationbar" data-ej-mode="header" data-ej-title="Tiles" data-ej-titlealignment="center" data-ej-position="top" data-ej-touchend="tileSelection">

    </div>
    <div style="top: 45px; position: relative;">
        <div id="tileview1" data-role="ejmtile" data-ej-showroundedcorner="true" data-ej-imageposition="fill" data-ej-caption-position="outer" data-ej-caption-alignment="center" data-ej-tilesize="small" data-ej-caption-text="Settings" data-ej-imagepath="../themes/sampleimages/tileview/" data-ej-imageurl="setting.png">
        </div>

        <div id="tileview2" data-role="ejmtile" data-ej-showroundedcorner="true" data-ej-imageposition="fill" data-ej-caption-position="outer" data-ej-caption-alignment="center" data-ej-tilesize="small" data-ej-caption-text="Calculator" data-ej-imagepath="../themes/sampleimages/tileview/" data-ej-imageurl="calculator.png">
        </div>

        <div id="tileview3" data-role="ejmtile" data-ej-showroundedcorner="true" data-ej-imageposition="fill" data-ej-caption-position="outer" data-ej-caption-alignment="center" data-ej-tilesize="small" data-ej-caption-text="Calendar" data-ej-imagepath="../themes/sampleimages/tileview/" data-ej-imageurl="calendar.png">
        </div>

        <div id="tileview4" data-role="ejmtile" data-ej-showroundedcorner="true" data-ej-imageposition="fill" data-ej-caption-position="outer" data-ej-caption-alignment="center" data-ej-tilesize="small" data-ej-caption-text="Camera" data-ej-imagepath="../themes/sampleimages/tileview/" data-ej-imageurl="camera.png">
        </div>

        <div id="tileview5" data-role="ejmtile" data-ej-showroundedcorner="true" data-ej-imageposition="fill" data-ej-caption-position="outer" data-ej-caption-alignment="center" data-ej-tilesize="small" data-ej-caption-text="Clock" data-ej-imagepath="../themes/sampleimages/tileview/" data-ej-imageurl="clock.png">
        </div>


        <div id="tileview6" data-role="ejmtile" data-ej-showroundedcorner="true" data-ej-imageposition="fill" data-ej-caption-position="outer" data-ej-caption-alignment="center" data-ej-tilesize="small" data-ej-caption-text="Contact" data-ej-imagepath="../themes/sampleimages/tileview/" data-ej-imageurl="contact.png">
        </div>

        <div id="tileview7" data-role="ejmtile" data-ej-showroundedcorner="true" data-ej-imageposition="fill" data-ej-caption-position="outer" data-ej-caption-alignment="center" data-ej-tilesize="small" data-ej-caption-text="Map" data-ej-imagepath="../themes/sampleimages/tileview/" data-ej-imageurl="map.png">
        </div>

        <div id="tileview8" data-role="ejmtile" data-ej-showroundedcorner="true" data-ej-imageposition="fill" data-ej-caption-position="outer" data-ej-caption-alignment="center" data-ej-tilesize="small" data-ej-caption-text="Messaging" data-ej-imagepath="../themes/sampleimages/tileview/" data-ej-imageurl="messaging.png">
        </div>

        <div id="tileview9" data-role="ejmtile" data-ej-showroundedcorner="true" data-ej-imageposition="fill" data-ej-caption-position="outer" data-ej-caption-alignment="center" data-ej-tilesize="small" data-ej-caption-text="Music" data-ej-imagepath="../themes/sampleimages/tileview/" data-ej-imageurl="music.png">
        </div>
        <div id="tileview10" data-role="ejmtile" data-ej-showroundedcorner="true" data-ej-imageposition="fill" data-ej-caption-position="outer" data-ej-caption-alignment="center" data-ej-tilesize="small" data-ej-caption-text="Notes" data-ej-imagepath="../themes/sampleimages/tileview/" data-ej-imageurl="notes.png">
        </div>

        <div id="tileview13" data-role="ejmtile" data-ej-showroundedcorner="true" data-ej-imageposition="fill" data-ej-caption-position="outer" data-ej-caption-alignment="center" data-ej-tilesize="small" data-ej-caption-text="Phone" data-ej-imagepath="../themes/sampleimages/tileview/" data-ej-imageurl="phone.png">
        </div>
        <div id="tileview20" data-role="ejmtile" data-ej-showroundedcorner="true" data-ej-imageposition="fill" data-ej-caption-position="outer" data-ej-caption-alignment="center" data-ej-tilesize="small" data-ej-caption-text="Weather" data-ej-imagepath="../themes/sampleimages/tileview/" data-ej-imageurl="weather.png">
        </div>
    </div>
Add the following styles to set the background image for the page.
.e-m-tile.e-m-ios7:before {
            color: white;
        }

      .e-m-ios7  .tiles {
            top: 45px;
            position: relative;
            height: 100%;
            width: 100%;
            background-image: url(../themes/sampleimages/tileview/bg.png);
            background-size: 100% 100%;
            background-repeat: no-repeat;
            padding: 3px;
        }
Run the above code to render the following output.
