Getting Started with MobileJs TextArea
24 Feb 20233 minutes to read
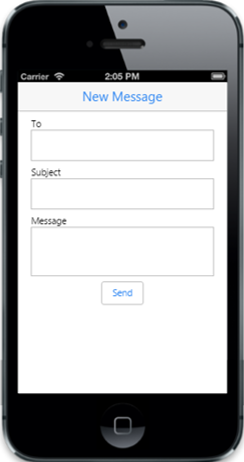
The **Essential JavaScript Mobile widget for TextArea ** allows the input of multiple lines of text within the web page. It also has expandable option that allows more text to the TextArea.From the following guidelines, you can create basic Mail sending form by using the TextArea control. In the following output, message field is rendered by using the TextArea.
Create the layout
Create an HTML file and add the following template to the HTML file.
<!DOCTYPE html>
<html>
<head>
    <title>TextArea</title>
    <meta name="viewport" content="width=device-width, initial-scale=1.0,maximum-scale=1.0, user-scalable=no" />
    <link href="http://cdn.syncfusion.com/25.1.35/js/mobile/ej.mobile.all.min.css" rel="stylesheet" />
    <script src="http://cdn.syncfusion.com/js/assets/external/jquery-3.0.0.min.js"></script>
    <script src="http://cdn.syncfusion.com/25.1.35/js/mobile/ej.mobile.all.min.js"> </script>
</head>
<body>
    <div data-role="ejmheader" id="mailheader" data-ej-title="New Message"></div>
    <div id="mailcontainer" class="sample">
        <div>
            <span>To</span>
            <input id="mailto" name="user_name" data-role="ejmtextbox" />
            <span>Subject</span>
            <input id="mailsubject" name="user_name" data-role="ejmtextbox" />
            <span>Message</span>
            <!--Add TextArea Code example Here-->
            <div class="submit" align="center">
                <input id="btn" name="mailsend" data-role="ejmbutton" data-ej-text="Send" type="button" />
            </div>
        </div>
    </div>
    <div id="ScrollPanel" data-role="ejmscrollpanel" data-ej-target="mailcontainer"></div>
</body>
</html>
Create TextArea
To render the TextArea control, you can set ejm textarea to data-role attribute for the specific input element as follows.
<!-- TextArea element -->

<textarea id="textarea" data-role="ejmtextarea"></textarea>
Add the following styles to show the TextArea control in an order.
<!-- TextArea element -->

        .sample {
            padding: 10px 20px;
        }
Run the code and get the following output.