Getting started
21 Feb 20175 minutes to read
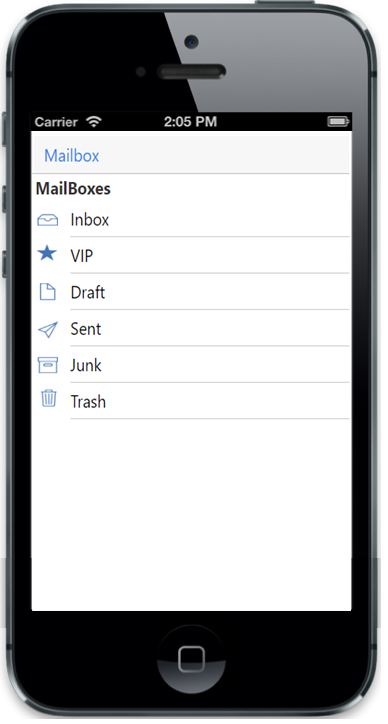
This section explains briefly on how to create a ListView control in your application.
Create your first ListView in JavaScript
Essential JavaScript Mobile ListView widget builds an interactive listview interface. This control allows you to select an item from a list-like interface and provides the infrastructure to display a set of data items in different layouts or views. Lists display data, data navigation, result lists, and data entry.
The following steps help you to add a ListView control for a mobile application that views a list of items such as images, text and navigates to the child item when you click a list item.
Create a basic mobile layout
Essential JavaScript Mobile ListView widget is rendered, either by specifying static content on a list. The following steps help you create a basic ListView for your application.
- Create an HTML file and add the following template to the HTML file.
<html>
<head>
    <meta id="viewport" name="viewport" content="width=device-width, initial-scale=1.0,maximum-scale=1.0, user-scalable=no" />
    <title>ListView</title>
    <link href="http://cdn.syncfusion.com/25.1.35/js/mobile/ej.mobile.all.min.css" rel="stylesheet" />
    <script src="http://cdn.syncfusion.com/js/assets/external/jquery-1.10.2.min.js"></script>
    <script src="http://cdn.syncfusion.com/js/assets/external/jsrender.min.js"></script>
    <script src="http://cdn.syncfusion.com/js/assets/external/jquery.globalize.min.js"></script>
    <script src="http://cdn.syncfusion.com/25.1.35/js/mobile/ej.mobile.all.min.js"></script>
</head>
<body>
    <div>
        <!--- Add Header Element Here-->
        <!--Add Listview Element Here-->
    </div>
</body>
</html>
Add the following code to render ListView
<!--Add Header Element Here-->
     <div id="header" data-role="ejmnavigationbar" data-ej-title="Mailbox" data-ej-isrelative="true">
    </div>
    <!--Add ListView Element Here-->
        <ul id="listview" data-role="ejmlistview" data-ej-datasource="window.listData" data-ej-fields-groupby="group" data-ej-fields-text="text" data-ej-fields-image="image"></ul>
    <script>
        window.listData = [{ text: "Inbox", image: "http://js.syncfusion.com/ug/mobile/content/listview/sprite.png", group: "MailBoxes" },
                           { text: "VIP", image: "http://js.syncfusion.com/ug/mobile/content/listview/sprite.png", group: "MailBoxes" },
                           { text: "Draft", image: "http://js.syncfusion.com/ug/mobile/content/listview/sprite.png", group: "MailBoxes" },
                           { text: "Sent", image: "http://js.syncfusion.com/ug/mobile/content/listview/sprite.png", group: "MailBoxes" },
                           { text: "Junk", image: "http://js.syncfusion.com/ug/mobile/content/listview/sprite.png", group: "MailBoxes" },
                           { text: "Trash", image: "http://js.syncfusion.com/ug/mobile/content/listview/sprite.png", group: "MailBoxes" }];
    </script>
Add the below style for images
.e-m-lv-item .e-m-lv-image {
            background-size: 26px 375px;
        }


        .e-m-lv-item:nth-child(2) .e-m-lv-image {
            background-position: 8px -87px;
        }

        .e-m-lv-item:nth-child(3) .e-m-lv-image {
            background-position: 7px -337px;
        }

        .e-m-lv-item:nth-child(4) .e-m-lv-image {
            background-position: 11px -40px;
        }

        .e-m-lv-item:nth-child(5) .e-m-lv-image {
            background-position: 8px -229px;
        }

        .e-m-lv-item:nth-child(6) .e-m-lv-image {
            background-position: 8px 12px;
        }

        .e-m-lv-item:nth-child(7) .e-m-lv-image {
            background-position: 12px -286px;
        }