Getting Started
5 Jun 202312 minutes to read
The Group Button helps to display multiple buttons that is stacked together in a single line and looks like a navigation component. The following section helps you to create a Group Button widget within a Mail App.

Create the necessary Layout
The Group Button widget can be created using the HTML input elements with type radio or checkbox. In the Mail App, you can use the radio input element to view the Mail content with three options All, Read and Unread. The respective contents are displayed on clicking the specific buttons in the group.
Create an HTML file and add the following template to the HTML file for Group Button creation.
<!DOCTYPE html>
<html>
<head>
    <meta id="viewport" name="viewport" content="width=device-width, initial-scale=1.0,maximum-scale=1.0, user-scalable=no" />
    <title>Group Button</title>
    <link href="[http://cdn.syncfusion.com/25.1.35/js/mobile/ej.mobile.all.min.css](http://cdn.syncfusion.com/25.1.35/js/mobile/ej.mobile.all.min.css)" rel="stylesheet" />
    <script src="[https://cdn.syncfusion.com/js/assets/external/jquery-1.10.2.min.js](https://cdn.syncfusion.com/js/assets/external/jquery-1.10.2.min.js)"></script>
    <script src="[https://cdn.syncfusion.com/js/assets/external/jsrender.min.js](https://cdn.syncfusion.com/js/assets/external/jsrender.min.js)"></script>
    <script src="[http://cdn.syncfusion.com/25.1.35/js/mobile/ej.mobile.all.min.js](http://cdn.syncfusion.com/25.1.35/js/mobile/ej.mobile.all.min.js)"></script>
</head>
<body>
    <!-- header control -->
    <div id="header" data-role="ejmnavigationbar" data-ej-title="Mail" data-ej-isrelative="true" data-ej-titlealignment="center"></div>
    <div id="grpbutton_sample" class="sample">
        <div>
            <!--Add Group Button control-->
        </div>
    </div>
    <!--Scroll Panel-->
    <div data-role="ejmscrollpanel" data-ej-target="grpbutton_sample"></div>
</body>
</html>
Creating Group Button
To create Group Button control, set the data-role attribute to ejmgroupbutton to a div element and then include multiple buttons through input element. Also, specify the type and name attribute to the “input” element as mentioned in the following code.
<!--Group Button Control-->
   <div id="groupbutton" data-role="ejmgroupbutton"  data-ej-selecteditemindex="0">
        <label>
            <input type="radio"  name="options">
            All
        </label>
        <label>
            <input type="radio" name="options">
            Read
        </label>
        <label>
            <input type="radio" name="options">
            Unread
        </label>
    </div>
Use the following styles for content.
<style type="text/css">
.sample {
padding-top: 20px;
text-align: center;
}
.cont-bg {
text-align: left;
padding-left: 20px;
padding-right: 20px;
}
.templatetext {
font-size: 15px;
font-weight: bolder !important;
position: relative;
top: 10px;
}
.designationstyle {
float: right;
font-size: 12px;
padding-top: 13px;
position: relative;
}
.message-title {
font-weight: bold !important;
font-size: 14px;
padding-top: 10px;
}
.aboutstyle {
font-size: 14px;
overflow: hidden;
padding-top: 10px;
text-align: justify;
text-overflow: ellipsis;
white-space: nowrap;
}
.border-panel {
height: 25px;
}
.content-text {
color: #C0C0C0;
height: 0px;
}
#all, #read, #unread {
padding-top: 20px;
}
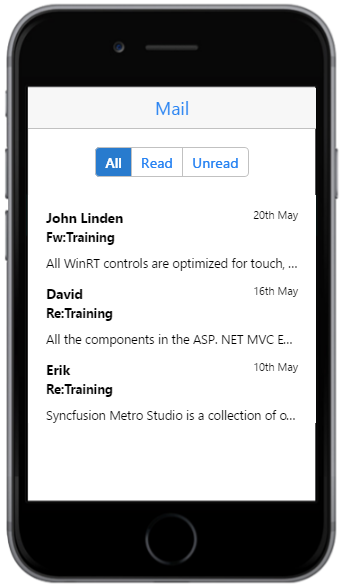
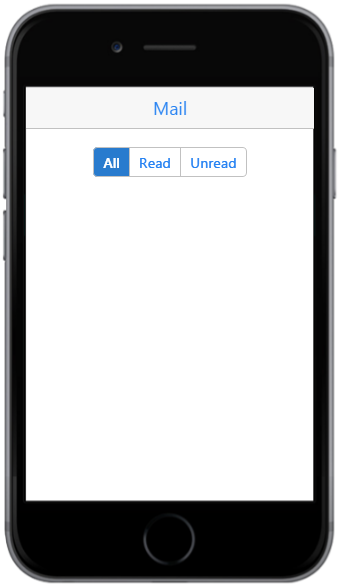
</style>Execute the above code to display the output with the created group button.
Handling Events
In the Mail App, while navigating through different buttons - the content view is changed using the touchEnd event which is specified using data-ej-touchend attribute. Using this event, you can handle the functionalities that are necessary to switch the view.
<div id="groupbutton" data-role="ejmgroupbutton" data-ej-touchend="onselect" data-ej-selecteditemindex="0">
        <label>
            <input type="radio"  name="options">
            All
        </label>
        <label>
            <input type="radio" name="options">
            Read
        </label>
        <label>
            <input type="radio" name="options">
            Unread
        </label>
    </div>

<!--Add the Mail Content-->
Add the following function definition to handle the event.
<script type="text/javascript">

    function onselect(args) {
        // Touch End Event Handling
    }

</script>
In case, if you are using three options All, Read and Unread to view the mail content, it can be done using the Essential JavaScript Mobile Listview control. Refer to the following code to create the listview control and to implement the switching logic through the GroupButton’s touchEnd event.
<div id="all">
<div data-role="ejmlistview" id="templatelist1" data-ej-allowscrolling="false" data-ej-datasource="window.dbAll" data-ej-databinding="true" data-ej-templateid="lvtemplate"></div>
</div>
<div id="read">
<div data-role="ejmlistview" id="templatelist2" data-ej-allowscrolling="false" data-ej-datasource="window.dbRead" data-ej-databinding="true" data-ej-templateid="lvtemplate"></div>
</div>
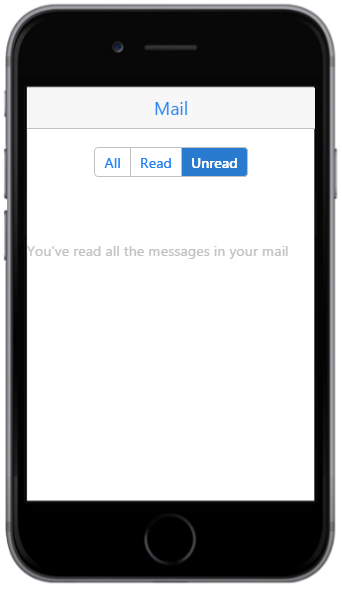
<div id="unread">
<div class="border-panel"></div>
<div class="border-panel"></div>
<div class="content-text">You've read all the messages in your mail</div>
<div class="border-panel"></div>
<div class="border-panel"></div>
</div>
<script id="lvtemplate" type="text/x-jsrender">
<div class="cont-bg">
<span class="templatetext"></span>
<span class="designationstyle"></span>
<div class="message-title"></div>
<div class="aboutstyle"></div>
</div>
</script>To handle the events, add the following script to the code.
<script type="text/javascript">
$(function () {
//hiding read and unread elements initially
$("#read,#unread").hide();
});
//Touch End Event Handling
function onselect(args) {
$("#all,#read,#unread").hide();
$("#" + args.text.toLowerCase()).show();
}
window.dbMailContent =
[{ "Name": "John Linden", "Title": "Fw:Training", "Message": "All WinRT controls are optimized for touch, supporting common gestures: zooming,panning, selecting, double-tapping, rotating, resizing.", "Time": "20th May", "Flag": "All" },
{ "Name": "David", "Title": "Re:Training", "Message": "All the components in the ASP. NET MVC Essential Studio have been built from the ground up with performance in mind and are extremely lightweight.", "Time": "16th May", "Flag": "All" },
{ "Name": "Erik", "Title": "Re:Training", "Message": "Syncfusion Metro Studio is a collection of over 2500 Metro-style icon templates that can be easily customized to create thousands of unique Metro icons.", "Time": "10th May", "Flag": "All" },
{ "Name": "Claire", "Title": "Fw:Training", "Message": "All the components in the ASP. NET MVC Essential Studio have been built from the ground up with performance in mind and are extremely lightweight.", "Time": "16th May", "Flag": "Read" },
{ "Name": "David", "Title": "Re:Training", "Message": "All WinRT controls are optimized for touch, supporting common gestures: zooming,panning, selecting, double-tapping, rotating, resizing.", "Time": "10th May", "Flag": "Read" },
{ "Name": "John Linden", "Title": "Re:Training", "Message": "With our sophisiticated Direct-Trac support system, built from the ground up to support enterprise customers, you will have a streamlined experience working with our support team.", "Time": "5th May", "Flag": "Read" }];
window.dbAll = ej.DataManager(window.dbMailContent).executeLocal(ej.Query().from(window.dbMailContent).where(ej.Predicate("Flag", ej.FilterOperators.equal, "All")));
window.dbRead = ej.DataManager(window.dbMailContent).executeLocal(ej.Query().from(window.dbMailContent).where(ej.Predicate("Flag", ej.FilterOperators.equal, "Read")));
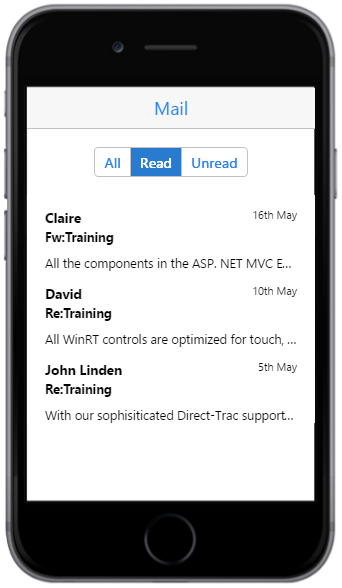
</script>Execute the above code to render the following output.