Getting Started with .NET MAUI DataPager
18 Nov 201813 minutes to read
This section provides a quick overview for working with the SfDataPager for .NET MAUI. Follow the steps below to add a basic DataPager to your project.
Prerequisites
Before proceeding, ensure the following are set up:
- Install .NET 9 SDK or later.
- Set up a .NET MAUI environment with Visual Studio 2022 v17.12 or later.
Step 1: Create a new .NET MAUI project
- Go to File > New > Project and choose the .NET MAUI App template.
- Name the project and choose a location. Then, click Next.
- Select the .NET framework version and click Create.
Step 2: Install the Syncfusion® MAUI DataPager NuGet package
- In Solution Explorer, right-click the project and choose Manage NuGet Packages.
- Search for Syncfusion.Maui.DataPager and install the latest version.
- Ensure the necessary dependencies are installed correctly, and the project is restored.
Prerequisites
Before proceeding, ensure the following are set up:
- Install .NET 9 SDK or later.
- Set up a .NET MAUI environment with Visual Studio Code.
- Ensure that the .NET MAUI workloads are installed and configured as described here.
Step 1: Create a new .NET MAUI project
- Open the command palette by pressing
Ctrl+Shift+Pand type .NET:New Project and enter. - Choose the .NET MAUI App template.
- Select the project location, type the project name and press Enter.
- Then choose Create project.
Step 2: Install the Syncfusion® MAUI DataPager NuGet package
- Press Ctrl + ` (backtick) to open the integrated terminal in Visual Studio Code.
- Ensure you’re in the project root directory where your .csproj file is located.
- Run the command
dotnet add package Syncfusion.Maui.DataPagerto install the Syncfusion® .NET MAUI DataPager package. - To ensure all dependencies are installed, run
dotnet restore.
Prerequisites
Before proceeding, ensure the following are set up:
- Install .NET 9 SDK or later.
- Set up a .NET MAUI environment with JetBrains Rider 2024.3 or later.
- Make sure the MAUI workloads are installed and configured as described here.
Step 1: Create a new .NET MAUI project
- Go to File > New Solution, Select .NET (C#) and choose the .NET MAUI App template.
- Enter the Project Name, Solution Name, and Location.
- Select the .NET framework version and click Create.
Step 2: Install the Syncfusion® MAUI DataPager NuGet package
- In Solution Explorer, right-click the project and choose Manage NuGet Packages.
- Search for Syncfusion.Maui.DataPager and install the latest version.
- Ensure the necessary dependencies are installed correctly, and the project is restored. If not, Open the Terminal in Rider and manually run:
dotnet restore
Step 3: Register Syncfusion handler
To use Syncfusion controls, register the Syncfusion core handler in your application’s startup configuration.
In the MauiProgram.cs file (located at the root of your project), add the following namespace:
using Syncfusion.Maui.Core.Hosting;Then, register the Syncfusion core handler in the CreateMauiApp method:
builder.ConfigureSyncfusionCore();Step 4: Import the DataPager namespace
Add the following namespace in your XAML or C#.
xmlns:pager="clr-namespace:Syncfusion.Maui.DataPager;assembly=Syncfusion.Maui.DataPager"using Syncfusion.Maui.DataPager;Step 5: Define Model and ViewModel
First, create a data model class and a repository to manage the data. Create a simple data model as shown in the following code example, and save it as OrderInfo.cs file:
public class OrderInfo
{
    private string? orderID;
    private string? customerID;
    private string? customer;
    private string? shipCity;
    private string? shipCountry;

    public string? OrderID
    {
        get { return orderID; }
        set { this.orderID = value; }
    }

    public string? CustomerID
    {
        get { return customerID; }
        set { this.customerID = value; }
    }

    public string? ShipCountry
    {
        get { return shipCountry; }
        set { this.shipCountry = value; }
    }

    public string? Customer
    {
        get { return this.customer; }
        set { this.customer = value; }
    }

    public string? ShipCity
    {
        get { return shipCity; }
        set { this.shipCity = value; }
    }

    public OrderInfo(string orderId, string customerId, string country, string customer, string shipCity)
    {
        this.OrderID = orderId;
        this.CustomerID = customerId;
        this.Customer = customer;
        this.ShipCountry = country;
        this.ShipCity = shipCity;
    }
}
Next, create a data repository class that manages a collection of OrderInfo objects. This repository serves as a simple data source for the DataPager. Create a new class file and save it as OrderInfoRepository.cs in the same Models folder or project root:
public class OrderInfoRepository
{
    private ObservableCollection<OrderInfo> orders;
    public ObservableCollection<OrderInfo> Orders
    {
        get { return orders; }
        set { this.orders = value; }
    }

    public OrderInfoRepository()
    {
        orders = new ObservableCollection<OrderInfo>();
        this.GenerateOrders();
    }

    public void GenerateOrders()
    {
        orders.Add(new OrderInfo("1001", "Maria Anders", "Germany", "ALFKI", "Berlin"));
        orders.Add(new OrderInfo("1002", "Ana Trujillo", "Mexico", "ANATR", "Mexico D.F."));
        orders.Add(new OrderInfo("1003", "Ant Fuller", "Mexico", "ANTON", "Mexico D.F."));
        orders.Add(new OrderInfo("1004", "Thomas Hardy", "UK", "AROUT", "London"));
        orders.Add(new OrderInfo("1005", "Tim Adams", "Sweden", "BERGS", "London"));
        orders.Add(new OrderInfo("1006", "Hanna Moos", "Germany", "BLAUS", "Mannheim"));
        orders.Add(new OrderInfo("1007", "Andrew Fuller", "France", "BLONP", "Strasbourg"));
        orders.Add(new OrderInfo("1008", "Martin King", "Spain", "BOLID", "Madrid"));
        orders.Add(new OrderInfo("1009", "Lenny Lin", "France", "BONAP", "Marsiella"));
    }
}
Step 6: Add the DataPager with DataGrid
Create a DataPager instance and bind your data collection to the Source property. Then, bind the PagedSource to a data display control like SfDataGrid.
The following code example illustrates using SfDataPager with the data grid control:
<ContentPage xmlns="http://schemas.microsoft.com/dotnet/2021/maui"
             xmlns:x="http://schemas.microsoft.com/winfx/2009/xaml"
             xmlns:local="clr-namespace:DataPgerDemo"
             xmlns:syncfusion="clr-namespace:Syncfusion.Maui.DataGrid;assembly=Syncfusion.Maui.DataGrid"
             xmlns:pager="clr-namespace:Syncfusion.Maui.DataPager;assembly=Syncfusion.Maui.DataPager"
             x:Class="DataPgerDemo.MainPage">

    <ContentPage.BindingContext>
        <local:OrderInfoViewModel x:Name="viewModel"/>
    </ContentPage.BindingContext>

    <Grid>
        <Grid.RowDefinitions>
            <RowDefinition Height="*" />
            <RowDefinition Height="Auto" />
        </Grid.RowDefinitions>
        <Border Grid.Row="1" Padding="5">
            <pager:SfDataPager x:Name="dataPager"
                               PageSize="15"
                               NumericButtonCount="10"
                               Source="{Binding Orders}">
            </pager:SfDataPager>
        </Border>
        <syncfusion:SfDataGrid x:Name="dataGrid"
                               Grid.Row="0"
                               ItemsSource="{Binding Source={x:Reference dataPager}, Path=PagedSource}">
        </syncfusion:SfDataGrid>
    </Grid>
</ContentPage>
using Syncfusion.Maui.DataGrid;
using Syncfusion.Maui.DataPager;
public partial class MainPage : ContentPage
{
// Note: The XAML approach above is the recommended method. This C# example demonstrates
// programmatic creation for scenarios where declarative XAML markup is not available.
public NormalPage()
{
InitializeComponent();
SfDataPager dataPager = new SfDataPager();
OrderInfoViewModel viewModel = new OrderInfoViewModel();
dataPager.PageSize = 15;
dataPager.NumericButtonCount = 10;
dataPager.Source = viewModel.Orders;
SfDataGrid dataGrid = new SfDataGrid();
dataGrid.ItemsSource = dataPager.PagedSource;
Border border = new Border();
border.Padding = new Thickness(5);
border.Content = dataPager;
Grid grid = new Grid();
grid.RowDefinitions.Add(new RowDefinition() { Height = GridLength.Star });
grid.RowDefinitions.Add(new RowDefinition() { Height = GridLength.Auto });
grid.Children.Add(dataGrid);
grid.Children.Add(border);
grid.SetRow(dataGrid, 0);
grid.SetRow(border, 1);
this.Content = grid;
}
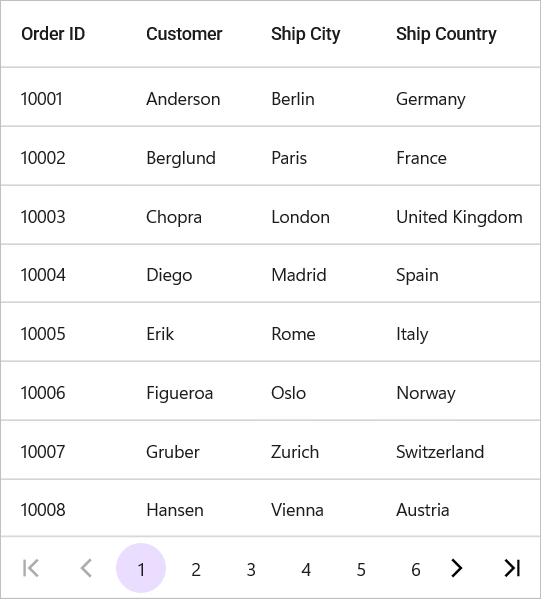
}The following screenshot shows the result of running the above code:
Note: You can refer to our .NET MAUI DataPager feature tour page for its groundbreaking feature representations. You can also explore our .NET MAUI DataPager Example that shows you how to render the DataPager in .NET MAUI.