Getting Started with .NET MAUI Navigation Drawer
This section guides you through setting up and configuring a Navigation Drawer in your .NET MAUI application. Follow the steps below to add a basic Navigation Drawer to your project.
Prerequisites
Before proceeding, ensure the following are set up:
- Install .NET 9 SDK or later.
- Set up a .NET MAUI environment with Visual Studio 2022 v17.12 or later.
Step 1: Create a new .NET MAUI project
- Go to File > New > Project and choose the .NET MAUI App template.
- Name the project and choose a location. Then click Next.
- Select the .NET framework version and click Create.
Step 2: Install the Syncfusion® .NET MAUI Toolkit NuGet package
- In Solution Explorer, right-click the project and choose Manage NuGet Packages.
- Search for Syncfusion.Maui.Toolkit and install the latest version.
- Ensure the necessary dependencies are installed correctly, and the project is restored.
Prerequisites
Before proceeding, ensure the following are set up:
- Install .NET 9 SDK or later.
- Set up a .NET MAUI environment with Visual Studio Code.
- Ensure that the .NET MAUI workloads are installed and configured as described here.
Step 1: Create a new .NET MAUI project
- Open the command palette by pressing
Ctrl+Shift+Pand type .NET:New Project and enter. - Choose the .NET MAUI App template.
- Select the project location, type the project name and press Enter.
- Then choose Create project.
Step 2: Install the Syncfusion® .NET MAUI Toolkit NuGet package
- Press Ctrl + ` (backtick) to open the integrated terminal in Visual Studio Code.
- Ensure you’re in the project root directory where your .csproj file is located.
- Run the command
dotnet add package Syncfusion.Maui.Toolkitto install the Syncfusion® .NET MAUI Toolkit NuGet package. - To ensure all dependencies are installed, run
dotnet restore.
Prerequisites
Before proceeding, ensure the following are set up:
- Install .NET 9 SDK or later.
- Set up a .NET MAUI environment with JetBrains Rider 2024.3 or later.
- Make sure the MAUI workloads are installed and configured as described here.
Step 1: Create a new .NET MAUI project
- Go to File > New Solution, Select .NET (C#) and choose the .NET MAUI App template.
- Enter the Project Name, Solution Name, and Location.
- Select the .NET framework version and click Create.
Step 2: Install the Syncfusion® MAUI Toolkit NuGet package
- In Solution Explorer, right-click the project and choose Manage NuGet Packages.
- Search for Syncfusion.Maui.Toolkit and install the latest version.
- Ensure the necessary dependencies are installed correctly, and the project is restored. If not, Open the Terminal in Rider and manually run:
dotnet restore
Step 3: Register Syncfusion handler
Make sure to add the namespace.
using Syncfusion.Maui.Toolkit.Hosting;Register the Syncfusion toolkit handler in your CreateMauiApp method of MauiProgram.cs file to use Syncfusion controls.
builder.ConfigureSyncfusionToolkit();Step 4: Import NavigationDrawer namespace
Add the following namespace in your XAML or C#.
xmlns:navigationDrawer="clr-namespace:Syncfusion.Maui.Toolkit.NavigationDrawer;assembly=Syncfusion.Maui.Toolkit"using Syncfusion.Maui.Toolkit.NavigationDrawer;Step 5: Add a Navigation Drawer with DrawerContentView
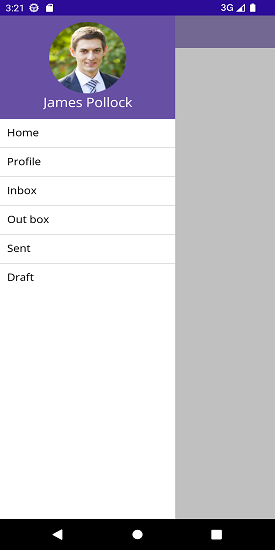
Create an ImageButton and set the required image to the Source property. Ensure the image is placed in the Resources/Images directory. Subscribe to the Clicked event of the button and invoke the ToggleDrawer() method to toggle the drawer. Properly align the layout of ContentView to position the hamburger icon at the top left, as demonstrated in the following code.
<navigationDrawer:SfNavigationDrawer x:Name="navigationDrawer">
    <navigationDrawer:SfNavigationDrawer.DrawerSettings>
        <navigationDrawer:DrawerSettings DrawerWidth="250"
                                 DrawerHeaderHeight="160">
            <navigationDrawer:DrawerSettings.DrawerHeaderView>
                <Grid BackgroundColor="#6750A4" RowDefinitions="120,40">
                    <Image Source="user.png"/>
                    <Label Text="James Pollock" Grid.Row="1"/>
                </Grid>
            </navigationDrawer:DrawerSettings.DrawerHeaderView>
            <navigationDrawer:DrawerSettings.DrawerContentView>
                <CollectionView x:Name="collectionView" SelectionMode="Single"
                  SelectionChanged="collectionView_SelectionChanged">
                    <CollectionView.ItemsSource>
                        <x:Array Type="{x:Type x:String}">
                            <x:String>Home</x:String>
                            <x:String>Profile</x:String>
                            ...
                        </x:Array>
                    </CollectionView.ItemsSource>
                    <CollectionView.ItemTemplate>
                        <!--Load your Data Template -->
                    </CollectionView.ItemTemplate>
                </CollectionView>
            </navigationDrawer:DrawerSettings.DrawerContentView>
        </navigationDrawer:DrawerSettings>
    </navigationDrawer:SfNavigationDrawer.DrawerSettings>
    <navigationDrawer:SfNavigationDrawer.ContentView>
        <Grid x:Name="mainContentView" RowDefinitions="Auto,*">
            <HorizontalStackLayout BackgroundColor="#6750A4" Spacing="10" Padding="5,0,0,0">
                <ImageButton x:Name="hamburgerButton" Clicked="hamburgerButton_Clicked"/>
                <Label x:Name="headerLabel" />
            </HorizontalStackLayout>
            <Label Grid.Row="1" x:Name="contentLabel" />
        </Grid>
    </navigationDrawer:SfNavigationDrawer.ContentView>
</navigationDrawer:SfNavigationDrawer>
SfNavigationDrawer navigationDrawer = new SfNavigationDrawer();
var drawerSettings = new DrawerSettings
{
DrawerWidth = 250,
DrawerHeaderHeight = 160
};
var headerGrid = new Grid
{
BackgroundColor = Color.FromArgb("#6750A4"),
RowDefinitions =
{
new RowDefinition { Height = 120 },
new RowDefinition { Height = 40 }
}
};
var userImage = new Image { Source = "user.png" };
var userLabel = new Label { Text = "James Pollock" };
Grid.SetRow(userLabel, 1);
headerGrid.Children.Add(userImage);
headerGrid.Children.Add(userLabel);
drawerSettings.DrawerHeaderView = headerGrid;
collectionView = new CollectionView
{
SelectionMode = SelectionMode.Single,
ItemsSource = new List<string>
{
"Home",
"Profile",
"Settings",
"About"
}
};
collectionView.SelectionChanged += CollectionView_SelectionChanged;
drawerSettings.DrawerContentView = collectionView;
navigationDrawer.DrawerSettings = drawerSettings;
var mainGrid = new Grid
{
RowDefinitions =
{
new RowDefinition { Height = GridLength.Auto },
new RowDefinition { Height = GridLength.Star }
}
};
var topBar = new HorizontalStackLayout
{
BackgroundColor = Color.FromArgb("#6750A4"),
Spacing = 10,
Padding = new Thickness(5, 0, 0, 0)
};
var hamburgerButton = new ImageButton();
hamburgerButton.Clicked += HamburgerButton_Clicked;
headerLabel = new Label();
topBar.Children.Add(hamburgerButton);
topBar.Children.Add(headerLabel);
contentLabel = new Label();
Grid.SetRow(contentLabel, 1);
mainGrid.Children.Add(topBar);
mainGrid.Children.Add(contentLabel);
navigationDrawer.ContentView = mainGrid;
Content = navigationDrawer;private void hamburgerButton_Clicked(object sender, EventArgs e)
{
navigationDrawer.ToggleDrawer();
}
private void collectionView_SelectionChanged(object sender, SelectionChangedEventArgs e)
{
if (e.CurrentSelection.FirstOrDefault() is string selectedItem)
{
headerLabel.Text = selectedItem;
contentLabel.Text = $"{selectedItem} Content";
navigationDrawer.ToggleDrawer();
}
}
You can download the Navigation Drawer Getting Started sample from here.