How can I help you?
Getting Started
Create your first TreeGrid in JavaScript
The Essential JavaScript TreeGrid has been designed to represent and edit the hierarchical data.
This section explains how to create a TreeGrid widget in your application with hierarchical data source, enable sorting and editing. The following screenshot displays the output.
1.Create an HTML file and add the following template to the HTML file.
<!DOCTYPE html>
    <html xmlns="http://www.w3.org/1999/xhtml">
        <head>
            <meta name="viewport"content="width=device-width, initial-scale=1.0"/>
            <meta charset="utf-8" />
            <link href=" http://cdn.syncfusion.com/33.1.44/js/web/flat-azure/ej.web.all.min.css" rel="stylesheet"/>
            <script src="http://cdn.syncfusion.com/js/assets/external/jquery-1.10.2.min.js"></script>
            <script src="http://cdn.syncfusion.com/js/assets/external/jsrender.min.js"></script>
            <script src="http://cdn.syncfusion.com/js/assets/external/jquery.globalize.min.js"></script>
            <script src="http://cdn.syncfusion.com/js/assets/external/jquery.easing.1.3.min.js"></script>
            <script src="http://cdn.syncfusion.com/33.1.44/js/web/ej.web.all.min.js" type="text/javascript"></script>
        </head>
        <body>
        <!--Add TreeGrid control here -->
        </body>
    </html>
2.Add <div> element with in the <Body> tag.
<body style="width:100%;height:100%;position:static;">
       <!--Add  TreeGrid control here-->
       <div id="TreeGridContainer" style="width:60%;height:80%;position:absolute;"></div>
    </body>
3.Create the TreeGrid with the empty data source.
$(function () {
         $("#TreeGridContainer").ejTreeGrid({
             columns: [
                 { field: "taskName", headerText: "Task Name" },
                 { field: "startDate", headerText: "Start date"},
                 { field: "endDate", headerText: "End Date" },
                 { field: "duration", headerText: "Duration"},
                 { field: "progress", headerText: "Progress"}
             ]
         });

     });
TreeGrid with empty datasource
4.Create data source for TreeGrid.
var treeGridDataSource = [
                {
                    taskID: 2,
                    taskName: "Planning",
                    startDate: "02/03/2014",
                    endDate: "02/07/2014",
                    duration: 10,
                    progress: 56,
                    subtasks: [
                        {
                            taskID: 3,
                            taskName: "Plan timeline",
                            startDate: "02/03/2014",
                            endDate: "02/07/2014",
                            duration: 5,
                            progress: "100"
                        },
                        {
                            taskID: 4,
                            taskName: "Plan budget",
                            startDate: "02/03/2014",
                            endDate: "02/07/2014",
                            duration: 5,
                            progress: "100"
                        },
                        {
                            taskID: 5,
                            taskName: "Allocate resources",
                            startDate: "02/03/2014",
                            endDate: "02/07/2014",
                            duration: 5,
                            progress: "100"
                        },
                        {
                            taskID: 6,
                            taskName: "Planning complete",
                            startDate: "02/07/2014",
                            endDate: "02/07/2014",
                            duration: 0,
                            progress: 40
                        }
                    ]
                },
                {
                    taskID: 7,
                    taskName: "Design",
                    startDate: "02/10/2014",
                    endDate: "02/14/2014",
                    duration: 10,
                    progress: 76,
                    subtasks: [
                        {
                            taskID: 8,
                            taskName: "Software Specification",
                            startDate: "02/10/2014",
                            endDate: "02/12/2014",
                            duration: 3,
                            progress: "60"
                        },
                        {
                            taskID: 9,
                            taskName: "Develop prototype",
                            startDate: "02/10/2014",
                            endDate: "02/12/2014",
                            duration: 3,
                            progress: "100"
                        },
                        {
                            taskID: 10,
                            taskName: "Get approval from customer",
                            startDate: "02/13/2014",
                            endDate: "02/14/2014",
                            duration: 2,
                            progress: "100"
                        },
                        {
                            taskID: 11,
                            taskName: "Design complete",
                            startDate: "02/14/2014",
                            endDate: "02/14/2014",
                            duration: 0,
                            predecessor: "10FF",
                            progress: 65
                        }
                    ]
                }

        ];
5.Initialize the TreeGrid with data source created in last step.
$(function () {
$("#TreeGridContainer").ejTreeGrid({
dataSource: treeGridDataSource,
//Map the child mapping to render the hierarchical data
childMapping: "subtasks",
columns: [
{ field: "taskName", headerText: "Task Name" },
{ field: "startDate", headerText: "Start Date"},
{ field: "endDate", headerText: "End Date" },
{ field: "duration", headerText: "Duration"},
{ field: "progress", headerText: "Progress"}
]
});
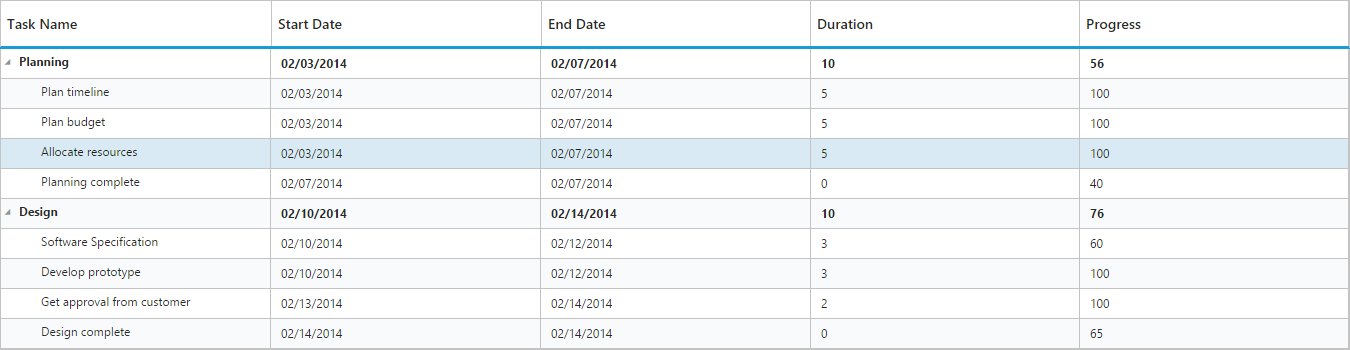
});TreeGrid widget is displayed as the output in the following screenshot.
Enable Sorting
The TreeGrid control has sorting functionality, to arrange the data in ascending or descending order based on a particular column.
Multicolumn Sorting
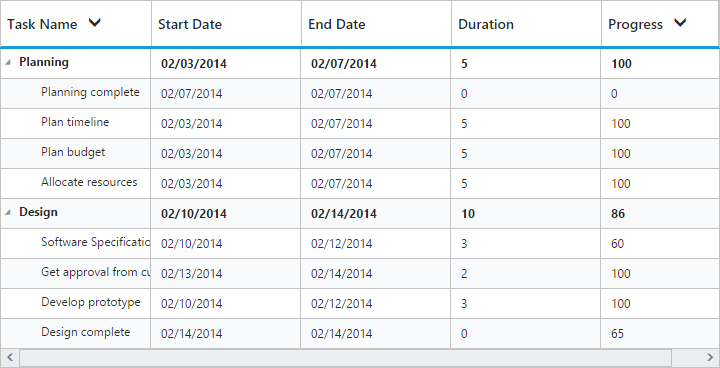
Enable the multicolumn sorting in TreeGrid by setting the allowMultiSorting as true. You can sort multiple columns in TreeGrid, by selecting the desired column header while holding the Ctrl key.
$("#TreeGridContainer").ejTreeGrid({
            //...
            allowSorting: true,
            allowMultiSorting:true
        });
Enable Editing
You can enable Editing in TreeGrid by using the editSettings property as follows.
$("#TreeGridContainer").ejTreeGrid({
        //...
        editSettings: {
            allowEditing: true,
            editMode: "cellEditing"
        }
    });
And also, the following editors are provided for support in TreeGrid control.
- string
- boolean
- numeric
- dropdown
- datepicker
- datetimepicker
You can set the editor type for a particular column as follows.
$("#TreeGridContainer").ejTreeGrid({
//...
columns: [{
field: "startDate",
headerText: "Start Date",
editType: "datepicker"
}, {
field: "endDate",
headerText: "End Date"
}, {
field: "duration",
headerText: "Duration",
editType: "numericedit"
}, ]
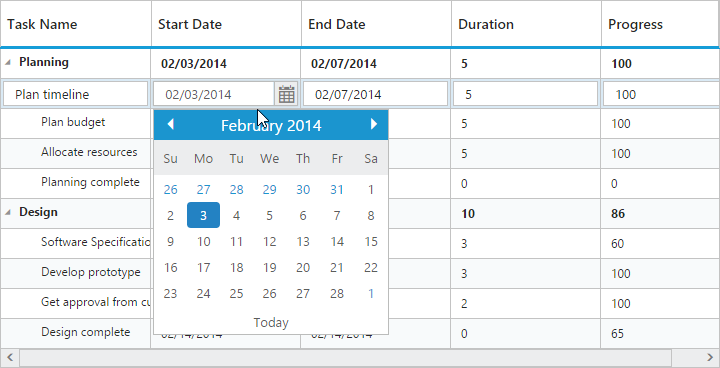
})The output of the DateTimePicker editor in TreeGrid control is as follows.
Define dimension of TreeGrid
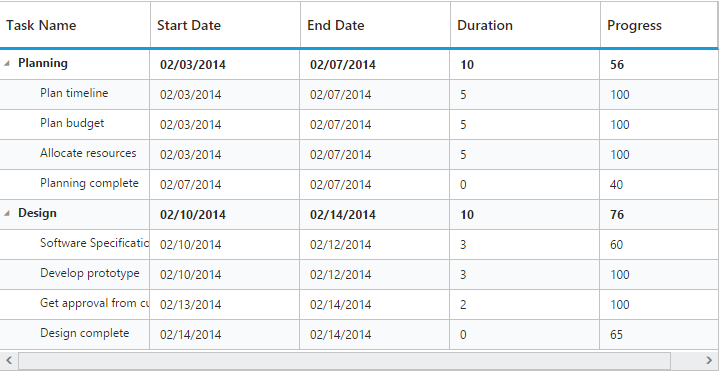
The TreeGrid control is render with 100% width and 450pxheight by default, we can define the dimension of TreeGrid control by using sizeSettings property. TreeGrid control width and height can be defined by either width and height properties or by defining inline style in TreeGrid container element.
The below code example shows how to define width and height for TreeGrid.
<!--<div id="TreeGridContainer" style="width:700px;height:350px"></div>-->
<div id="TreeGridContainer"></div>

<script>
    $("#TreeGridContainer").ejTreeGrid({
        //...
        sizeSettings:{
            width: "700px",
            height: "350px"
        }
    });
</script>
NOTE
TreeGrid control will automatically update the width and height value based on container element on window resize action, this can be enabled by setting
isResponsiveproperty astruefor thisheightandwidthvalue will be defined in percentage.
Localization
Localization is the process of customizing the User Interface (UI) based on a culture, specific to a particular country or region, in order to display regional data. The culture is represented by a unique string like en-US for US English and fr-FR for French.
Localization is the key feature that provides solutions to global customers with the help of localized control. It is necessary to include the specific culture script files (ej.culture.fr-FR.min.js file for French culture) in the reference section, which is available in the following location.
(installed location)\Syncfusion\Essential Studio\15.4.0.20\JavaScript\assets\scripts\i18n
Also, it is possible to localize all the texts in the Gantt control with specific culture by referring to the ej.localetexts.fr-FR.min.js file which is available in the following location.
(installed location)\Syncfusion\Essential Studio\15.4.0.20\JavaScript\assets\scripts\i10n
Culture of the TreeGrid control can be defined by using locale property.
The following code example explains how to localize the control in French culture.
<head>
    //…..
    <script src="Scripts/ej.culture.fr-FR.min.js"></script>
    <script src="Scripts/ej.localetexts.fr-FR.js"></script>
    //...
</head>

<script type="text/javascript">
    $(function() {
        $("#TreeGridContainer").ejTreeGrid({
            //...
            locale: "fr-FR"
            //...
        });

    });
</script>
The above screenshot shows TreeGrid with fr-FR culture.