Advanced Functionalities
Offline Support
Offline support allows data-bound Syncfusion UI widgets to function without active server connection. Users can continue working with the data.
With offline as true, the DataManager requests the server only once and further data manipulation operation can be done at client side itself.
In the following code example, the offline property of the DataManager is set as true.
<table class="table table-bordered">
        <thead>
            <tr>
                <th>Order ID</th>
                <th>Customer ID</th>
                <th>Ship Name</th>
                <th>Ship City</th>
                <th>Freight</th>
            </tr>
        </thead>
        <tbody></tbody>
    </table>
    <script type="text/javascript">
        var dataManager = ej.DataManager({
            url: "http://mvc.syncfusion.com/Services/Northwnd.svc/Orders",
            crossDomain: true,
            offline: true,
            async: false

        });
        var query = ej.Query()
                    .select(["OrderID", "CustomerID", "ShipName", "ShipCity", "Freight"])
                    .take(10)

        var promise = dataManager.executeQuery(query);

        promise.done(function (e) {
            renderTable(e.result); // the JSON data is get from the result
        });
        function renderTable(data) {
            var tableBody = "", row;
            for (var i = 0; i < data.length; i++) {
                row = data[i];
                tableBody += String.format("<tr><td>{0}</td><td>{1}</td><td>{2}</td><td>{3}</td><td>{4}</td></tr>", row.OrderID, row.CustomerID, row.ShipName, row.ShipCity, row.Freight);
            }
            $(".table tbody").html(tableBody);
        }
    </script>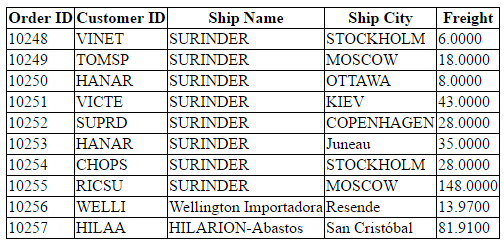
Load on demand
Load on demand is powerful technique to reduce band width size of consuming data. It allow you to retrieve the required range of data alone from the server and this feature helps you when the server contains large amount of data.
You can use the following code example for implementing load on demand using DataManager.
<div class="datatable">
        <table id="table1" class="table table-striped table-bordered" style="width:700px">
            <thead>
            <tr>
                <th>Order ID</th>
                <th>Customer ID</th>
                <th> EmployeeID </th>
            </tr>
            </thead>
            <tbody></tbody>
        </table>
    </div>
    <div class="col-md-5">
        <form class="form-horizontal" role="form">
            <div class="form-group">
                <label class="col-sm-4 control-label">
                Page Index:
                </label>
                <div class="col-sm-8">
                <input type="text" class="form-control" id="from">
                </div>
            </div>
            <div class="form-group">
                <label class="col-sm-4 control-label">
                Page Size:
                </label>
                <div class="col-sm-8">
                <input type="text" class="form-control" id="to">
                </div>
            </div>
            <div class="form-group">
                <div class="col-sm-offset-4 col-sm-4">
                <button type="button" id="submit" class="btn btn-default">
                    Load data on demand
                </button>
                </div>
            </div>
        </form>
    </div>

    <script type="text/javascript">
        var dataManager, query, tempQuery;
        $(function () {
            dataManager = ej.DataManager({
                url: "http://mvc.syncfusion.com/Services/Northwnd.svc/Orders",crossDomain:true } );
            query = ej.Query().page(1, 5);
            var dataSource = dataManager.executeQuery(query).done(function (args) {
                renderTable(args.result);
            });
        });
        // This function can be better replaced with any template engine. We used this for simplicity in demo.
        function renderTable(data) {
            var tableBody = "", row;
            for (var i = 0; i < data.length; i++) {
                row = data[i];
                tableBody += String.format("<tr><td>{0}</td><td>{1}</td><td>{2}</td></tr>", row.OrderID, row.CustomerID, row.EmployeeID);
            }
            $(".table tbody").html(tableBody);
        }
        $("#submit").click(function (e) {
            var from = parseInt($("#from").val());
            var to = parseInt($("#to").val());
            tempQuery = new ej.Query();
            tempQuery.page(from, to);
            dataManager.executeQuery(tempQuery).done(function (e1) {
                renderTable(e1.result);
            });
        });
    </script>
The result of the above code example is illustrated as follows.
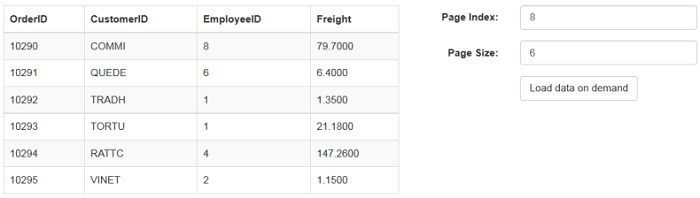
Load on demand {:.caption}
The request and the response for the above code is send as follows.
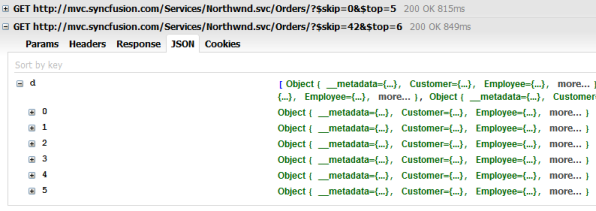
Demanded data {:.caption}
Custom Request Headers
You can add custom request headers using DataManager and the headers can be added to the request headers in three ways that is illustrated in the following code example.
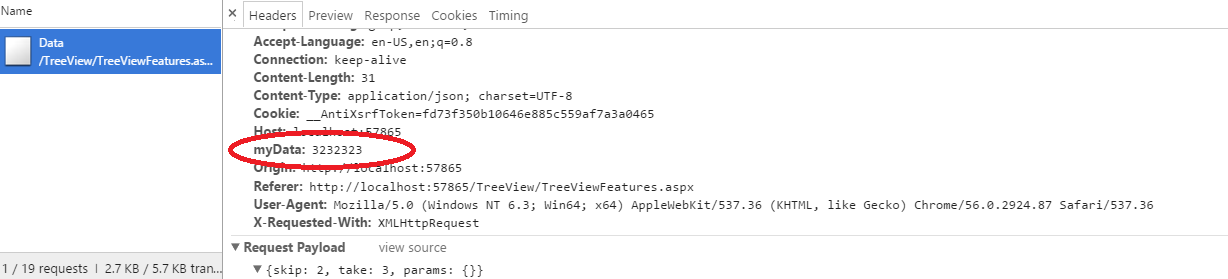
Adding Custom Request Headers to every Request using headers
You can add custom request headers to every request made by the DataManager using the headers property. Refer to the following code example for setting the custom request headers using the headers property.
<div class="datatable" style="padding:10px">
        <table id="table1" class="table table-striped table-bordered" style="width:700px" >
            <thead>
            <tr>
                <th>Order ID</th>
                <th>Customer ID</th>
                <th>Employee ID</th>
            </tr>
            </thead>
            <tbody></tbody>
        </table>
    </div>
    <script type="text/javascript">
        $(function () {
            var dataManager1 = ej.DataManager({
            url: "TreeViewFeatures.aspx/Data",
            adaptor: new ej.UrlAdaptor(),
            headers: [{ "myData": 3232323 }] });
            var query = ej.Query().take(3).skip(2);
            var execute = dataManager1.executeQuery(query) // executing query
            .done(function (e) {
                renderTable(e.result);
            });
        });
        // This function can be better replaced with any template engine. We used this for simplicity in demo.
        function renderTable(data) {
            var tableBody = "", row;
            for (var i = 0; i < data.length; i++) {
                row = data[i];
                tableBody += String.format("<tr><td>{0}</td><td>{1}</td><td>{2}</td></tr>", row.OrderID, row.CustomerID, row.EmployeeID);
            }
            $(".table tbody").html(tableBody);
        }
    </script>
The above method generates the request header with custom header as follows.
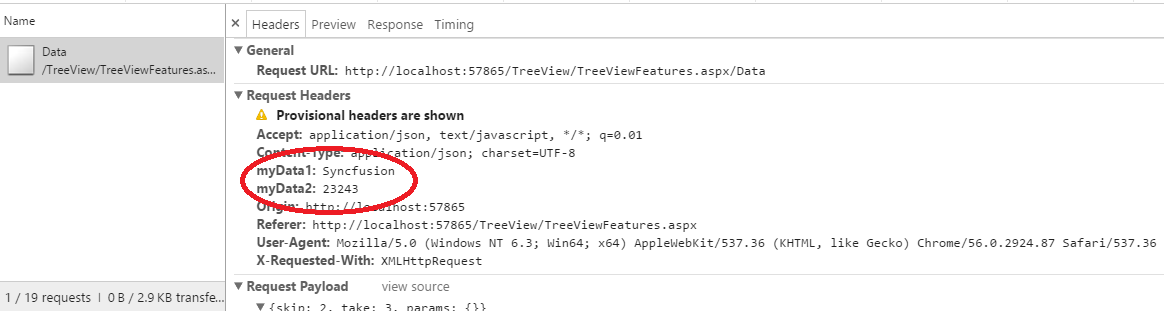
Adding Custom Request Headers to every Request using pre-request callback beforeSend
You can set the custom headers using pre-request callback beforeSend as follows. The setRequestHeader method can be used to modify the XMLHTTPRequest.
<div class="datatable" style="padding:10px">
        <table id="table1" class="table table-striped table-bordered" style="width:700px" >
            <thead>
            <tr>
                <th>Order ID</th>
                <th>Customer ID</th>
                <th>Employee ID</th>
            </tr>
            </thead>
            <tbody></tbody>
        </table>
    </div>
    <script type="text/javascript">
        $(function () {
            var customAdaptor = new ej.UrlAdaptor().extend({
                beforeSend: function (request, settings) {
                    settings.setRequestHeader("myData1", "Syncfusion");
                    settings.setRequestHeader("myData2", 23243);

                }
            });

            var dataManager1 = ej.DataManager({ url: "TreeViewFeatures.aspx/Data", adaptor: new customAdaptor() });
            var query = ej.Query().take(3).skip(2);
            var execute = dataManager1.executeQuery(query) // executing query
                    .done(function (e) {
                        renderTable(e.result);
                    });
        });
    </script>
The above method generates the request header with custom header as follows.
Adding Custom Request Headers using addParams method
You can use the addParams method of ej.Query class, to add custom parameter to the data request.
<div class="datatable" style="padding:10px">
        <table id="table1" class="table table-striped table-bordered" style="width:700px" >
            <thead>
            <tr>
                <th>Order ID</th>
                <th>Customer ID</th>
                <th>Employee ID</th>
            </tr>
            </thead>
            <tbody></tbody>
        </table>
    </div>
    <script type="text/javascript">
        $(function () {
            var dataManager1 = ej.DataManager({
            url: "TreeViewFeatures.aspx/Data",
            adaptor: new ej.UrlAdaptor() });
            var query = ej.Query().take(3).skip(2).addParams("Syncfusion", true);
            var execute = dataManager1.executeQuery(query) // executing query
            .done(function (e) {
                renderTable(e.result);
            });
        });
        // This function can be better replaced with any template engine. We used this for simplicity in demo.
        function renderTable(data) {
            var tableBody = "", row;
            for (var i = 0; i < data.length; i++) {
                row = data[i];
                tableBody += String.format("<tr><td>{0}</td><td>{1}</td><td>{2}</td></tr>", row.OrderID, row.CustomerID, row.EmployeeID);
            }
            $(".table tbody").html(tableBody);
        }
    </script>
The custom parameter will be passed along with the data request of the grid as follows.

Cross domain & JSONP
The DataManager contains support for creating cross domain request, you can achieve this by using crossDomain and jsonp property of the DataManager. The following code example illustrate on how to create cross domain request.
<div class="datatable">
        <table id="table1" class="table table-striped table-bordered" style="width:700px">
            <thead>
            <tr>
                <th>Order ID</th>
                <th>Customer ID</th>
                <th> EmployeeID </th>
            </tr>
            </thead>
            <tbody></tbody>
        </table>
    </div>
    <script type="text/javascript">
        var dataManager, query, tempQuery;
        $(function () {
            dataManager = ej.DataManager({
                url: "http://mvc.syncfusion.com/Services/Northwnd.svc/Orders",
                crossDomain:true });
            query = ej.Query().page(1, 5);
            var dataSource = dataManager.executeQuery(query).done(function (args) {
                renderTable(args.result);
            });
        });
        // This function can be better replaced with any template engine. We used this for simplicity in demo.
        function renderTable(data) {
            var tableBody = "", row;
            for (var i = 0; i < data.length; i++) {
                row = data[i];
                tableBody += String.format("<tr><td>{0}</td><td>{1}</td><td>{2}</td></tr>", row.OrderID, row.CustomerID, row.EmployeeID);
            }
            $(".table tbody").html(tableBody);
        }
    </script>
Result of above code example is illustrated as follows.
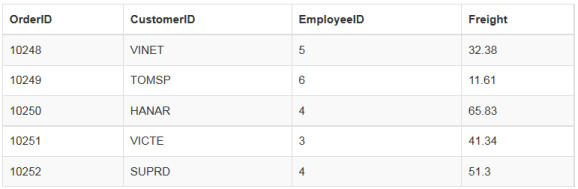
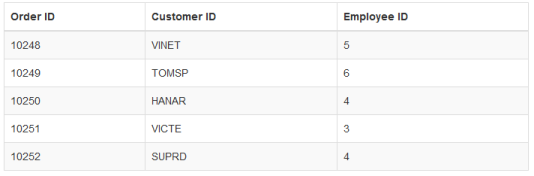
HTML Table
Other than JSON and Remote datasource, the DataManager can also fetch and use data from HTML element. You can achieve this by using the table property of the DataManager. The DataManager can fetch data from the HTML table element.
Refer to the following code example for the HTML element binding using DataManager.
<div class="datatable" style="padding:10px">
        <table id="datasource" style="display:none">
            <thead>
            <tr>
                <th>OrderID</th>
                <th>EmployeeID</th>
                <th>CustomerID</th>
            </tr>
            </thead>
            <tbody>
            <tr>
                <td>10248</td>
                <td>VINET</td>
                <td>5</td>
            </tr>
            <tr>
                <td>10249</td>
                <td>TOMSP</td>
                <td>6</td>
            </tr>
            <tr>
                <td>10250</td>
                <td>HANAR</td>
                <td>4</td>
            </tr>
            <tr>
                <td>10251</td>
                <td>VICTE</td>
                <td>3</td>
            </tr>
            <tr>
                <td>10252</td>
                <td>SUPRD</td>
                <td>4</td>
            </tr>
            </tbody>
        </table>
        <table id="table1" class="table table-striped table-bordered" style="width:700px">
            <thead>
            <tr>
                <th>Order ID</th>
                <th>Customer ID</th>
                <th>Employee ID</th>
            </tr>
            </thead>
            <tbody></tbody>
        </table>
    </div>
   <script type="text/javascript">
        $(function () {
            var dataManager = ej.DataManager({ table:$("#datasource") });
            var query = new ej.Query();
            var promise = dataManager.executeQuery(query);
            promise.done(function (e) {
                renderTable(e.result);
            });

        });
        function renderTable(data) {
            var tableBody = "", row;
            for (var i = 0; i < data.length; i++) {
                row = data[i];
                tableBody += String.format("<tr><td>{0}</td><td>{1}</td><td>{2}</td></tr>", row.OrderID, row.CustomerID, row.EmployeeID);
            }
            $(".table tbody").html(tableBody);
        }
   </script>
The result of the above code example is illustrated as follows.