Getting Started
5 Mar 202121 minutes to read
Essential Calculate can be configured in a web HTML page by using the following steps,
-
Create a
HTMLfile and add the following code templates,<!DOCTYPE html> <html> <head> <!--Add scripts and CSS files here --> </head> <body> <!--- Create CalcEngine object Here ---> </body> </html> -
Add scripts files and
CSSfile into thetitletag of the createdHTMLpage,<head> <meta name="viewport" content="width=device-width, initial-scale=1.0" charset="utf-8" /> <!-- Style sheet for default theme (flat azure) --> <link href="http://cdn.syncfusion.com/13.2.0.29/js/web/gradient-saffron-dark/ej.web.all.min.css" rel="stylesheet" /> <!--Scripts--> <script src="http://cdn.syncfusion.com/js/assets/external/jquery-1.10.2.min.js"></script> <script src="http://cdn.syncfusion.com/js/assets/external/jquery.easing.1.3.min.js"></script> <!—The below script have the reference of ejCalculate --> <script src="http://cdn.syncfusion.com/13.2.0.29/js/web/ej.web.all.min.js"></script> <!--Add custom scripts here --> </head>
Calculating a simple equation
This section explains about calculating a simple equation 2*SQRT(25) + SIN(RADIANS(90)) using calculate engine and getting 11 as a result.
Creating calculate object
The calculate engine will be created within the body tag like below,
<body>

<script type="text/javascript">
   <!--- Create CalcEngine object Here --->
var calcObj = new CalcEngine();
   <!--- compute formula code --->
</script>
 </body>
Here, the CalcEngine is instantiated with empty constructor. If any control needs to be integrated with CalcEngine, that control can be passed as parameter of constructor.
Computing formulas
The parseAndComputeFormula method will be used evaluate the equation 2*SQRT(25) + SIN(RADIANS(90)) and return the calculated value in a string format.
<body>
<script type="text/javascript">
   <!--- code after CalcEngine object --->
var result= calcObj.parseAndComputeFormula("2*SQRT(25)+SIN(RADIANS(90)));
 </body>
Performing calculation with sheet
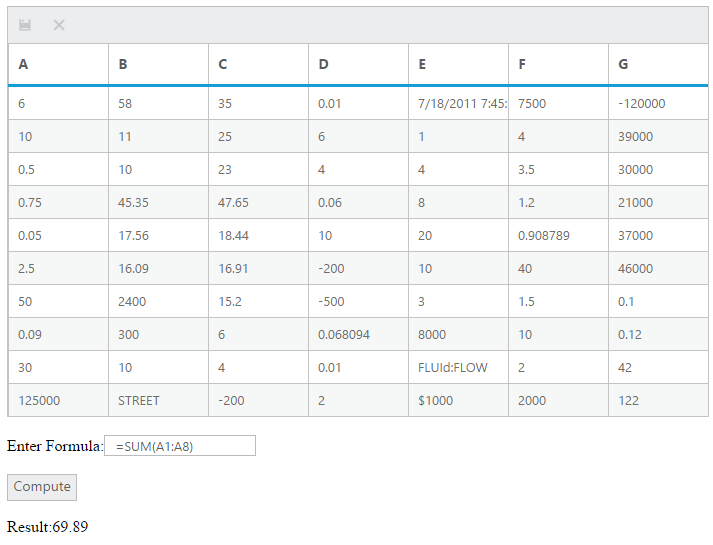
Any grid can be registered as a worksheet. When an equation have cell references =SUM(A1:A8) as a part, the source grid can be integrated into CalcEngine and registered as worksheet.
The HTML codes templates and scripts which is described above can be used before registering the grid. After that, the needed text boxes and labels are coded with the Body tag.
<div class="row">

<!--- text box for entering formula --->
<div class="tdcls">
      <input id="formulaTxt" class="e-ejinputtext" type="text" value="" />
    </div>
</div>
<!--- compute button --->
<div class="row">
    <div class="col-md-3">
        <input type="button" value="Compute" />
    </div>
</div>
<!--- for result --->
<div class="row" id="result">
    <div class="tempcalcBox">
    </div>
</div>
The classes defined in the div tag are css style. Those code are as follows,
<style type="text/css" class="cssStyles">

        .calcBox
        {
            margin-left: 5px;
            margin-top: 5px;
            height : auto;
        }

         .tempcalcBox
        {
            margin-left: 5px;
            margin-top: 5px;
            height : 10px;
        }

         .formulaTxt
         {
             width: 100%;
         }

        .tdcls {
            width: 100%;
        }
</style>
Then, the data for the grid can be populated for using it as cell references while using formulas.
And, the grid will be configured with dataSource.
<script type="text/javascript">

        $(function () {

        var griddata = [{ serialNumber: 1, a: 6, b: 58, c: 35, d: 0.01, e: "7/18/2011 7:45:05 AM", f: 7500, g:-120000 },
        { serialNumber: 2, a: 10, b: 11, c: 25, d: 6, e: 1, f: 4, g:39000 },
        { serialNumber: 3, a: 0.5, b: 10, c: 23, d: 4, e: 4, f: 3.5, g:30000 },
        { serialNumber: 4, a: 0.75, b: 45.35, c: 47.65, d: 0.06, e: 8, f: 1.2, g:21000 },
        { serialNumber: 5, a: 0.05, b: 17.56, c: 18.44, d: 10, e: 20, f: 0.908789, g:37000 },
        { serialNumber: 6, a: 2.5, b: 16.09, c: 16.91, d: -200, e: 10, f: 40, g:46000 },
        { serialNumber: 7, a: 50, b: 2400, c: 15.20, d: -500, e: 3, f: 1.5, g:0.1 },
        { serialNumber: 8, a: 0.09, b: 300, c: 6, d: 0.068094, e: 8000, f: 10, g:0.12 },
        { serialNumber: 9, a: 30, b: 10, c: 4, d: 0.01, e: "FLUId:FLOW", f: 2, g:42 },
        { serialNumber: 10, a: 125000, b: "STREET", c: -200, d: 2, e: "$1000", f: 2000, g:122}]

var element = $("#Grid");
element.ejGrid({
   dataSource: griddata,
   editSettings:{allowEditing: true,
        allowAdding: true,
editMode: ej.Grid.EditMode.Batch,
},
columns: [
 { field: "serialNumber", headerText: "serialNumber", isPrimaryKey: true, visible: false },
 { field: "a", headerText: "A", type: "string" },
 { field: "b", headerText: "B", type: "string" },
 { field: "c", headerText: "C", type: "string" },
 { field: "d", headerText: "D", type: "string" },
 { field: "e", headerText: "E", type: "string" },
 { field: "f", headerText: "F", type: "string" },
 { field: "g", headerText: "G", type: "string" }
        ],
toolbarSettings: { showToolbar: true,
              toolbarItems: ['update', 'cancel'] },
            });
Registering a grid
A grid can be integrated into CalcEngine by passing it through constructor. Similarly, the grid can be registered as a worksheet for identifying the cell references.
<body>
<script type="text/javascript">
   <!--- Create CalcEngine object Here --->
var calcObj = new CalcEngine($("#Grid"));
calcObj.setUseDependencies(true);
calcObj.registerGridAsSheet("Sheet1", $("#Grid"), "0");
calcObj.cell = "G10";

calcObj.addNamedRange("SUMRANGE", "Sheet1!$B$1:$B$3")

calcObj.addNamedRange("FIRSTCELL", "Sheet1!A1")
<!--- other codes --->
 </body>
Here the dependencies can be enabled by setting UseDependencies property to true. Also, named ranges can be added to simplify the formula.
Transfer the grid data to cell references
The methods SetValueRowCol and GetValueRowCol act as intermediate to transfer the data between CalcEngine and the Grid. These code can be written after sheet has been registered into CalcEngine.
<script type="text/javascript">
<!--- other codes --->
calcObj.getValueRowCol = function (sheetID,row, col) {
            var gridData = $("#Grid").data("ejGrid");
            var rowData = $("#Grid").data("ejGrid").model.dataSource[Number(row) - 1];
            if (gridData.batchChanges.changed.length > 0) {
                for (var i in gridData.batchChanges.changed) {
                    if (gridData.batchChanges.changed[i].serialNumber == rowData.serialNumber) {
                        rowData = gridData.batchChanges.changed[i];
                        break;
                    }
                }
            }
            var data = "";
            switch (col) {
                case 1:
                    data = rowData.a;
                    break;
                case 2:
                    data = rowData.b;
                    break;
                case 3:
                    data = rowData.c;
                    break;
                case 4:
                    data = rowData.d;
                    break;
                case 5:
                    data = rowData.e;
                    break;
                case 6:
                    data = rowData.f;
                    break;
                case 7:
                    data = rowData.g;
                    break;
                default:
                    data = "";
                    break;
            }
            return data;
        }
Here is the code for setValueRowCol,
calcObj.setValueRowCol = function (sheetID, value, row, col) {
            //var rowData = grid.model.currentViewData[Number(row) - 1];
            var rowData = $("#Grid").data("ejGrid").model.dataSource[Number(row) - 1];
            var data = "";
            switch (col) {
                case 1:
                    rowData.a = value;
                    break;
                case 2:
                    rowData.b = value;
                    break;
                case 3:
                    rowData.c = value;
                    break;
                case 4:
                    rowData.d = value;
                    break;
                case 5:
                    rowData.e = value;
                    break;
                case 6:
                    rowData.f = value;
                    break;
                case 7:
                    rowData.g = value;
                    break;
                default:
                    break;
            }
        }

</script>
Evaluating formula
The given formula in the text box can be evaluated using parseAndComputeFormula by clicking on the compute button.
$("input:button").ejButton({
click: function (args) {
if (document.activeElement.value == "Compute") {
try
{
    var value = calcObj.parseAndComputeFormula($("#formulaTxt").val());     document.getElementById("result").innerHTML = value;
}
catch(ex)
{
	alert(ex.message);
}
}
<!--- grid’s Ok icon code --->
else if (document.activeElement.value == "OK") {
$("#Grid").data("ejGrid")._triggerConfirm(args);
}
<!--- grids’s Cancel icon code --->
else if (document.activeElement.value == "Cancel") {  $("#Grid").data("ejGrid")._triggerConfirm(args);  }
}
});
Performing calculation using indexer method (CalcQuick)
The indexer method will provides options to directly parse and compute a formula, or register variable names that can later be used in more complex formulas involving these variables.
These registered variable names are indexer keys. In [C] = [A] + [B] * 10, the names A, B, C are indexer keys. The text boxes can be taken for registering it as keys. Here is the HTML code for text boxes inside div tag.
<div>

 <input type="text" id="txtBoxA" />

 <input type="text" id="txtBoxB" />

 <input type="text" id="txtBoxC" />

</div>
Register elements as keys
CalcQuick object can be created in the body tag. Each element is registered as the key or virtual references by using the setKeyValue method.
<script type="text/javascript">

 // … other codes
 var calculator = new CalcQuick();
 calculator.setKeyValue("A", document.getElementById("txtBoxA").value);
 calculator.setKeyValue("B", document.getElementById("txtBoxB").value);
 calculator.setKeyValue("C", document.getElementById("txtBoxC").value);

// .. other codes.

</script>
Assigning formulas and values
After registering keys, the formulas and values are assigned for the keys.
document.getElementById("txtBoxA").value = "12";
document.getElementById("txtBoxB").value = "3";
document.getElementById("txtBoxC").value = "= [A] + 2 * [B]";

// codes -> setDirty
Evaluate keys
The evaluation of keys can be triggered using setDirty method which will computes the formulas of the keys. The result will be returned through getKeyValue method.
//evaluating key formulas
calculator.setDirty();
document.getElementById("txtBoxA").value = calculator.getKeyValue("A");
document.getElementById("txtBoxB").value = calculator.getKeyValue("B");
document.getElementById("txtBoxC").value = calculator.getKeyValue("C");
After the code, the computed value will be returned in the txtBoxC. The formula of the key can be retrieved through getFormula(key) method.