Getting Started
17 Nov 201713 minutes to read
This section helps to understand the getting started of the Ember TreeGrid with the step-by-step instructions.
Getting started TreeGrid with Ember CLI
- To quick start with create a new Ember CLI application run the below commands in the command prompt.
> ember new EmberTreeGrid    // Create new Ember CLI app as 'EmberTreeGrid'

> cd EmberTreeGrid- Add syncfusion-ember in
package.jsonto add the Syncfusion Ember add-on into your applicationEmberTreeGrid.
"devDependencies": {
        ...
	    "syncfusion-ember":"*" //To install the latest version
}- Disable EXTEND_PROTOTYPES option in the environment.js file under config folder to prevent on function prototype extension in our controls events.
EmberENV: {
        FEATURES: {
            // Here you can enable experimental features on an ember canary build
            // e.g. 'with-controller': true
        },
        EXTEND_PROTOTYPES: false,
},- Open the command prompt in the root folder and run the command
npm installto download the dependent files in node-modules.
Configure Syncfusion source and theme reference
- Copy the files
ej.web.all.minandjsrender.mininto thevendorfolder. Import the same into the application using below code inember-cli-build.js.
module.exports = function(defaults) {
        var app = new EmberApp(defaults, {
            // Add options here
        });
        app.import('vendor/ej.web.all.min.js');
        app.import('vendor/jsrender.min.js');
        return app.toTree();
};- Create the folder
scriptsandcontentin public folder and copy JavaScript and CSS files from/scriptsand/contentfolder which is in JavaScript samples location(Click explore button from the Javascript Dashboard)into created folders. And include the necessary file references in Index page which is inappfolder of the Ember application.
<head>
        <link rel="stylesheet" href="content/ejthemes/default-theme/ej.web.all.min.css">
    </head>
    <body>
    </body>
Configure the routes for the Router
- Use the below commands in the command prompt for generate routing to create template
default.hbsfile in templates folder and routerdefault.jsfile in routes folder. It also add the routing content inrouter.js.
> ember generate route treegrid/default // Defining routesCreate TreeGrid sample in Ember CLI Application
- Use below code in
default.hbsin templates folder to render the TreeGrid.
{{ej-treegrid id="TreeGridDefault"
                e-dataSource=model.dataSource
                e-childMapping="subtasks"
                e-treeColumnIndex= 1
                e-isResponsive=true
                e-columns=model.columns
}}- Use the below code in
default.jsin routes folder to bind the model to the TreeGrid.
import Route from '@ember/routing/route';
let sampleData = [
{
taskID: 1,
taskName: "Planning",
startDate: new Date("02/03/2014"),
endDate: new Date("02/07/2014"),
progress: 100,
duration: 5,
priority: "Normal",
approved: false,
subtasks: [
{ taskID: 2, taskName: "Plan timeline", startDate: new Date("02/03/2014"), endDate: new Date("02/07/2014"), duration: 5, progress: 100, priority: "Normal", approved: false },
{ taskID: 3, taskName: "Plan budget", startDate: new Date("02/03/2014"), endDate: new Date("02/07/2014"), duration: 5, progress: 100, approved: true },
{ taskID: 4, taskName: "Allocate resources", startDate: new Date("02/03/2014"), endDate: new Date("02/07/2014"), duration: 5, progress: 100, priority: "Critical", approved: false },
{ taskID: 5, taskName: "Planning complete", startDate: new Date("02/07/2014"), endDate: new Date("02/07/2014"), duration: 0, progress: 0, priority: "Low", approved: true }
]
},
{
taskID: 6,
taskName: "Design",
startDate: new Date("02/10/2014"),
endDate: new Date("02/14/2014"),
duration: 3,
progress: 86,
priority: "High",
approved: false,
subtasks: [
{ taskID: 7, taskName: "Software Specification", startDate: new Date("02/10/2014"), endDate: new Date("02/12/2014"), duration: 3, progress: 60, priority: "Normal", approved: false },
{ taskID: 8, taskName: "Develop prototype", startDate: new Date("02/10/2014"), endDate: new Date("02/12/2014"), duration: 3, progress: 100, priority: "Critical", approved: false },
{ taskID: 9, taskName: "Get approval from customer", startDate: new Date("02/13/2014"), endDate: new Date("02/14/2014"), duration: 2, progress: 100, approved: true },
{ taskID: 10, taskName: "Design Documentation", startDate: new Date("02/13/2014"), endDate: new Date("02/14/2014"), duration: 2, progress: 100, approved: true }
]
}
];
export default Route.extend({
model() {
return {
dataSource: sampleData,
columns: [
{ field: "taskID", headerText: "Task Id", editType: "numericedit" },
{ field: "taskName", headerText: "Task Name", editType: "stringedit" },
{ field: "startDate", headerText: "Start Date", editType: "datepicker" },
{ field: "endDate", headerText: "End Date", editType: "datepicker" },
{ field: "duration", headerText: "Duration", editType: "numericedit" },
{ field: "progress", headerText: "Progress", editType: "numericedit" }
],
}
}
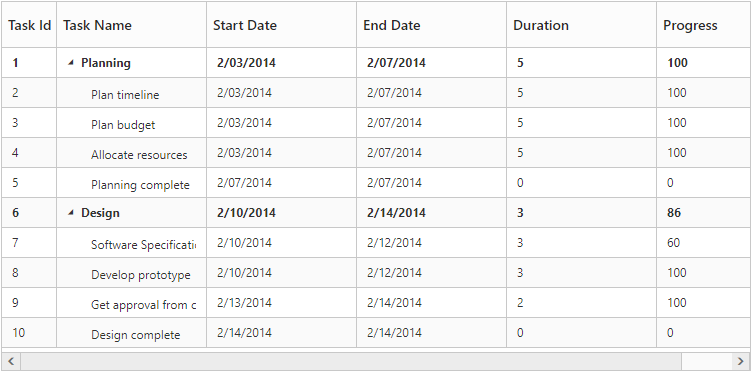
});A TreeGrid Control is created as shown in the following screen shot.
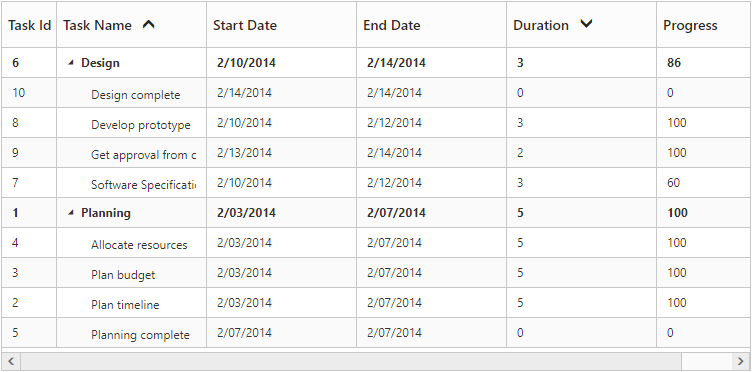
Enable Sorting
The TreeGrid control has sorting functionality, to arrange the data in ascending or descending order based on a particular column.
Multicolumn Sorting
Enable the multicolumn sorting in TreeGrid by setting allowMultiSorting as true. You can sort multiple columns in TreeGrid, by selecting the desired column header while holding the Ctrl key.
{{ej-treegrid id="TreeGridControl"
    e-allowSorting=true
    e-allowMultiSorting=true
}}
Enable Editing
You can enable Editing in TreeGrid by using the editSettings property as follows.
{{ej-treegrid id="TreeGridControl"
    e-editSettings=model.editsettings
}}export default Route.extend({
model() {
return {
editsettings : {
allowAdding: true,
allowEditing: true,
allowDeleting: true,
editMode: 'cellEditing',
rowPosition: 'belowSelectedRow'
}
}
}
});And also, the following editors are provided for editing support in TreeGrid control.
- string
- boolean
- numeric
- dropdown
- datepicker
- datetimepicker
You can set the editor type for a particular column as follows.
{{ej-treegrid id="TreeGridControl">
//..
    e-columns=model.columns
}}export default Route.extend({
model() {
return {
columns: [
{ field: "taskID", headerText: "Task Id", editType: "numericedit" },
{ field: "taskName", headerText: "Task Name", editType: "stringedit" },
{ field: "startDate", headerText: "Start Date", editType: "datepicker" },
{ field: "endDate", headerText: "End Date", editType: "datepicker" },
{ field: "duration", headerText: "Duration", editType: "numericedit" },
{ field: "progress", headerText: "Progress", editType: "numericedit" }
],
}
}
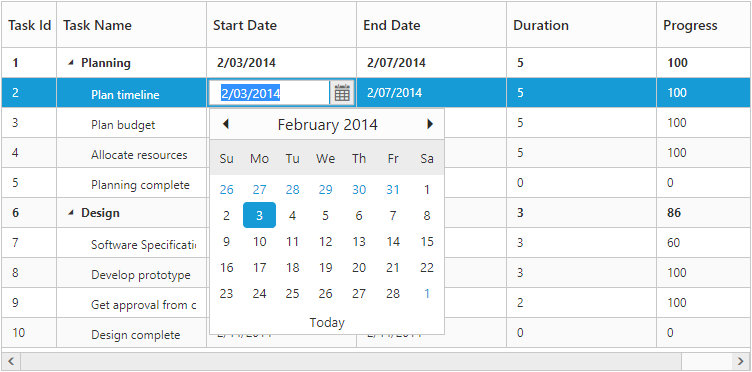
});The output of the DatePicker editor in TreeGrid control is as follows.
Build or Run the Ember CLI application.
-
To Build the Ember CLI application using the command
ember buildwhich builds the application and creates thedistfolder. Now you can host thedistfolder in IIS. -
To Run the Ember CLI application using the command
ember serverwhich builds the application and creates thedistfolder. However it hosts the application in the urlhttp://localhost:4200. -
Open the browser and navigates to
http://localhost:4200/treegrid/default.