Table format in TypeScript DOCX Editor
28 Aug 20266 minutes to read
TypeScript DOCX Editor (Document Editor) customizes the formatting of a table or table cells such as table width, cell margins, cell spacing, background color, and table alignment. This section describes how to customize these formats for selected cells, rows, or a table in detail.
Cell margins
You can customize the cell margins by using the following sample code.
//To change the left margin
documenteditor.selection.cellFormat.leftMargin = 5.4;
//To change the right margin
documenteditor.selection.cellFormat.rightMargin = 5.4;
//To change the top margin
documenteditor.selection.cellFormat.topMargin = 5.4;
//To change the bottom margin
documenteditor.selection.cellFormat.bottomMargin = 5.4;
You can also define the default cell margins for a table. If the specific cell margin value is not defined explicitly in the cell formatting, the corresponding value will be retrieved from the default cell margins of the table. Refer to the following sample code.
//To change the left margin
documenteditor.selection.tableFormat.leftMargin = 5.4;
//To change the right margin
documenteditor.selection.tableFormat.rightMargin = 5.4;
//To change the top margin
documenteditor.selection.tableFormat.topMargin = 5.4;
//To change the bottom margin
documenteditor.selection.tableFormat.bottomMargin = 5.4;
Background color
You can explicitly set the background color of selected cells using the following sample code.
documenteditor.selection.cellFormat.background = '#E0E0E0';Refer to the following sample code to customize the background color of the table.
documenteditor.selection.tableFormat.background = '#E0E0E0';Cell spacing
Refer to the following sample code to customize the spacing between each cell in a table.
documenteditor.selection.tableFormat.cellSpacing = 2;Cell vertical alignment
The content is aligned within a table cell to ‘Top’, ‘Center’, or ‘Bottom’. You can customize this property of selected cells. Refer to the following sample code.
documenteditor.selection.cellFormat.verticalAlignment = 'Bottom';Table alignment
The tables are aligned in DOCX Editor to ‘Left’, ‘Right’, or ‘Center’. Refer to the following sample code.
documenteditor.selection.tableFormat.tableAlignment = 'Center';Cell width
Set the desired width of table cells that will be considered when the table is laid out. Refer to the following sample code.
import { DocumentEditor, Editor, Selection, SfdtExport } from '@syncfusion/ej2-documenteditor';
//Inject the required module
DocumentEditor.Inject(Editor, Selection, SfdtExport);
let documenteditor: DocumentEditor = new DocumentEditor({
    isReadOnly: false,
    enableSelection: true,
    enableEditor: true,
    enableSfdtExport: true
});
documenteditor.appendTo('#DocumentEditor');
documenteditor.editor.insertTable(2, 2);
//To change the width of a cell
documenteditor.selection.cellFormat.preferredWidthType = 'Point';
documenteditor.selection.cellFormat.preferredWidth = 100;
Table width
You can set the desired width of a table in ‘Point ‘or ‘Percent’ type. Refer to the following sample code.
import { DocumentEditor, Editor, Selection, SfdtExport } from '@syncfusion/ej2-documenteditor';
//Inject the required module
DocumentEditor.Inject(Editor, Selection, SfdtExport);
let documenteditor: DocumentEditor = new DocumentEditor({
    isReadOnly: false,
    enableSelection: true,
    enableEditor: true,
    enableSfdtExport: true
});
documenteditor.appendTo('#DocumentEditor');
documenteditor.editor.insertTable(2, 2);
//To change the width of a table
documenteditor.selection.tableFormat.preferredWidthType = 'Point';
documenteditor.selection.tableFormat.preferredWidth = 300;
Apply borders
DOCX Editor exposes API to customize the borders for table cells by specifying the settings. Refer to the following sample code.
import { DocumentEditor, Editor, Selection, SfdtExport, BorderSettings } from '@syncfusion/ej2-documenteditor';
//Inject the required module
DocumentEditor.Inject(Editor, Selection, SfdtExport);
let documenteditor: DocumentEditor = new DocumentEditor({
    isReadOnly: false,
    enableSelection: true,
    enableEditor: true,
    enableSfdtExport: true
});
documenteditor.appendTo('#DocumentEditor');
documenteditor.editor.insertTable(2, 2);
//To apply border
let borderSettings: BorderSettings = {
    type: 'AllBorders',
    lineWidth: 12
};
documenteditor.editor.applyBorders(borderSettings);
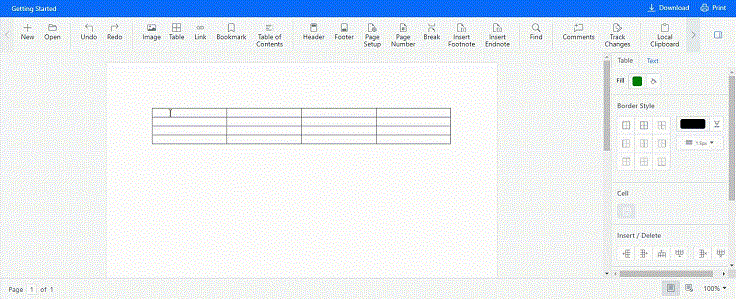
Please check the below gif which illustrates how to apply a border for selected cells through the properties pane options - border color, line size, and no border:
Working with row formatting
DOCX Editor allows various row formatting such as height and repeat header.
Row height
You can customize the height of a table row as ‘Auto’, ‘AtLeast’, or ‘Exactly’. Refer to the following sample code.
import { DocumentEditor, Editor, Selection, SfdtExport } from '@syncfusion/ej2-documenteditor';
//Inject the required module
DocumentEditor.Inject(Editor, Selection, SfdtExport);
let documenteditor: DocumentEditor = new DocumentEditor({
    isReadOnly: false,
    enableSelection: true,
    enableEditor: true,
    enableSfdtExport: true
});
documenteditor.appendTo('#DocumentEditor');
documenteditor.editor.insertTable(2, 2);
//To change row height of first row
documenteditor.selection.rowFormat.heightType = 'Exactly';
documenteditor.selection.rowFormat.height = 20;
Header row
The header row describes the content of a table. A table can optionally have a header row. Only the first row of a table can be the header row. If the cursor position is at the first row of the table, then you can define whether it is a header row or not, using the following sample code.
documenteditor.selection.rowFormat.isHeader = true;Allow row break across pages
This property is valid if a table row does not fit in the current page during table layout. It defines whether a table row can be allowed to break. If the value is false, the entire row will be moved to the start of the next page. You can modify this property for selected rows using the following sample code.
documenteditor.selection.rowFormat.allowRowBreakAcrossPages = false;Title
DOCX Editor exposes API to get or set the table title of the selected table. Refer to the following sample code to set title.
documenteditor.selection.tableFormat.title = 'Shipping Details';Description
DOCX Editor exposes API to get or set the table description of the selected table. Refer to the following sample code to set description.
documenteditor.selection.tableFormat.description = 'Freight cost and shipping details';Online Demo
Explore how to format tables in Word documents using the JavaScript DOCX Editor in this live JavaScript Table Format demo.