Getting Started with JavaScript DOCX Editor
28 Aug 20268 minutes to read
JavaScript DOCX Editor (Document Editor) enables you to create, edit, view, and print Word documents in web applications. This section guides you through the steps to get started and create a DOCX Editor in a JavaScript (ES5) application.
Prerequisites
Create a JavaScript application
Create a folder named documenteditor-app with index.html and index.js files with the default structure. Your application structure should look like this:
  documenteditor-app/
  ├── index.html
  └── index.js
Add DOCX Editor resources
Add the required DOCX Editor style and script references to the index.html file using one of the following methods:
To use local scripts and styles for the DOCX Editor, follow these steps:
-
Download and install the DOCX Editor SDK.
-
Create a
resourcesfolder in your application (for example,documenteditor-app/resources). -
From the installed SDK location, copy the required packages from the following folder into the
resourcesfolder:
<Install path>/Syncfusion/Essential Studio/DOCX Editor SDK/{VERSION}/Web (Essential JS 2)/JavaScript
Replace
{VERSION}in the path above with the installed DOCX Editor SDK version (for example,34.1.29). Use the same version segment in the CDN URLs in the next tab to keep the local and CDN resources in sync.
- After copying the files, add the DOCX Editor and its dependent control style and script references at the end of the <head> section in the
index.htmlfile.
<!-- DOCX Editor dependent theme -->
<link href="resources/ej2-base/styles/tailwind3.css" rel="stylesheet" type="text/css" />
<link href="resources/ej2-buttons/styles/tailwind3.css" rel="stylesheet" type="text/css" />
<link href="resources/ej2-inputs/styles/tailwind3.css" rel="stylesheet" type="text/css" />
<link href="resources/ej2-popups/styles/tailwind3.css" rel="stylesheet" type="text/css" />
<link href="resources/ej2-lists/styles/tailwind3.css" rel="stylesheet" type="text/css" />
<link href="resources/ej2-navigations/styles/tailwind3.css" rel="stylesheet" type="text/css" />
<link href="resources/ej2-splitbuttons/styles/tailwind3.css" rel="stylesheet" type="text/css" />
<link href="resources/ej2-dropdowns/styles/tailwind3.css" rel="stylesheet" type="text/css" />
<!-- DOCX Editor theme -->
<link href="resources/ej2-documenteditor/styles/tailwind3.css" rel="stylesheet" type="text/css" />
<!-- DOCX Editor dependent scripts -->
<script src="resources/ej2-base/dist/global/ej2-base.min.js" type="text/javascript"></script>
<script src="resources/ej2-data/dist/global/ej2-data.min.js" type="text/javascript"></script>
<script src="resources/ej2-svg-base/dist/global/ej2-svg-base.min.js" type="text/javascript"></script>
<script src="resources/ej2-file-utils/dist/global/ej2-file-utils.min.js" type="text/javascript"></script>
<script src="resources/ej2-compression/dist/global/ej2-compression.min.js" type="text/javascript"></script>
<script src="resources/ej2-pdf-export/dist/global/ej2-pdf-export.min.js" type="text/javascript"></script>
<script src="resources/ej2-buttons/dist/global/ej2-buttons.min.js" type="text/javascript"></script>
<script src="resources/ej2-popups/dist/global/ej2-popups.min.js" type="text/javascript"></script>
<script src="resources/ej2-splitbuttons/dist/global/ej2-splitbuttons.min.js" type="text/javascript"></script>
<script src="resources/ej2-inputs/dist/global/ej2-inputs.min.js" type="text/javascript"></script>
<script src="resources/ej2-lists/dist/global/ej2-lists.min.js" type="text/javascript"></script>
<script src="resources/ej2-navigations/dist/global/ej2-navigations.min.js" type="text/javascript"></script>
<script src="resources/ej2-dropdowns/dist/global/ej2-dropdowns.min.js" type="text/javascript"></script>
<script src="resources/ej2-calendars/dist/global/ej2-calendars.min.js" type="text/javascript"></script>
<script src="resources/ej2-charts/dist/global/ej2-charts.min.js" type="text/javascript"></script>
<script src="resources/ej2-office-chart/dist/global/ej2-office-chart.min.js" type="text/javascript"></script>
<!-- DOCX Editor script -->
<script src="resources/ej2-documenteditor/dist/global/ej2-documenteditor.min.js" type="text/javascript"></script>
Reference the scripts and styles directly from the CDN and add at the end of the <head> section in the index.html file.
Script: https://cdn.syncfusion.com/ej2/{VERSION}/{PACKAGE_NAME}/dist/global/{PACKAGE_NAME}.min.js
Style: https://cdn.syncfusion.com/ej2/{VERSION}/{PACKAGE_NAME}/styles/{THEME_NAME}.css
<!-- DOCX Editor dependent theme -->
<link href="https://cdn.syncfusion.com/ej2/34.1.29/ej2-base/styles/tailwind3.css" rel="stylesheet" type="text/css" />
<link href="https://cdn.syncfusion.com/ej2/34.1.29/ej2-buttons/styles/tailwind3.css" rel="stylesheet" type="text/css" />
<link href="https://cdn.syncfusion.com/ej2/34.1.29/ej2-inputs/styles/tailwind3.css" rel="stylesheet" type="text/css" />
<link href="https://cdn.syncfusion.com/ej2/34.1.29/ej2-popups/styles/tailwind3.css" rel="stylesheet" type="text/css" />
<link href="https://cdn.syncfusion.com/ej2/34.1.29/ej2-lists/styles/tailwind3.css" rel="stylesheet" type="text/css" />
<link href="https://cdn.syncfusion.com/ej2/34.1.29/ej2-navigations/styles/tailwind3.css" rel="stylesheet" type="text/css" />
<link href="https://cdn.syncfusion.com/ej2/34.1.29/ej2-splitbuttons/styles/tailwind3.css" rel="stylesheet" type="text/css" />
<link href="https://cdn.syncfusion.com/ej2/34.1.29/ej2-dropdowns/styles/tailwind3.css" rel="stylesheet" type="text/css" />
<!-- DOCX Editor theme -->
<link href="https://cdn.syncfusion.com/ej2/34.1.29/ej2-documenteditor/styles/tailwind3.css" rel="stylesheet" type="text/css" />
<!-- DOCX Editor dependent scripts -->
<script src="https://cdn.syncfusion.com/ej2/34.1.29/ej2-base/dist/global/ej2-base.min.js" type="text/javascript"></script>
<script src="https://cdn.syncfusion.com/ej2/34.1.29/ej2-data/dist/global/ej2-data.min.js" type="text/javascript"></script>
<script src="https://cdn.syncfusion.com/ej2/34.1.29/ej2-svg-base/dist/global/ej2-svg-base.min.js" type="text/javascript"></script>
<script src="https://cdn.syncfusion.com/ej2/34.1.29/ej2-file-utils/dist/global/ej2-file-utils.min.js" type="text/javascript"></script>
<script src="https://cdn.syncfusion.com/ej2/34.1.29/ej2-compression/dist/global/ej2-compression.min.js" type="text/javascript"></script>
<script src="https://cdn.syncfusion.com/ej2/34.1.29/ej2-pdf-export/dist/global/ej2-pdf-export.min.js" type="text/javascript"></script>
<script src="https://cdn.syncfusion.com/ej2/34.1.29/ej2-buttons/dist/global/ej2-buttons.min.js" type="text/javascript"></script>
<script src="https://cdn.syncfusion.com/ej2/34.1.29/ej2-popups/dist/global/ej2-popups.min.js" type="text/javascript"></script>
<script src="https://cdn.syncfusion.com/ej2/34.1.29/ej2-splitbuttons/dist/global/ej2-splitbuttons.min.js" type="text/javascript"></script>
<script src="https://cdn.syncfusion.com/ej2/34.1.29/ej2-inputs/dist/global/ej2-inputs.min.js" type="text/javascript"></script>
<script src="https://cdn.syncfusion.com/ej2/34.1.29/ej2-lists/dist/global/ej2-lists.min.js" type="text/javascript"></script>
<script src="https://cdn.syncfusion.com/ej2/34.1.29/ej2-navigations/dist/global/ej2-navigations.min.js" type="text/javascript"></script>
<script src="https://cdn.syncfusion.com/ej2/34.1.29/ej2-dropdowns/dist/global/ej2-dropdowns.min.js" type="text/javascript"></script>
<script src="https://cdn.syncfusion.com/ej2/34.1.29/ej2-calendars/dist/global/ej2-calendars.min.js" type="text/javascript"></script>
<script src="https://cdn.syncfusion.com/ej2/34.1.29/ej2-charts/dist/global/ej2-charts.min.js" type="text/javascript"></script>
<script src="https://cdn.syncfusion.com/ej2/34.1.29/ej2-office-chart/dist/global/ej2-office-chart.min.js" type="text/javascript"></script>
<!-- DOCX Editor script -->
<script src="https://cdn.syncfusion.com/ej2/34.1.29/ej2-documenteditor/dist/global/ej2-documenteditor.min.js" type="text/javascript"></script>
This example uses the
Tailwind 3theme. To use a different built-in theme, replace thetailwind3.cssreferences with the corresponding theme stylesheets. Refer to the Themes documentation for information about the available themes and the different ways to include theme styles in a JavaScript application. To generate customized resources, refer to the CRG documentation.
Register a Syncfusion License Key
Before initializing the JavaScript (ES5) DOCX Editor control, generate a Syncfusion license key and register it in your application.
Initialize the DOCX Editor
Add a container element for the DOCX Editor in the index.html file and then initialize the control in the <script> tag.
<!DOCTYPE html>
<html xmlns="http://www.w3.org/1999/xhtml">
<head>
    <title>Syncfusion JavaScript DOCX Editor</title>
    <!-- Add your style references here -->
</head>
<body>
    <!-- Element that renders the DOCX Editor -->
    <div id='DocumentEditor'></div>
    <script src="index.js" type="text/javascript"></script>
</body>
</html>
// Inject toolbar
ej.documenteditor.DocumentEditorContainer.Inject(ej.documenteditor.Toolbar);
// Initialize Document Editor Container component
var documenteditorContainer = new ej.documenteditor.DocumentEditorContainer({
enableToolbar: true,
height: '590px'
});
// Use the following service URL only for demo purposes
documenteditorContainer.serviceUrl = 'https://document.syncfusion.com/web-services/docx-editor/api/documenteditor/';
// Render the Document Editor Container
documenteditorContainer.appendTo('#DocumentEditor');The hosted Web API URL is for demo and evaluation purposes only. For production, host your own web service using the GitHub Web Service example or the Docker image.
Run the application
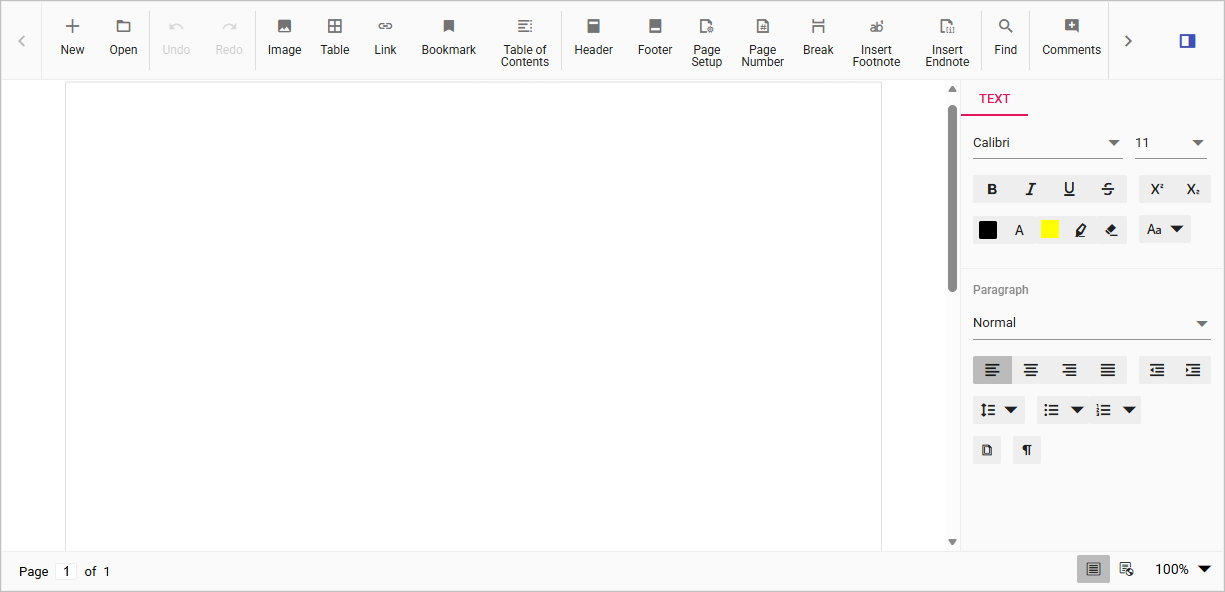
Open the index.html file in a web browser. The JavaScript (ES5) DOCX Editor is rendered with a toolbar and an editable document area, as shown below.
You can also explore the DOCX Editor interactively using the live sample below.
Online Demo
Explore how to create, edit, and print Word documents using the JavaScript (ES5) DOCX Editor in this live demo here.
Server-side dependencies
The DOCX Editor component requires server-side interactions for the following operations:
- Open file formats other than SFDT
- Paste with formatting
- Restrict editing
- Spell check
- Save as file formats other than SFDT and DOCX
If you don’t require the above functionalities, you can deploy the component as a pure client-side solution without any server-side interactions.
For detailed information about server-side dependencies, refer to the Web Services Overview page.