Create PowerPoint Document in Blazor
21 Jul 202624 minutes to read
Syncfusion® Essential® PowerPoint is a .NET Core PowerPoint library used to create, read, and edit PowerPoint documents programmatically without Microsoft PowerPoint or interop dependencies. Using this library, you can create a PowerPoint document in Blazor.
Blazor Web App Server Application
Prerequisites:
- Visual Studio 2022.
- Install .NET 8 SDK or later (.NET 8, .NET 9, and .NET 10 are supported).
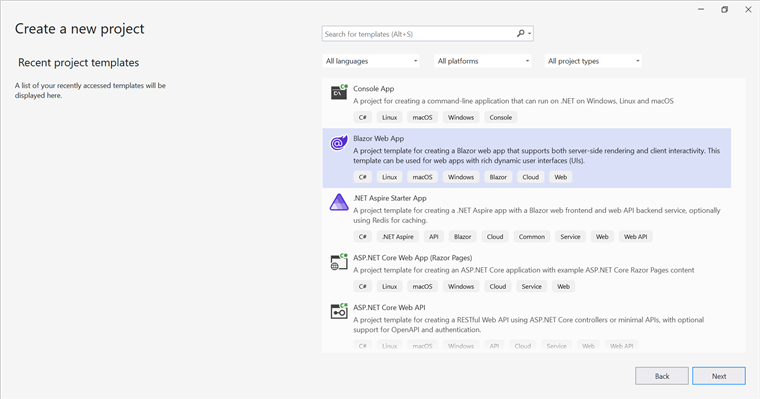
Step 1: Create a new C# Blazor Web app project.
- Select “Blazor Web App” from the template and click Next.
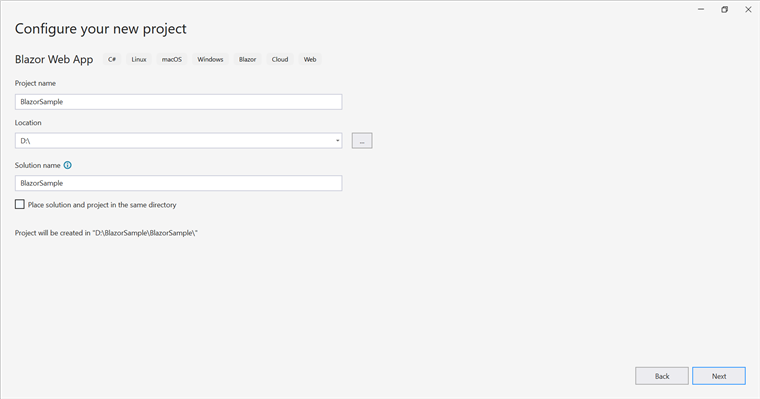
- Name the project and click Next.
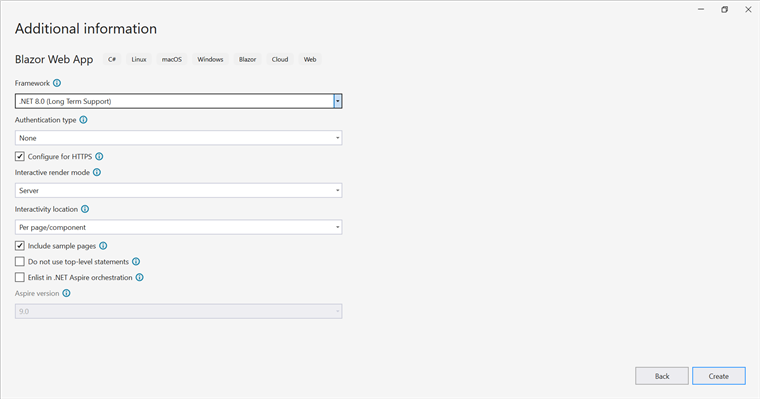
- Select the framework and click Create button.
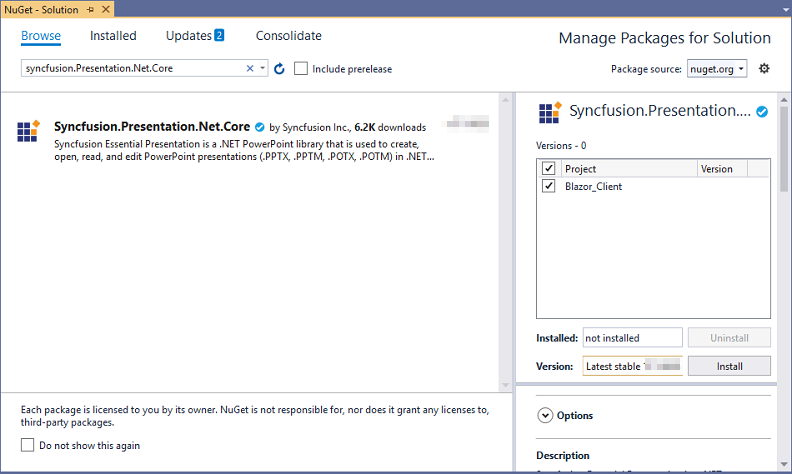
Step 2: Install the Syncfusion.Presentation.Net.Core NuGet package.
To create a PowerPoint document in Web App Server, install Syncfusion.Presentation.Net.Core in the Blazor project.
NOTE
Starting with v16.2.0.x, if Syncfusion® assemblies are referenced from trial setup or from the NuGet feed, the “Syncfusion.Licensing” assembly reference must also be added and a license key included in projects. Please refer to this link to know about registering Syncfusion® license key in an application to use Syncfusion components.
Step 3: Create a Razor file named Presentation.razor in the Pages folder, which is located inside the Components folder.
NOTE
The
@rendermode InteractiveServerdirective enables interactive server-side rendering, which is required because the PowerPoint service executes on the server.
NOTE
Replace
Create_PowerPoint_presentationwith your actual project namespace in the@usingand@injectdirectives.
Include the following namespaces in the file:
@rendermode InteractiveServer
@page "/Presentation"
@using System.IO;
@using Create_PowerPoint_presentation;
@inject Create_PowerPoint_presentation.Data.PowerPointService service
@inject Microsoft.JSInterop.IJSRuntime JS
Step 4: Add a button to Presentation.razor.
Include the following code to create a new button that triggers the presentation generation:
<h2>Syncfusion Presentation Library (Essential Presentation)</h2>
<p>The Syncfusion Blazor Presentation library (Essential Presentation) used to create, read, edit, and convert Presentation files in applications without Microsoft Office dependencies.</p>
<button class="btn btn-primary" @onclick="@CreatePowerPoint">Create PowerPoint</button>
Step 5: Implement CreatePowerPoint method in Presentation.razor.
Add the following code to create and download the PowerPoint document:
@code {
    MemoryStream documentStream;
    /// <summary>
    /// Create and download the Presentation document
    /// </summary>
    protected async void CreatePowerPoint()
    {
        documentStream = service.CreatePowerPoint();
        await JS.SaveAs("Sample.pptx", documentStream.ToArray());
    }
}
Step 6: Create a new cs file PowerPointService in the Data folder.
Include the following namespaces in the file:
using Syncfusion.Presentation;
using System.IO;
Step 7: Implement the CreatePowerPoint method in PowerPointService.cs.
Create a new method named CreatePowerPoint that returns a MemoryStream, and include the following code snippet to create a PowerPoint document in Blazor Web app Server.
public MemoryStream CreatePowerPoint()
{
    // Create a new instance of PowerPoint Presentation file
    IPresentation pptxDoc = Presentation.Create();
    // Add a new slide to file and apply background color
    ISlide slide = pptxDoc.Slides.Add(SlideLayoutType.TitleOnly);
    // Specify the fill type and fill color for the slide background
    slide.Background.Fill.FillType = FillType.Solid;
    slide.Background.Fill.SolidFill.Color = ColorObject.FromArgb(232, 241, 229);
    // Add title content to the slide by accessing the title placeholder of the  TitleOnly layout-slide
    IShape titleShape = slide.Shapes[0] as IShape;
    titleShape.TextBody.AddParagraph("Company History").HorizontalAlignment =  HorizontalAlignmentType.Center;
    // Add description content to the slide by adding a new TextBox IShape
    IShape descriptionShape = slide.AddTextBox(53.22, 141.73, 874.19, 77.70);
    descriptionShape.TextBody.Text = "IMN Solutions PVT LTD is the software company, established in 1987, by George Milton. The company has been listed as the trusted partner for many high-profile organizations since 1988 and got awards for quality products from reputed organizations.";
    // Add bullet points to the slide
    IShape bulletPointsShape = slide.AddTextBox(53.22, 270, 437.90, 116.32);
    // Add a paragraph for a bullet point
    IParagraph firstPara = bulletPointsShape.TextBody.AddParagraph("The company acquired the MCY corporation for 20 billion dollars and became the top revenue maker for the year 2015.");
    // Format how the bullets should be displayed
    firstPara.ListFormat.Type = ListType.Bulleted;
    firstPara.LeftIndent = 35;
    firstPara.FirstLineIndent = -35;
    // Add another paragraph for the next bullet point
    IParagraph secondPara = bulletPointsShape.TextBody.AddParagraph("The company is participating in top open source projects in automation industry.");
    // Format how the bullets should be displayed
    secondPara.ListFormat.Type = ListType.Bulleted;
    secondPara.LeftIndent = 35;
    secondPara.FirstLineIndent = -35;
    // Add an auto-shape to the slide
    IShape stampShape = slide.Shapes.AddShape(AutoShapeType.Explosion1, 48.93, 430.71, 104.13, 80.54);
    // Format the auto-shape color by setting the fill type and text
    stampShape.Fill.FillType = FillType.None;
    stampShape.TextBody.AddParagraph("IMN").HorizontalAlignment =  HorizontalAlignmentType.Center;
    // Save the PowerPoint Presentation as stream
    MemoryStream stream = new MemoryStream();
    pptxDoc.Save(stream);
    // Close the PowerPoint Presentation as stream
    pptxDoc.Close();
    stream.Position = 0;
    // Download the PowerPoint document in the browser
    JS.SaveAs("Sample.pptx", stream.ToArray());
}
Step 8: Add the service in Program.cs.
Add the following line to the Program.cs file to register PowerPointService as a scoped service in the Blazor application.
builder.Services.AddScoped<Create_PowerPoint_presentation.Data.PowerPointService>();Step 9: Create FileUtils.cs for JavaScript interoperability.
Create a new class file named FileUtils in the project and add the following code to invoke the JavaScript action for file download in the browser.
public static class FileUtils
{
    public static ValueTask<object> SaveAs(this IJSRuntime js, string filename, byte[] data)
       => js.InvokeAsync<object>(
           "saveAsFile",
           filename,
           Convert.ToBase64String(data));
}
Step 10: Add the following JavaScript function to App.razor.
Add this function in the App.razor file located in the Pages folder.
<script type="text/javascript">
    function saveAsFile(filename, bytesBase64) {
        if (navigator.msSaveBlob)
        {
            // Download document in legacy Edge/IE browser
            var data = window.atob(bytesBase64);
            var bytes = new Uint8Array(data.length);
            for (var i = 0; i < data.length; i++)
            {
                bytes[i] = data.charCodeAt(i);
            }
            var blob = new Blob([bytes.buffer], { type: "application/octet-stream" });
            navigator.msSaveBlob(blob, filename);
        }
        else
        {
            var link = document.createElement('a');
            link.download = filename;
            link.href = "data:application/octet-stream;base64," + bytesBase64;
            document.body.appendChild(link); // Needed for Firefox
            link.click();
            document.body.removeChild(link);
        }
    }
</script>
Step 11: Add the navigation link.
Add the following code snippet to the Navigation menu’s Razor file in the Layout folder.
<div class="nav-item px-3">
    <NavLink class="nav-link" href="presentation">
        <span class="oi oi-list-rich" aria-hidden="true"></span> Generate Presentation
    </NavLink>
</div>
Step 12: Build the project.
Click on Build → Build Solution or press Ctrl+Shift+B to build the project.
Step 13: Run the project.
Click the Start button (green arrow) or press F5 to run the application.
A complete working sample is available on GitHub.
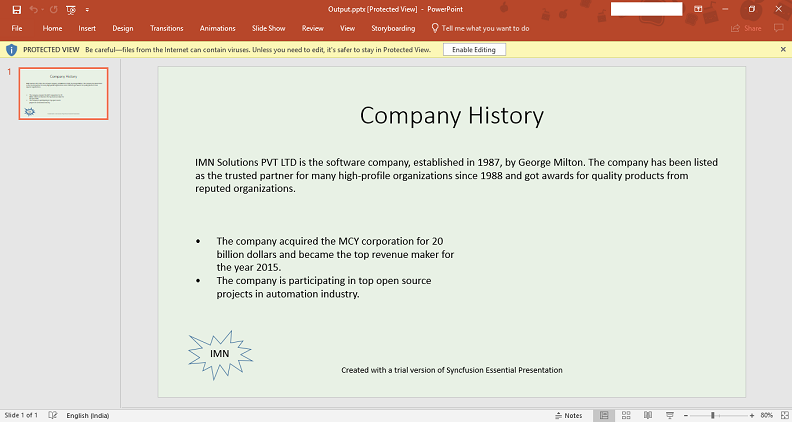
Upon executing the program, the PowerPoint document will be generated as follows.
Prerequisites:
- Visual Studio Code.
- Install .NET 8 SDK or later.
- Open Visual Studio Code and install the C# for Visual Studio Code extension from the Extensions Marketplace.
Step 1: Create a new C# Blazor Web app project.
- Open the command palette by pressing Ctrl+Shift+P and type .NET:New Project and enter.
- Choose the Blazor Web App template.

- Select the project location, type the project name and press enter.
- Then choose Create project.
Step 2: To create a PowerPoint document in Blazor Web App Server, install Syncfusion.Presentation.Net.Core to the Blazor project.
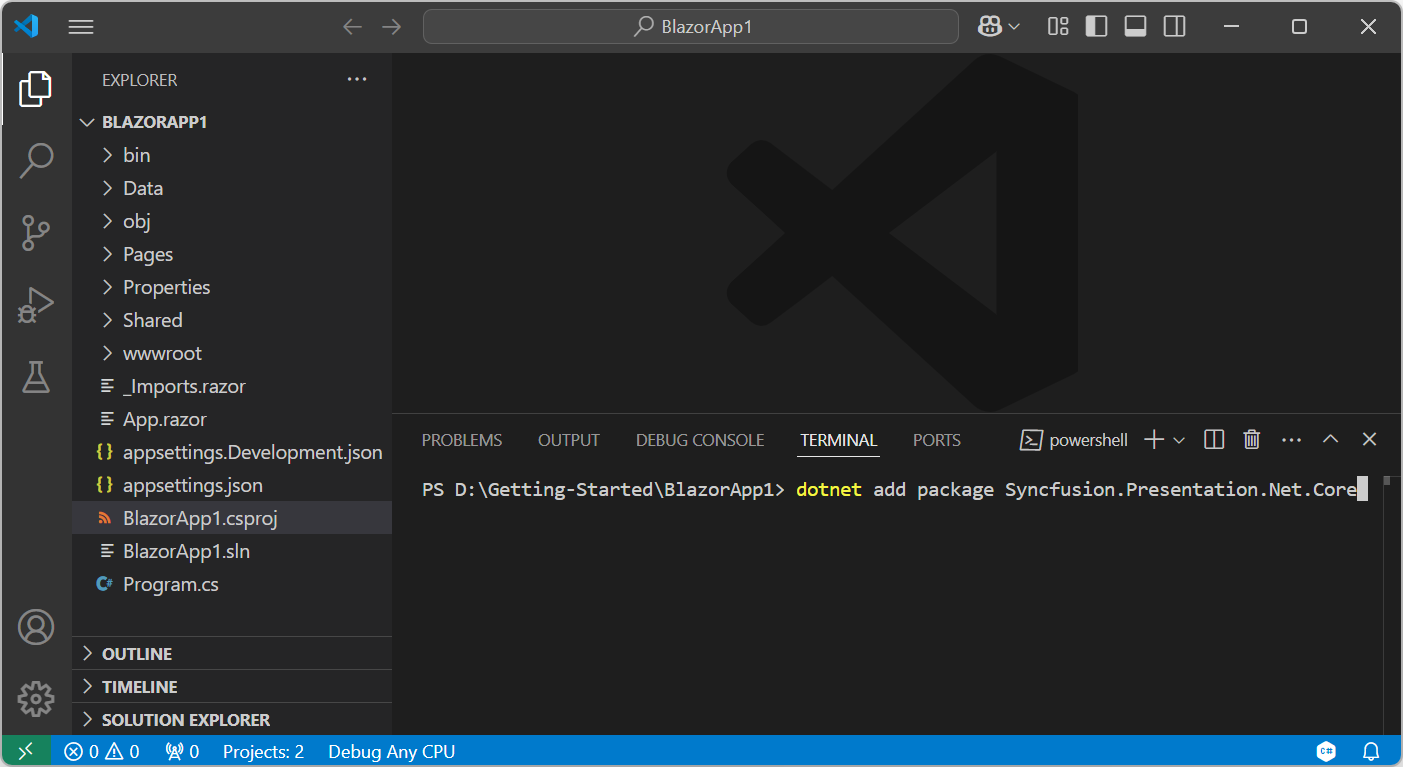
- Press Ctrl + ` (backtick) to open the integrated terminal in Visual Studio Code.
- Ensure you’re in the project root directory where your .csproj file is located.
- Run the command
dotnet add package Syncfusion.Presentation.Net.Coreto install the NuGet package.
NOTE
Starting with v16.2.0.x, if Syncfusion® assemblies are referenced from trial setup or from the NuGet feed, the “Syncfusion.Licensing” assembly reference must also be added and a license key included in projects. Please refer to this link to know about registering Syncfusion® license key in an application to use Syncfusion components.
Step 3: Create a Razor file named Presentation.razor in the Pages folder, which is located inside the Components folder.
Include the following namespaces in the file:
@rendermode InteractiveServer
@page "/Presentation"
@using System.IO;
@using Create_PowerPoint_presentation;
@inject Create_PowerPoint_presentation.Data.PowerPointService service
@inject Microsoft.JSInterop.IJSRuntime JS
Step 4: Add a button to Presentation.razor.
Include the following code to create a new button that triggers the PowerPoint generation:
<h2>Syncfusion Presentation Library (Essential Presentation)</h2>
<p>The Syncfusion Blazor Presentation library (Essential Presentation) used to create, read, edit, and convert Presentation files in applications without Microsoft Office dependencies.</p>
<button class="btn btn-primary" @onclick="@CreatePowerPoint">Create PowerPoint</button>
Step 5: Implement CreatePowerPoint method in Presentation.razor.
Add the following code to create and download the PowerPoint document:
@code {
    MemoryStream documentStream;
    /// <summary>
    /// Create and download the Presentation document
    /// </summary>
    protected async void CreatePowerPoint()
    {
        documentStream = service.CreatePowerPoint();
        await JS.SaveAs("Sample.pptx", documentStream.ToArray());
    }
}
Step 6: Create a new cs file PowerPointService in the Data folder.
Include the following namespaces in the file:
using Syncfusion.Presentation;
using System.IO;
Step 7: Implement the CreatePowerPoint method in PowerPointService.cs.
Create a new method named CreatePowerPoint that returns a MemoryStream, and include the following code snippet to create a PowerPoint document in Blazor Web app Server.
public MemoryStream CreatePowerPoint()
{
    // Create a new instance of PowerPoint Presentation file
    IPresentation pptxDoc = Presentation.Create();
    // Add a new slide to file and apply background color
    ISlide slide = pptxDoc.Slides.Add(SlideLayoutType.TitleOnly);
    // Specify the fill type and fill color for the slide background
    slide.Background.Fill.FillType = FillType.Solid;
    slide.Background.Fill.SolidFill.Color = ColorObject.FromArgb(232, 241, 229);
    // Add title content to the slide by accessing the title placeholder of the  TitleOnly layout-slide
    IShape titleShape = slide.Shapes[0] as IShape;
    titleShape.TextBody.AddParagraph("Company History").HorizontalAlignment =  HorizontalAlignmentType.Center;
    // Add description content to the slide by adding a new TextBox IShape
    IShape descriptionShape = slide.AddTextBox(53.22, 141.73, 874.19, 77.70);
    descriptionShape.TextBody.Text = "IMN Solutions PVT LTD is the software company, established in 1987, by George Milton. The company has been listed as the trusted partner for many high-profile organizations since 1988 and got awards for quality products from reputed organizations.";
    // Add bullet points to the slide
    IShape bulletPointsShape = slide.AddTextBox(53.22, 270, 437.90, 116.32);
    // Add a paragraph for a bullet point
    IParagraph firstPara = bulletPointsShape.TextBody.AddParagraph("The company acquired the MCY corporation for 20 billion dollars and became the top revenue maker for the year 2015.");
    // Format how the bullets should be displayed
    firstPara.ListFormat.Type = ListType.Bulleted;
    firstPara.LeftIndent = 35;
    firstPara.FirstLineIndent = -35;
    // Add another paragraph for the next bullet point
    IParagraph secondPara = bulletPointsShape.TextBody.AddParagraph("The company is participating in top open source projects in automation industry.");
    // Format how the bullets should be displayed
    secondPara.ListFormat.Type = ListType.Bulleted;
    secondPara.LeftIndent = 35;
    secondPara.FirstLineIndent = -35;
    // Add an auto-shape to the slide
    IShape stampShape = slide.Shapes.AddShape(AutoShapeType.Explosion1, 48.93, 430.71, 104.13, 80.54);
    // Format the auto-shape color by setting the fill type and text
    stampShape.Fill.FillType = FillType.None;
    stampShape.TextBody.AddParagraph("IMN").HorizontalAlignment =  HorizontalAlignmentType.Center;
    // Save the PowerPoint Presentation as stream
    MemoryStream stream = new MemoryStream();
    pptxDoc.Save(stream);
    // Close the PowerPoint Presentation as stream
    pptxDoc.Close();
    stream.Position = 0;
    // Download the PowerPoint document in the browser
    JS.SaveAs("Sample.pptx", stream.ToArray());
}
Step 8: Add the service in Program.cs.
Add the following line to the Program.cs file to register PowerPointService as a scoped service in the Blazor application.
builder.Services.AddScoped<Create_PowerPoint_presentation.Data.PowerPointService>();Step 9: Create FileUtils.cs for JavaScript interoperability.
Create a new class file named FileUtils in the project and add the following code to invoke the JavaScript action for file download in the browser.
public static class FileUtils
{
    public static ValueTask<object> SaveAs(this IJSRuntime js, string filename, byte[] data)
       => js.InvokeAsync<object>(
           "saveAsFile",
           filename,
           Convert.ToBase64String(data));
}
Step 10: Add the following JavaScript function to App.razor.
Add this function in the App.razor file located in the Pages folder.
<script type="text/javascript">
    function saveAsFile(filename, bytesBase64) {
        if (navigator.msSaveBlob)
        {
            // Download document in Edge browser
            var data = window.atob(bytesBase64);
            var bytes = new Uint8Array(data.length);
            for (var i = 0; i < data.length; i++)
            {
                bytes[i] = data.charCodeAt(i);
            }
            var blob = new Blob([bytes.buffer], { type: "application/octet-stream" });
            navigator.msSaveBlob(blob, filename);
        }
        else
        {
            var link = document.createElement('a');
            link.download = filename;
            link.href = "data:application/octet-stream;base64," + bytesBase64;
            document.body.appendChild(link); // Needed for Firefox
            link.click();
            document.body.removeChild(link);
        }
    }
</script>
Step 11: Add the navigation link.
Add the following code snippet to the Navigation menu’s Razor file in the Layout folder.
<div class="nav-item px-3">
    <NavLink class="nav-link" href="presentation">
        <span class="oi oi-list-rich" aria-hidden="true"></span> Generate Presentation
    </NavLink>
</div>
Step 12: Build the project.
Run the following command in terminal to build the project.
dotnet build
Step 13: Run the project.
Run the following command in terminal to run the project.
dotnet run
A complete working sample is available on GitHub.
Upon executing the program, the PowerPoint document will be generated as follows.
Prerequisites:
- JetBrains Rider.
- Install .NET 8 SDK or later.
Step 1: Open JetBrains Rider and create a new Blazor Web app project.
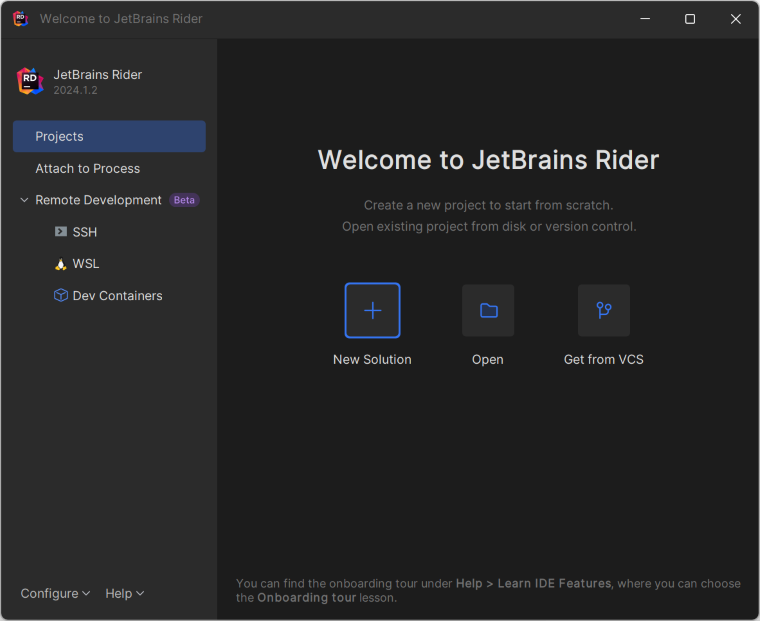
- Launch JetBrains Rider.
- Click New Solution on the welcome screen.
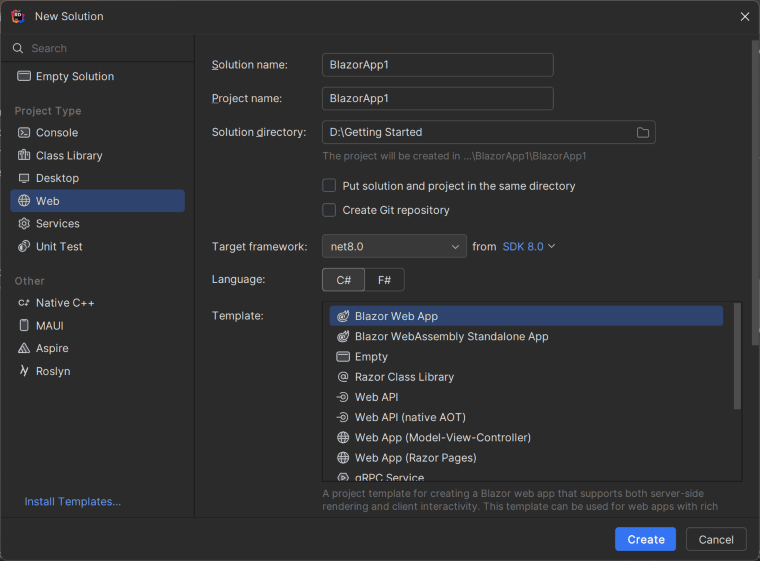
- In the new Solution dialog, select Project Type as Web.
- Select the target framework (e.g., .NET 8.0, .NET 9.0).
- Choose template as Blazor Web App.
- Enter a project name and specify the location.
- Click create.
Step 2: Install the NuGet package from NuGet.org.
- Click the NuGet icon in the Rider toolbar and type Syncfusion.Presentation.Net.Core in the search bar.
- Ensure that “nuget.org” is selected as the package source.
- Select the latest Syncfusion.Presentation.Net.Core NuGet package from the list.
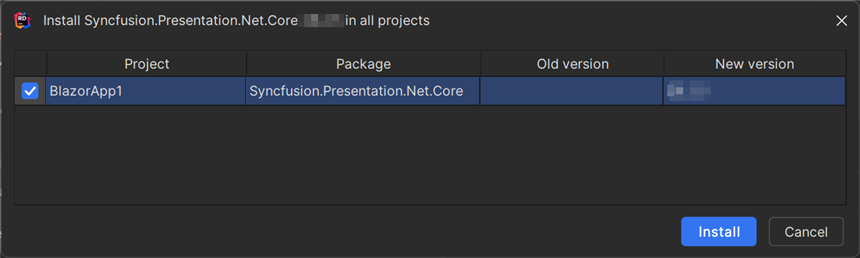
- Click the + (Add) button to add the package.
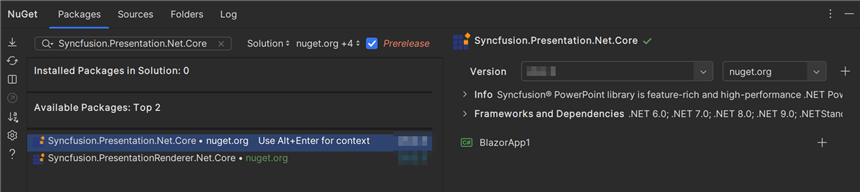
- Click the Install button to complete the installation.
NOTE
Starting with v16.2.0.x, if Syncfusion® assemblies are referenced from trial setup or from the NuGet feed, the “Syncfusion.Licensing” assembly reference must also be added and a license key included in projects. Please refer to this link to know about registering Syncfusion® license key in an application to use Syncfusion components.
Step 3: Create a Razor file named Presentation.razor in the Pages folder, which is located inside the Components folder.
Include the following namespaces in the file:
@rendermode InteractiveServer
@page "/Presentation"
@using System.IO;
@using Create_PowerPoint_presentation;
@inject Create_PowerPoint_presentation.Data.PowerPointService service
@inject Microsoft.JSInterop.IJSRuntime JS
Step 4: Add a button to Presentation.razor.
Include the following code to create a new button that triggers the PowerPoint generation:
<h2>Syncfusion Presentation Library (Essential Presentation)</h2>
<p>The Syncfusion Blazor Presentation library (Essential Presentation) used to create, read, edit, and convert Presentation files in applications without Microsoft Office dependencies.</p>
<button class="btn btn-primary" @onclick="@CreatePowerPoint">Create PowerPoint</button>
Step 5: Implement CreatePowerPoint method in Presentation.razor.
Add the following code to create and download the PowerPoint document:
@code {
    MemoryStream documentStream;
    /// <summary>
    /// Create and download the Presentation document
    /// </summary>
    protected async void CreatePowerPoint()
    {
        documentStream = service.CreatePowerPoint();
        await JS.SaveAs("Sample.pptx", documentStream.ToArray());
    }
}
Step 6: Create a new cs file PowerPointService in the Data folder.
Include the following namespaces in the file:
using Syncfusion.Presentation;
using System.IO;
Step 7: Implement the CreatePowerPoint method in PowerPointService.cs.
Create a new method named CreatePowerPoint that returns a MemoryStream, and include the following code snippet to create a PowerPoint document in Blazor Web app Server.
public MemoryStream CreatePowerPoint()
{
    // Create a new instance of PowerPoint Presentation file
    IPresentation pptxDoc = Presentation.Create();
    // Add a new slide to file and apply background color
    ISlide slide = pptxDoc.Slides.Add(SlideLayoutType.TitleOnly);
    // Specify the fill type and fill color for the slide background
    slide.Background.Fill.FillType = FillType.Solid;
    slide.Background.Fill.SolidFill.Color = ColorObject.FromArgb(232, 241, 229);
    // Add title content to the slide by accessing the title placeholder of the  TitleOnly layout-slide
    IShape titleShape = slide.Shapes[0] as IShape;
    titleShape.TextBody.AddParagraph("Company History").HorizontalAlignment =  HorizontalAlignmentType.Center;
    // Add description content to the slide by adding a new TextBox IShape
    IShape descriptionShape = slide.AddTextBox(53.22, 141.73, 874.19, 77.70);
    descriptionShape.TextBody.Text = "IMN Solutions PVT LTD is the software company, established in 1987, by George Milton. The company has been listed as the trusted partner for many high-profile organizations since 1988 and got awards for quality products from reputed organizations.";
    // Add bullet points to the slide
    IShape bulletPointsShape = slide.AddTextBox(53.22, 270, 437.90, 116.32);
    // Add a paragraph for a bullet point
    IParagraph firstPara = bulletPointsShape.TextBody.AddParagraph("The company acquired the MCY corporation for 20 billion dollars and became the top revenue maker for the year 2015.");
    // Format how the bullets should be displayed
    firstPara.ListFormat.Type = ListType.Bulleted;
    firstPara.LeftIndent = 35;
    firstPara.FirstLineIndent = -35;
    // Add another paragraph for the next bullet point
    IParagraph secondPara = bulletPointsShape.TextBody.AddParagraph("The company is participating in top open source projects in automation industry.");
    // Format how the bullets should be displayed
    secondPara.ListFormat.Type = ListType.Bulleted;
    secondPara.LeftIndent = 35;
    secondPara.FirstLineIndent = -35;
    // Add an auto-shape to the slide
    IShape stampShape = slide.Shapes.AddShape(AutoShapeType.Explosion1, 48.93, 430.71, 104.13, 80.54);
    // Format the auto-shape color by setting the fill type and text
    stampShape.Fill.FillType = FillType.None;
    stampShape.TextBody.AddParagraph("IMN").HorizontalAlignment =  HorizontalAlignmentType.Center;
    // Save the PowerPoint Presentation as stream
    MemoryStream stream = new MemoryStream();
    pptxDoc.Save(stream);
    // Close the PowerPoint Presentation as stream
    pptxDoc.Close();
    stream.Position = 0;
    // Download the PowerPoint document in the browser
    JS.SaveAs("Sample.pptx", stream.ToArray());
}
Step 8: Add the service in Program.cs.
Add the following line to the Program.cs file to register PowerPointService as a scoped service in the Blazor application.
builder.Services.AddScoped<Create_PowerPoint_presentation.Data.PowerPointService>();Step 9: Create FileUtils.cs for JavaScript interoperability.
Create a new class file named FileUtils in the project and add the following code to invoke the JavaScript action for file download in the browser.
public static class FileUtils
{
    public static ValueTask<object> SaveAs(this IJSRuntime js, string filename, byte[] data)
       => js.InvokeAsync<object>(
           "saveAsFile",
           filename,
           Convert.ToBase64String(data));
}
Step 10: Add the following JavaScript function to App.razor.
Add this function in the App.razor file located in the Pages folder.
<script type="text/javascript">
    function saveAsFile(filename, bytesBase64) {
        if (navigator.msSaveBlob)
        {
            // Download document in Edge browser
            var data = window.atob(bytesBase64);
            var bytes = new Uint8Array(data.length);
            for (var i = 0; i < data.length; i++)
            {
                bytes[i] = data.charCodeAt(i);
            }
            var blob = new Blob([bytes.buffer], { type: "application/octet-stream" });
            navigator.msSaveBlob(blob, filename);
        }
        else
        {
            var link = document.createElement('a');
            link.download = filename;
            link.href = "data:application/octet-stream;base64," + bytesBase64;
            document.body.appendChild(link); // Needed for Firefox
            link.click();
            document.body.removeChild(link);
        }
    }
</script>
Step 11: Add the navigation link.
Add the following code snippet to the Navigation menu’s Razor file in the Layout folder.
<div class="nav-item px-3">
    <NavLink class="nav-link" href="presentation">
        <span class="oi oi-list-rich" aria-hidden="true"></span> Generate Presentation
    </NavLink>
</div>
Step 12: Build the project.
Click the Build button in the toolbar or press Ctrl+Shift+B to build the project.
Step 13: Run the project.
Click the Run button (green arrow) in the toolbar or press F5 to run the app.
A complete working sample is available on GitHub.
Upon executing the program, the PowerPoint document will be generated as follows.
Looking for the full .NET PowerPoint Library component overview, features, pricing, and documentation? Visit the .NET PowerPoint Library page.
An online sample link to create a PowerPoint Presentation in ASP.NET Core.
WASM Standalone Application
Prerequisites:
- Visual Studio 2022.
- Install .NET 8 SDK or later.
Step 1: Create a new C# Blazor WASM Standalone app project.
Select “Blazor WebAssembly Standalone App” from the template and click the Next button.

Step 2: Install the Syncfusion.Presentation.Net.Core NuGet package.
To create a PowerPoint document in WASM Standalone app, install Syncfusion.Presentation.Net.Core to the Blazor project.
NOTE
Starting with v16.2.0.x, if Syncfusion® assemblies are referenced from trial setup or from the NuGet feed, the “Syncfusion.Licensing” assembly reference must also be added and a license key included in projects. Please refer to this link to know about registering Syncfusion® license key in an application to use Syncfusion components.
Step 3: Create a Razor file named Presentation.razor in the Pages folder.
Add the following namespaces in the file.
@page "/Presentation"
@using Syncfusion.Presentation
@using Syncfusion.OfficeChart
@using System.IO
@inject Microsoft.JSInterop.IJSRuntime JS
Step 4: Add a button to Presentation.razor.
Add the following code to create a new button that triggers the PowerPoint generation:
<h2>Syncfusion Presentation Library (Essential Presentation)</h2>
<p>The Syncfusion Blazor Presentation library (Essential Presentation) used to create, read, edit, and convert Presentation files in applications without Microsoft Office dependencies.</p>
<button class="btn btn-primary" @onclick="@CreatePowerPoint">Create PowerPoint</button>
Step 5: Implement CreatePowerPoint method in Presentation.razor.
Create a new async method named CreatePowerPoint and include the following code snippet to create a PowerPoint document in Blazor WASM Standalone app.
@functions {
    async void CreatePowerPoint()
    {
        // Create a new instance of PowerPoint Presentation file
        IPresentation pptxDoc = Presentation.Create();
        // Add a new slide to file and apply background color
        ISlide slide = pptxDoc.Slides.Add(SlideLayoutType.TitleOnly);
        // Specify the fill type and fill color for the slide background
        slide.Background.Fill.FillType = FillType.Solid;
        slide.Background.Fill.SolidFill.Color = ColorObject.FromArgb(232, 241, 229);
        // Add title content to the slide by accessing the title placeholder of the  TitleOnly layout-slide
        IShape titleShape = slide.Shapes[0] as IShape;
        titleShape.TextBody.AddParagraph("Company History").HorizontalAlignment =  HorizontalAlignmentType.Center;
        // Add description content to the slide by adding a new TextBox IShape
        IShape descriptionShape = slide.AddTextBox(53.22, 141.73, 874.19, 77.70);
        descriptionShape.TextBody.Text = "IMN Solutions PVT LTD is the software company, established in 1987, by George Milton. The company has been listed as the trusted partner for many high-profile organizations since 1988 and got awards for quality products from reputed organizations.";
        // Add bullet points to the slide
        IShape bulletPointsShape = slide.AddTextBox(53.22, 270, 437.90, 116.32);
        // Add a paragraph for a bullet point
        IParagraph firstPara = bulletPointsShape.TextBody.AddParagraph("The company acquired the MCY corporation for 20 billion dollars and became the top revenue maker for the year 2015.");
        // Format how the bullets should be displayed
        firstPara.ListFormat.Type = ListType.Bulleted;
        firstPara.LeftIndent = 35;
        firstPara.FirstLineIndent = -35;
        // Add another paragraph for the next bullet point
        IParagraph secondPara = bulletPointsShape.TextBody.AddParagraph("The company is participating in top open source projects in automation industry.");
        // Format how the bullets should be displayed
        secondPara.ListFormat.Type = ListType.Bulleted;
        secondPara.LeftIndent = 35;
        secondPara.FirstLineIndent = -35;
        // Add an auto-shape to the slide
        IShape stampShape = slide.Shapes.AddShape(AutoShapeType.Explosion1, 48.93, 430.71, 104.13, 80.54);
        // Format the auto-shape color by setting the fill type and text
        stampShape.Fill.FillType = FillType.None;
        stampShape.TextBody.AddParagraph("IMN").HorizontalAlignment =  HorizontalAlignmentType.Center;
        // Save the PowerPoint Presentation as stream
        MemoryStream stream = new MemoryStream();
        pptxDoc.Save(stream);
        // Close the PowerPoint Presentation as stream
        pptxDoc.Close();
        stream.Position = 0;
        // Download the PowerPoint document in the browser
        JS.SaveAs("Sample.pptx", stream.ToArray());
    }
}
Step 6: Create FileUtils.cs for JavaScript interoperability.
Create a new class file named FileUtils in the project and add the following code to invoke the JavaScript action for file download in the browser.
public static class FileUtils
{
    public static ValueTask<object> SaveAs(this IJSRuntime js, string filename, byte[] data)
       => js.InvokeAsync<object>(
           "saveAsFile",
           filename,
           Convert.ToBase64String(data));
}
Step 7: Add the following JavaScript function to index.html.
Add this function in the index.html file located in wwwroot.
<script type="text/javascript">
    function saveAsFile(filename, bytesBase64) {
        if (navigator.msSaveBlob) {
            // Download document in Edge browser
            var data = window.atob(bytesBase64);
            var bytes = new Uint8Array(data.length);
            for (var i = 0; i < data.length; i++) {
                bytes[i] = data.charCodeAt(i);
            }
            var blob = new Blob([bytes.buffer], { type: "application/octet-stream" });
            navigator.msSaveBlob(blob, filename);
        }
        else {
            var link = document.createElement('a');
            link.download = filename;
            link.href = "data:application/octet-stream;base64," + bytesBase64;
            document.body.appendChild(link); // Needed for Firefox
            link.click();
            document.body.removeChild(link);
        }
    }
</script>
Step 8: Add the navigation link.
Add the following code snippet to the Navigation menu’s Razor file in the Layout folder.
<div class="nav-item px-3">
    <NavLink class="nav-link" href="presentation">
        <span class="oi oi-list-rich" aria-hidden="true"></span> Generate Presentation
    </NavLink>
</div>
Step 9: Build the project.
Click on Build → Build Solution or press Ctrl+Shift+B to build the project.
Step 10: Run the project.
Click the Start button (green arrow) or press F5 to run the application.
A complete working sample is available on GitHub.
Upon executing the program, the PowerPoint document will be generated as follows.
NOTE
While the PowerPoint library works in WASM Standalone app, server-side deployment is recommended. WASM Standalone app deployment increases the application payload size.
Prerequisites:
- Visual Studio Code.
- Install .NET 8 SDK or later.
- Open Visual Studio Code and install the C# for Visual Studio Code extension from the Extensions Marketplace.
Step 1: Create a new C# Blazor WASM Standalone app project.
- Open the command palette by pressing Ctrl+Shift+P and type .NET:New Project and enter.
- Choose the Blazor WebAssembly Standalone App template.

- Select the project location, type the project name and press enter.
- Then choose Create project.
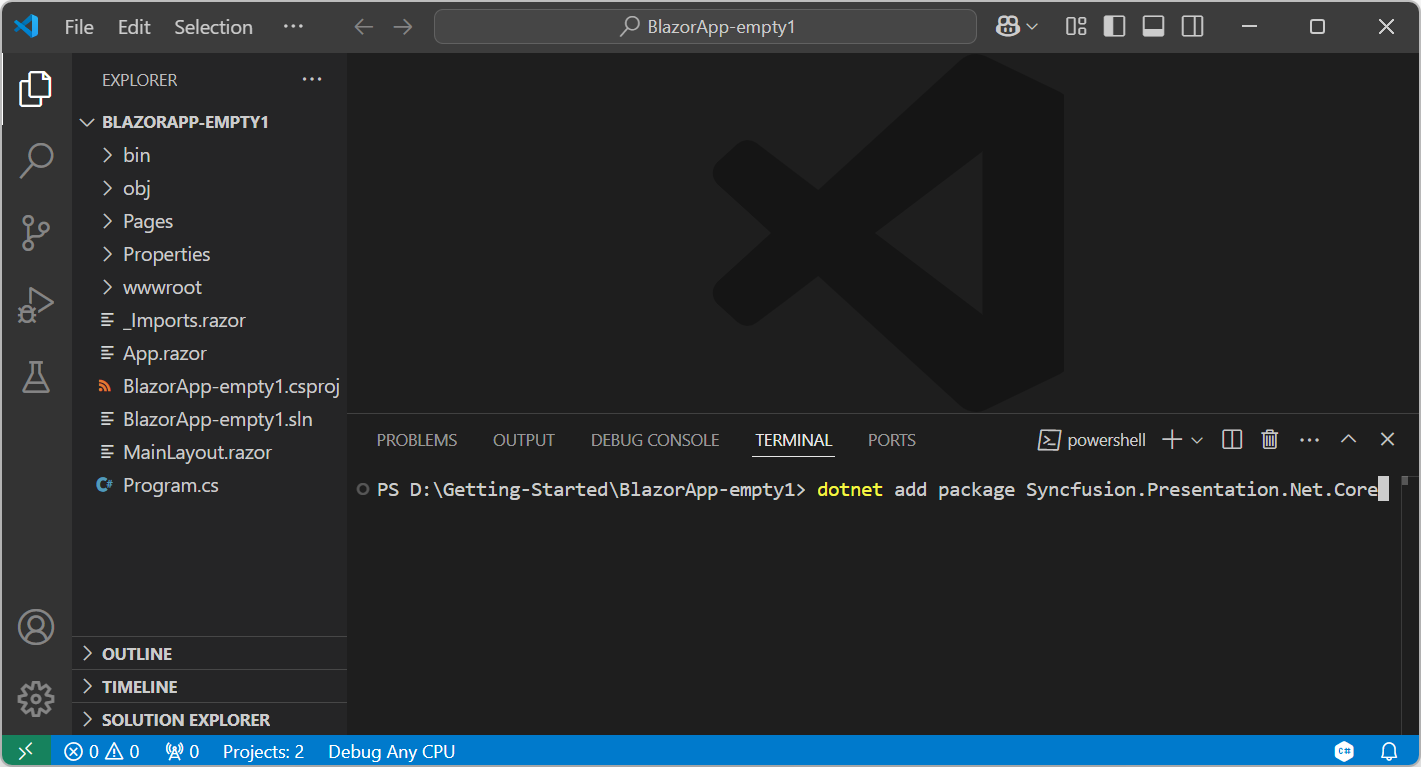
Step 2: To create a PowerPoint document in Blazor WASM Standalone app, install Syncfusion.Presentation.Net.Core to the Blazor project.
- Press Ctrl + ` (backtick) to open the integrated terminal in Visual Studio Code.
- Ensure you’re in the project root directory where your .csproj file is located.
- Run the command
dotnet add package Syncfusion.Presentation.Net.Coreto install the NuGet package.
NOTE
Starting with v16.2.0.x, if Syncfusion® assemblies are referenced from trial setup or from the NuGet feed, the “Syncfusion.Licensing” assembly reference must also be added and a license key included in projects. Please refer to this link to know about registering Syncfusion® license key in an application to use Syncfusion components.
Step 3: Create a Razor file named Presentation.razor in the Pages folder.
Add the following namespaces in the file.
@page "/Presentation"
@using Syncfusion.Presentation
@using Syncfusion.OfficeChart
@using System.IO
@inject Microsoft.JSInterop.IJSRuntime JS
Step 4: Add a button to Presentation.razor.
Add the following code to create a new button that triggers the PowerPoint generation:
<h2>Syncfusion Presentation Library (Essential Presentation)</h2>
<p>The Syncfusion Blazor Presentation library (Essential Presentation) used to create, read, edit, and convert Presentation files in applications without Microsoft Office dependencies.</p>
<button class="btn btn-primary" @onclick="@CreatePowerPoint">Create PowerPoint</button>
Step 5: Implement CreatePowerPoint method in Presentation.razor.
Create a new async method named CreatePowerPoint and include the following code snippet to create a PowerPoint document in Blazor WASM Standalone app.
@functions {
    async void CreatePowerPoint()
    {
        // Create a new instance of PowerPoint Presentation file
        IPresentation pptxDoc = Presentation.Create();
        // Add a new slide to file and apply background color
        ISlide slide = pptxDoc.Slides.Add(SlideLayoutType.TitleOnly);
        // Specify the fill type and fill color for the slide background
        slide.Background.Fill.FillType = FillType.Solid;
        slide.Background.Fill.SolidFill.Color = ColorObject.FromArgb(232, 241, 229);
        // Add title content to the slide by accessing the title placeholder of the  TitleOnly layout-slide
        IShape titleShape = slide.Shapes[0] as IShape;
        titleShape.TextBody.AddParagraph("Company History").HorizontalAlignment =  HorizontalAlignmentType.Center;
        // Add description content to the slide by adding a new TextBox IShape
        IShape descriptionShape = slide.AddTextBox(53.22, 141.73, 874.19, 77.70);
        descriptionShape.TextBody.Text = "IMN Solutions PVT LTD is the software company, established in 1987, by George Milton. The company has been listed as the trusted partner for many high-profile organizations since 1988 and got awards for quality products from reputed organizations.";
        // Add bullet points to the slide
        IShape bulletPointsShape = slide.AddTextBox(53.22, 270, 437.90, 116.32);
        // Add a paragraph for a bullet point
        IParagraph firstPara = bulletPointsShape.TextBody.AddParagraph("The company acquired the MCY corporation for 20 billion dollars and became the top revenue maker for the year 2015.");
        // Format how the bullets should be displayed
        firstPara.ListFormat.Type = ListType.Bulleted;
        firstPara.LeftIndent = 35;
        firstPara.FirstLineIndent = -35;
        // Add another paragraph for the next bullet point
        IParagraph secondPara = bulletPointsShape.TextBody.AddParagraph("The company is participating in top open source projects in automation industry.");
        // Format how the bullets should be displayed
        secondPara.ListFormat.Type = ListType.Bulleted;
        secondPara.LeftIndent = 35;
        secondPara.FirstLineIndent = -35;
        // Add an auto-shape to the slide
        IShape stampShape = slide.Shapes.AddShape(AutoShapeType.Explosion1, 48.93, 430.71, 104.13, 80.54);
        // Format the auto-shape color by setting the fill type and text
        stampShape.Fill.FillType = FillType.None;
        stampShape.TextBody.AddParagraph("IMN").HorizontalAlignment =  HorizontalAlignmentType.Center;
        // Save the PowerPoint Presentation as stream
        MemoryStream stream = new MemoryStream();
        pptxDoc.Save(stream);
        // Close the PowerPoint Presentation as stream
        pptxDoc.Close();
        stream.Position = 0;
        // Download the PowerPoint document in the browser
        JS.SaveAs("Sample.pptx", stream.ToArray());
    }
}
Step 6: Create FileUtils.cs for JavaScript interoperability.
Create a new class file named FileUtils in the project and add the following code to invoke the JavaScript action for file download in the browser.
public static class FileUtils
{
    public static ValueTask<object> SaveAs(this IJSRuntime js, string filename, byte[] data)
       => js.InvokeAsync<object>(
           "saveAsFile",
           filename,
           Convert.ToBase64String(data));
}
Step 7: Add the following JavaScript function to index.html.
Add this function in the index.html file located in wwwroot.
<script type="text/javascript">
    function saveAsFile(filename, bytesBase64) {
        if (navigator.msSaveBlob) {
            // Download document in Edge browser
            var data = window.atob(bytesBase64);
            var bytes = new Uint8Array(data.length);
            for (var i = 0; i < data.length; i++) {
                bytes[i] = data.charCodeAt(i);
            }
            var blob = new Blob([bytes.buffer], { type: "application/octet-stream" });
            navigator.msSaveBlob(blob, filename);
        }
        else {
            var link = document.createElement('a');
            link.download = filename;
            link.href = "data:application/octet-stream;base64," + bytesBase64;
            document.body.appendChild(link); // Needed for Firefox
            link.click();
            document.body.removeChild(link);
        }
    }
</script>
Step 8: Add the navigation link.
Add the following code snippet to the Navigation menu’s Razor file in the Layout folder.
<div class="nav-item px-3">
    <NavLink class="nav-link" href="presentation">
        <span class="oi oi-list-rich" aria-hidden="true"></span> Generate Presentation
    </NavLink>
</div>
Step 9: Build the project.
Run the following command in terminal to build the project.
dotnet build
Step 10: Run the project.
Run the following command in terminal to run the project.
dotnet run
A complete working sample is available on GitHub.
Upon executing the program, the PowerPoint document will be generated as follows.
NOTE
While the PowerPoint library works in WASM Standalone app, server-side deployment is recommended. WASM Standalone app deployment increases the application payload size.
Prerequisites:
- JetBrains Rider.
- Install .NET 8 SDK or later.
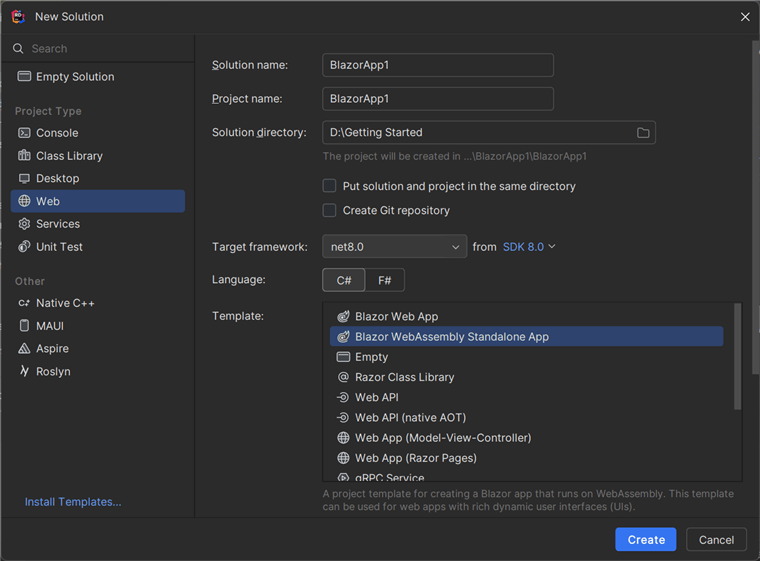
Step 1: Open JetBrains Rider and create a new Blazor WASM Standalone app project.
- Launch JetBrains Rider.
- Click New Solution on the welcome screen.
- In the new Solution dialog, select Project Type as Web.
- Select the target framework (e.g., .NET 8.0, .NET 9.0).
- Choose template as Blazor WebAssembly Standalone App.
- Enter a project name and specify the location.
- Click create.
Step 2: Install the NuGet package from NuGet.org.
- Click the NuGet icon in the Rider toolbar and type Syncfusion.Presentation.Net.Core in the search bar.
- Ensure that “nuget.org” is selected as the package source.
- Select the latest Syncfusion.Presentation.Net.Core NuGet package from the list.
- Click the + (Add) button to add the package.
- Click the Install button to complete the installation.
NOTE
Starting with v16.2.0.x, if Syncfusion® assemblies are referenced from trial setup or from the NuGet feed, the “Syncfusion.Licensing” assembly reference must also be added and a license key included in projects. Please refer to this link to know about registering Syncfusion® license key in an application to use Syncfusion components.
Step 3: Create a Razor file named Presentation.razor in the Pages folder.
Add the following namespaces in the file.
@page "/Presentation"
@using Syncfusion.Presentation
@using Syncfusion.OfficeChart
@using System.IO
@inject Microsoft.JSInterop.IJSRuntime JS
Step 4: Add a button to Presentation.razor.
Add the following code to create a new button that triggers the PowerPoint generation:
<h2>Syncfusion Presentation Library (Essential Presentation)</h2>
<p>The Syncfusion Blazor Presentation library (Essential Presentation) used to create, read, edit, and convert Presentation files in applications without Microsoft Office dependencies.</p>
<button class="btn btn-primary" @onclick="@CreatePowerPoint">Create PowerPoint</button>
Step 5: Implement CreatePowerPoint method in Presentation.razor.
Create a new async method named CreatePowerPoint and include the following code snippet to create a PowerPoint document in Blazor WASM Standalone app.
@functions {
    async void CreatePowerPoint()
    {
        // Create a new instance of PowerPoint Presentation file
        IPresentation pptxDoc = Presentation.Create();
        // Add a new slide to file and apply background color
        ISlide slide = pptxDoc.Slides.Add(SlideLayoutType.TitleOnly);
        // Specify the fill type and fill color for the slide background
        slide.Background.Fill.FillType = FillType.Solid;
        slide.Background.Fill.SolidFill.Color = ColorObject.FromArgb(232, 241, 229);
        // Add title content to the slide by accessing the title placeholder of the  TitleOnly layout-slide
        IShape titleShape = slide.Shapes[0] as IShape;
        titleShape.TextBody.AddParagraph("Company History").HorizontalAlignment =  HorizontalAlignmentType.Center;
        // Add description content to the slide by adding a new TextBox IShape
        IShape descriptionShape = slide.AddTextBox(53.22, 141.73, 874.19, 77.70);
        descriptionShape.TextBody.Text = "IMN Solutions PVT LTD is the software company, established in 1987, by George Milton. The company has been listed as the trusted partner for many high-profile organizations since 1988 and got awards for quality products from reputed organizations.";
        // Add bullet points to the slide
        IShape bulletPointsShape = slide.AddTextBox(53.22, 270, 437.90, 116.32);
        // Add a paragraph for a bullet point
        IParagraph firstPara = bulletPointsShape.TextBody.AddParagraph("The company acquired the MCY corporation for 20 billion dollars and became the top revenue maker for the year 2015.");
        // Format how the bullets should be displayed
        firstPara.ListFormat.Type = ListType.Bulleted;
        firstPara.LeftIndent = 35;
        firstPara.FirstLineIndent = -35;
        // Add another paragraph for the next bullet point
        IParagraph secondPara = bulletPointsShape.TextBody.AddParagraph("The company is participating in top open source projects in automation industry.");
        // Format how the bullets should be displayed
        secondPara.ListFormat.Type = ListType.Bulleted;
        secondPara.LeftIndent = 35;
        secondPara.FirstLineIndent = -35;
        // Add an auto-shape to the slide
        IShape stampShape = slide.Shapes.AddShape(AutoShapeType.Explosion1, 48.93, 430.71, 104.13, 80.54);
        // Format the auto-shape color by setting the fill type and text
        stampShape.Fill.FillType = FillType.None;
        stampShape.TextBody.AddParagraph("IMN").HorizontalAlignment =  HorizontalAlignmentType.Center;
        // Save the PowerPoint Presentation as stream
        MemoryStream stream = new MemoryStream();
        pptxDoc.Save(stream);
        // Close the PowerPoint Presentation as stream
        pptxDoc.Close();
        stream.Position = 0;
        // Download the PowerPoint document in the browser
        JS.SaveAs("Sample.pptx", stream.ToArray());
    }
}
Step 6: Create FileUtils.cs for JavaScript interoperability.
Create a new class file named FileUtils in the project and add the following code to invoke the JavaScript action for file download in the browser.
public static class FileUtils
{
    public static ValueTask<object> SaveAs(this IJSRuntime js, string filename, byte[] data)
       => js.InvokeAsync<object>(
           "saveAsFile",
           filename,
           Convert.ToBase64String(data));
}
Step 7: Add the following JavaScript function to index.html.
Add this function in the index.html file located in wwwroot.
<script type="text/javascript">
    function saveAsFile(filename, bytesBase64) {
        if (navigator.msSaveBlob) {
            // Download document in Edge browser
            var data = window.atob(bytesBase64);
            var bytes = new Uint8Array(data.length);
            for (var i = 0; i < data.length; i++) {
                bytes[i] = data.charCodeAt(i);
            }
            var blob = new Blob([bytes.buffer], { type: "application/octet-stream" });
            navigator.msSaveBlob(blob, filename);
        }
        else {
            var link = document.createElement('a');
            link.download = filename;
            link.href = "data:application/octet-stream;base64," + bytesBase64;
            document.body.appendChild(link); // Needed for Firefox
            link.click();
            document.body.removeChild(link);
        }
    }
</script>
Step 8: Add the navigation link.
Add the following code snippet to the Navigation menu’s Razor file in the Layout folder.
<div class="nav-item px-3">
    <NavLink class="nav-link" href="presentation">
        <span class="oi oi-list-rich" aria-hidden="true"></span> Generate Presentation
    </NavLink>
</div>
Step 9: Build the project.
Click the Build button in the toolbar or press Ctrl+Shift+B to build the project.
Step 10: Run the project.
Click the Run button (green arrow) in the toolbar or press F5 to run the app. A complete working sample is available on GitHub.
Upon executing the program, the PowerPoint document will be generated as follows.
NOTE
While the PowerPoint library works in WASM Standalone app, server-side deployment is recommended. WASM Standalone app deployment increases the application payload size.
Kindly explore the supported and unsupported features of PowerPoint library in Blazor.
Looking for the full .NET PowerPoint Library component overview, features, pricing, and documentation? Visit the .NET PowerPoint Library page.
An online sample link to create a PowerPoint Presentation in ASP.NET Core.