Working with Cell Formatting
18 Aug 202620 minutes to read
Syncfusion Flutter XlsIO provides a rich set of formatting options for cells and ranges, including font properties, alignment, borders, fill colors, number formats, merged cells, and built-in styles. The recommended approach is to create a Style object once, register it with the Styles collection, and then apply the style to one or more cells. Reusing a style reduces memory usage and improves performance, especially for large workbooks.
For prerequisites and installation steps, see the Flutter XlsIO Overview. For information on saving and disposing of a workbook, see Working with Workbook.
The code samples in this document use
await workbook.save(). Always callworkbook.dispose()after saving to release the XlsIO DOM memory, ideally inside atry/finallyblock.
Create a style
A Style is created and registered with workbook.styles.add(name). The method returns the new Style object, which you can then customize. When a hex color is set through backColor / fontColor and an Color value is set through backColorRgb / fontColorRgb, the *Rgb value takes precedence; use only one of the two for a given style.
import 'package:syncfusion_flutter_xlsio/xlsio.dart';

Future<void> createStyle() async {
  final Workbook workbook = Workbook();
  final Worksheet sheet = workbook.worksheets[0];

  // Create and register a new style.
  final Style style = workbook.styles.add('Style1');

  // Background color.
  style.backColor = '#FF5050';

  // Font.
  style.fontName = 'Aldhabi';
  style.fontColor = '#138939';
  style.fontSize = 16;
  style.bold = true;
  style.italic = true;
  style.underline = true;

  // Rotation (0–180 degrees).
  style.rotation = 120;

  // Alignment.
  style.hAlign = HAlignType.center;
  style.vAlign = VAlignType.bottom;
  style.indent = 1;

  // Borders.
  style.borders.top.lineStyle = LineStyle.double;
  style.borders.top.color = '#FFFF66';
  style.borders.right.lineStyle = LineStyle.thick;
  style.borders.right.colorRgb = const Color.fromARGB(255, 0, 34, 244);

  // Cell behavior.
  style.wrapText = true;

  // Number format.
  style.numberFormat = r'_($* #,##0_)';

  // Apply the style to a range.
  sheet.getRangeByName('A1').cellStyle = style;

  final List<int> bytes = await workbook.save();
  workbook.dispose();
}
Apply a global style
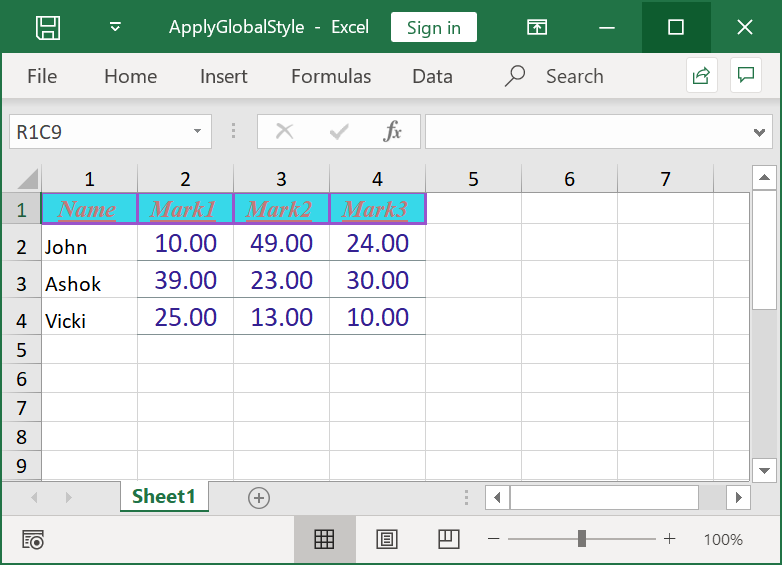
A global style is one that is created once and reused across multiple ranges. This approach is more memory-efficient than assigning a fresh Style to every cell. The example below creates two styles and applies each to a different range.
import 'package:syncfusion_flutter_xlsio/xlsio.dart';

Future<void> applyGlobalStyle() async {
  final Workbook workbook = Workbook();
  final Worksheet sheet = workbook.worksheets[0];

  // Populate cells with sample data.
  sheet.getRangeByName('A1').setText('Name');
  sheet.getRangeByName('A2').setText('John');
  sheet.getRangeByName('A3').setText('Ashok');
  sheet.getRangeByName('A4').setText('Vicki');
  sheet.getRangeByName('B1').setText('Mark1');
  sheet.getRangeByName('B2').setNumber(10);
  sheet.getRangeByName('B3').setNumber(39);
  sheet.getRangeByName('B4').setNumber(25);
  sheet.getRangeByName('C1').setText('Mark2');
  sheet.getRangeByName('C2').setNumber(49);
  sheet.getRangeByName('C3').setNumber(23);
  sheet.getRangeByName('C4').setNumber(13);
  sheet.getRangeByName('D1').setText('Mark3');
  sheet.getRangeByName('D2').setNumber(24);
  sheet.getRangeByName('D3').setNumber(30);
  sheet.getRangeByName('D4').setNumber(10);

  // Define a global header style.
  final Style globalStyle = workbook.styles.add('globalStyle');
  globalStyle.backColor = '#37D8E9';
  globalStyle.fontName = 'Times New Roman';
  globalStyle.fontSize = 12;
  globalStyle.fontColor = '#C67878';
  globalStyle.italic = true;
  globalStyle.bold = true;
  globalStyle.underline = true;
  globalStyle.wrapText = true;
  globalStyle.hAlign = HAlignType.center;
  globalStyle.vAlign = VAlignType.center;
  globalStyle.borders.all.lineStyle = LineStyle.thick;
  globalStyle.borders.all.color = '#9954CC';

  // Define a global body style.
  final Style globalStyle1 = workbook.styles.add('globalStyle1');
  globalStyle1.fontSize = 14;
  globalStyle1.fontColor = '#362191';
  globalStyle1.hAlign = HAlignType.center;
  globalStyle1.vAlign = VAlignType.center;
  globalStyle1.borders.bottom.lineStyle = LineStyle.thin;
  globalStyle1.borders.bottom.color = '#829193';
  globalStyle1.numberFormat = '0.00';

  // Apply each global style to a different range.
  sheet.getRangeByName('A1:D1').cellStyle = globalStyle;
  sheet.getRangeByName('B2:D4').cellStyle = globalStyle1;

  final List<int> bytes = await workbook.save();
  workbook.dispose();
}
The
Bordersclass exposes a single border for each side (top,bottom,left,right) plus anallshortcut that applies the same line style and color to all four sides.
Apply number formats
A number format controls the appearance of cell values without changing the underlying data. Syncfusion Flutter XlsIO supports reading and writing both built-in and custom number formats through the numberFormat property of a Range or Style.
Number format sections
A number format can have up to four sections, separated by semicolons. Each section defines the format applied to a specific kind of value:
| Section | Applies to |
|---|---|
| 1 | Positive numbers |
| 2 | Negative numbers |
| 3 | Zero values |
| 4 | Text values |
If only one section is provided, it applies to every value. The default format is General, which displays the value as-is.
Built-in number format codes
| Code | Description |
|---|---|
General |
General number format. |
0 (zero) |
Digit placeholder. Pads the value with zeros to fill the format. |
# |
Digit placeholder. Does not display extra zeros. |
? |
Digit placeholder. Leaves a space for insignificant zeros but does not display them. |
. (period) |
Decimal placeholder. Controls the number of digits on each side of the decimal separator. |
% |
Percentage placeholder. Multiplies by 100 and adds the % character. |
, (comma) |
Thousands separator. A comma followed by a placeholder scales the number by a thousand. |
E+, E-, e+, e-
|
Scientific notation. |
Text format codes
| Code | Description |
|---|---|
$, -, +, /, (, ), :, space |
Displayed as-is in the formatted value. To display any other character, enclose it in quotation marks or precede it with a backslash. |
\character |
Displays the succeeding character as a literal. The characters !, ^, &, ', ~, {, }, =, <, and > are automatically escaped. |
"text" |
Displays the text inside the quotation marks. |
* |
Repeats the next character in the format to fill the column width. Only one asterisk per section is allowed. |
_ (underscore) |
Skips the width of the next character. Commonly used as _) to leave space for a closing parenthesis so that positive and negative values line up at the decimal point. |
@ |
Text placeholder. |
Date format codes
| Code | Description |
|---|---|
m |
Month as a number without leading zeros (1–12). |
mm |
Month as a number with leading zeros (01–12). |
mmm |
Month as an abbreviation (Jan–Dec). |
mmmm |
Unabbreviated month (January–December). |
d |
Day without leading zeros (1–31). |
dd |
Day with leading zeros (01–31). |
ddd |
Week day as an abbreviation (Sun–Sat). |
dddd |
Unabbreviated week day (Sunday–Saturday). |
yy |
Year as a two-digit number (for example, 96). |
yyyy |
Year as a four-digit number (for example, 1996). |
Time format codes
| Code | Description |
|---|---|
h |
Hours as a number without leading zeros (0–23). |
hh |
Hours as a number with leading zeros (00–23). |
m |
Minutes as a number without leading zeros (0–59). |
mm |
Minutes as a number with leading zeros (00–59). |
s |
Seconds as a number without leading zeros (0–59). |
ss |
Seconds as a number with leading zeros (00–59). |
AM/PM, am/pm
|
Time based on the twelve-hour clock. |
Miscellaneous format codes
| Code | Description |
|---|---|
[BLACK], [BLUE], [CYAN], [GREEN], [MAGENTA], [RED], [WHITE], [YELLOW], [COLOR n]
|
Displays the characters in the specified color. n is a value from 1 to 56 and refers to the nth color in the color palette. |
[Condition value] |
Applies the format when the supplied condition is met. Supported operators are <, >, =, >=, <=, and <>. A format may contain up to two conditions. |
Example
The following sample demonstrates several common number formats. Column A holds the raw value, column B holds the format code as a string for reference, and column C holds the same raw value with the number format applied.
import 'package:syncfusion_flutter_xlsio/xlsio.dart';

Future<void> applyNumberFormats() async {
  final Workbook workbook = Workbook();
  final Worksheet sheet = workbook.worksheets[0];

  // Header row.
  sheet.getRangeByName('A1').setText('DATA');
  sheet.getRangeByName('B1').setText('FORMAT');
  sheet.getRangeByName('C1').setText('RESULT');

  final Style headingStyle = workbook.styles.add('HeadingStyle');
  headingStyle.bold = true;
  headingStyle.hAlign = HAlignType.center;
  headingStyle.wrapText = true;
  sheet.getRangeByName('A1:C1').cellStyle = headingStyle;

  // Two-decimal number.
  sheet.getRangeByName('A2').setNumber(100.23);
  sheet.getRangeByName('B2').setText('0.00');
  sheet.getRangeByName('C2').numberFormat = '0.00';
  sheet.getRangeByName('C2').setNumber(100.23);

  // Thousands separator.
  sheet.getRangeByName('A3').setNumber(43782);
  sheet.getRangeByName('B3').setText('###,##');
  sheet.getRangeByName('C3').numberFormat = '###,##';
  sheet.getRangeByName('C3').setNumber(43782);

  // Negative number with color.
  sheet.getRangeByName('A4').setNumber(-500);
  sheet.getRangeByName('B4').setText('[Blue]#,##0');
  sheet.getRangeByName('C4').numberFormat = '[Blue]#,##0';
  sheet.getRangeByName('C4').setNumber(-500);

  // Four-decimal number.
  sheet.getRangeByName('A5').setNumber(0.0123);
  sheet.getRangeByName('B5').setText('0.0000');
  sheet.getRangeByName('C5').numberFormat = '0.0000';
  sheet.getRangeByName('C5').setNumber(0.0123);

  // Scientific notation.
  sheet.getRangeByName('A6').setNumber(1.20);
  sheet.getRangeByName('B6').setText('0.00E+00');
  sheet.getRangeByName('C6').numberFormat = '0.00E+00';
  sheet.getRangeByName('C6').setNumber(1.20);

  // Percentage.
  sheet.getRangeByName('A7').setNumber(1.20);
  sheet.getRangeByName('B7').setText('0.00%');
  sheet.getRangeByName('C7').numberFormat = '0.00%';
  sheet.getRangeByName('C7').setNumber(1.20);

  // Date.
  sheet.getRangeByName('A8').setDateTime(DateTime(2005, 12, 25));
  sheet.getRangeByName('B8').setText('m/d/yyyy');
  sheet.getRangeByName('C8').numberFormat = 'm/d/yyyy';
  sheet.getRangeByName('C8').setDateTime(DateTime(2005, 12, 25));

  // Currency.
  sheet.getRangeByName('A9').setNumber(1.20);
  sheet.getRangeByName('B9').setText(r'$#,##0.00');
  sheet.getRangeByName('C9').numberFormat = r'$#,##0.00';
  sheet.getRangeByName('C9').setNumber(1.20);

  // Accounting.
  sheet.getRangeByName('A10').setNumber(234);
  sheet.getRangeByName('B10').setText(r'_($* #,##0_)');
  sheet.getRangeByName('C10').numberFormat = r'_($* #,##0_)';
  sheet.getRangeByName('C10').setNumber(234);

  // Column widths.
  sheet.getRangeByName('A1').columnWidth = 21;
  sheet.getRangeByName('B1:C1').columnWidth = 13;

  final List<int> bytes = await workbook.save();
  workbook.dispose();
}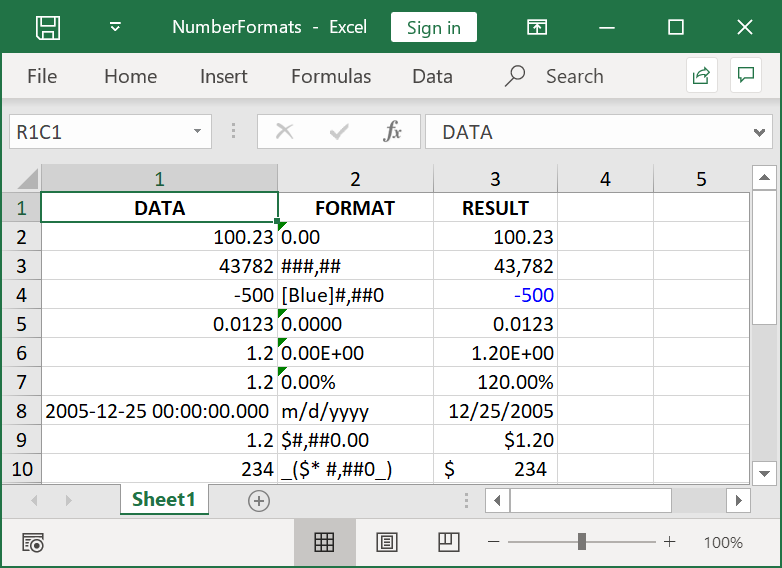
The decimal and thousands separators used in formatted values are taken from the culture of the application. The format codes in this section use
.and,as separators, but the same code with different culture settings will produce different output.
Access display text
A Range exposes the raw value of a cell through the text, number, dateTime, and formula properties. In addition, the displayText property returns the value of the cell with its number format applied. This is the value that is shown in the cell.
import 'package:syncfusion_flutter_xlsio/xlsio.dart';

Future<void> readDisplayText() async {
  final Workbook workbook = Workbook();
  final Worksheet sheet = workbook.worksheets[0];

  final Range range1 = sheet.getRangeByIndex(1, 1);
  range1.numberFormat = '0%';
  range1.setNumber(10);

  // The displayText is the formatted value, not the raw value.
  final String formatted = range1.displayText;

  // Use the formatted value (for example, log it or pass it to another API).
  // ignore: avoid_print
  print(formatted);

  final List<int> bytes = await workbook.save();
  workbook.dispose();
}
Merge and unmerge cells
Cells in a range can be merged into a single cell with the merge() method and unmerged back into individual cells with the unmerge() method. Only the value of the top-left cell of the merged range is preserved; values in the other cells of the range are discarded.
import 'package:syncfusion_flutter_xlsio/xlsio.dart';

Future<void> mergeAndUnmerge() async {
  final Workbook workbook = Workbook();
  final Worksheet sheet = workbook.worksheets[0];

  // Merge cells from A1 to C16.
  sheet.getRangeByName('A1:C16').merge();

  // Write a value while the cells are merged.
  sheet.getRangeByName('A1').setText('Merged header');

  // Unmerge the cells to restore the original layout.
  sheet.getRangeByName('A1:C16').unmerge();

  final List<int> bytes = await workbook.save();
  workbook.dispose();
}
Apply a built-in style
Syncfusion Flutter XlsIO ships with a set of built-in styles that match the styles available in Microsoft Excel. A built-in style can be applied to a range through the builtInStyle property.
import 'package:syncfusion_flutter_xlsio/xlsio.dart';

Future<void> applyBuiltInStyle() async {
  final Workbook workbook = Workbook();
  final Worksheet sheet = workbook.worksheets[0];

  sheet.getRangeByName('A2').setText('Sample');
  sheet.getRangeByName('A2').builtInStyle = BuiltInStyles.checkCell;

  final List<int> bytes = await workbook.save();
  workbook.dispose();
}
The BuiltInStyles enum includes a wide range of values such as good, bad, neutral, checkCell, calculation, linkedCell, warningText, and the various Excel cell-style presets (accent1, accent2, percent, currency, etc.). See the BuiltInStyles API reference for the full list.