Getting Started with JavaScript Diagram
This section explains how to create and render a simple Essential® JS 2 Diagram in a plain JavaScript application.
Ready to streamline your Syncfusion® JavaScript development? Discover the full potential of Syncfusion® JavaScript controls with Syncfusion® AI Coding Assistant. Effortlessly integrate, configure, and enhance your projects with intelligent, context-aware code suggestions, streamlined setups, and real-time insights—all seamlessly integrated into your preferred AI-powered IDEs like VS Code, Cursor, Syncfusion® CodeStudio and more. Explore Syncfusion® AI Coding Assistant.
Setup for local environment
Follow these steps to set up your local environment.
Step 1: Create a root folder named my-diagram-app for your application.
Step 2: Create a my-diagram-app/resources folder to store local script and style files.
Step 3: Open Visual Studio Code and create my-diagram-app/index.js and my-diagram-app/index.html files to initialize the Essential® JS 2 Diagram control.
Adding Syncfusion® resources
The Essential® JS 2 Diagram control can be initialized using one of the following methods:
- Using local script and style.
- Using CDN link for script and style.
Using local script and style
Step 1: Download Essential Studio® JavaScript (Essential® JS 2) to obtain the global scripts and styles.
Step 2: Identify the location of the script and style files from the build installation location. The syntax for the file paths are as follows:
Syntax:
Script:
**(installed location)**/Syncfusion/Essential Studio/{RELEASE_VERSION}/Web(Essential JS 2)/javascript/{PACKAGE_NAME}/dist/global/{PACKAGE_NAME}.min.js
Styles:**(installed location)**/Syncfusion/Essential Studio/{RELEASE_VERSION}/Web(Essential JS 2)/javascript/{PACKAGE_NAME}/styles/tailwind3.css
Example:
Script:
C:/Program Files (x86)/Syncfusion/Essential Studio/33.2.3/Web(Essential JS 2)/javascript/ej2-diagrams/dist/global/ej2-diagrams.min.js
Styles:C:/Program Files (x86)/Syncfusion/Essential Studio/33.2.3/Web(Essential JS 2)/javascript/ej2-diagrams/styles/tailwind3.css
Step 3: Copy the global script and style files into the resources folder.
Step 4: Add references to the scripts and styles into the index.html file to render the Syncfusion® Diagram.
The following example shows how to reference the script and style in an HTML file:
<!DOCTYPE html>
<html xmlns="http://www.w3.org/1999/xhtml">
<head>
    <title>Essential® JS 2</title>
    <!-- Essential® JS 2 tailwind3 theme -->
    <link href="resources/tailwind3.css" rel="stylesheet" type="text/css"/>

    <!-- Essential® JS 2 Diagram's global script -->
    <script src="resources/ej2.min.js" type="text/javascript"></script>
</head>

<body>
    <!-- Add the HTML <div> element for diagram  -->
    <div id="diagram"></div>
    <script src="index.js" type="text/javascript"></script>
</body>

</html>
Using CDN link for script and style
Using CDN links, you can reference the scripts and styles directly in the index.html.
Syntax:
Script:
https://cdn.syncfusion.com/ej2/{RELEASE_VERSION}/dist/{PACKAGE_NAME}.min.js
Styles:https://cdn.syncfusion.com/ej2/{RELEASE_VERSION}/{PACKAGE_NAME}/styles/tailwind3.css
Example:
Script:
https://cdn.syncfusion.com/ej2/33.2.3/dist/ej2-diagrams.min.js
Styles:https://cdn.syncfusion.com/ej2/33.2.3/ej2-diagrams/styles/tailwind3.css
The following example shows how to reference the scripts and styles in an HTML file using CDN links to render the Syncfusion® Diagram.
<!DOCTYPE html>
<html xmlns="http://www.w3.org/1999/xhtml">

<head>
    <title>Essential JS 2 Diagram</title>

    <!-- Essential JS 2 Diagram's dependent tailwind3 theme -->
    <link href="https://cdn.syncfusion.com/ej2/33.2.3/ej2-base/styles/tailwind3.css" rel="stylesheet">
    <link href="https://cdn.syncfusion.com/ej2/33.2.3/ej2-popups/styles/tailwind3.css" rel="stylesheet">
    <link href="https://cdn.syncfusion.com/ej2/33.2.3/ej2-navigations/styles/tailwind3.css" rel="stylesheet">
    <link href="https://cdn.syncfusion.com/ej2/33.2.3/ej2-diagrams/styles/tailwind3.css" rel="stylesheet">

    <!-- Essential JS 2 Diagram's global script -->
    <script src="https://cdn.syncfusion.com/ej2/33.2.3/dist/ej2.min.js" type="text/javascript"></script>
</head>

<body>
    <!-- Add the HTML <div> element for diagram  -->
    <div id="diagram"></div>
    <script src="index.js" type="text/javascript"></script>
</body>

</html>
The
{PACKAGE_NAME}.min.jsfile (e.g.,ej2-diagrams.min.js) and the package-specific{PACKAGE_NAME}/styles/tailwind3.cssfile (e.g.,ej2-diagrams/styles/tailwind3.css) contain only the Diagram package, while the combinedej2.min.jsbundle and the combinedtailwind3.cssfile include all Essential® JS 2 controls.
Create your first Diagram with nodes and connectors
This section explains how to create a simple flowchart by adding nodes, customizing their appearance, and connecting them using connectors.
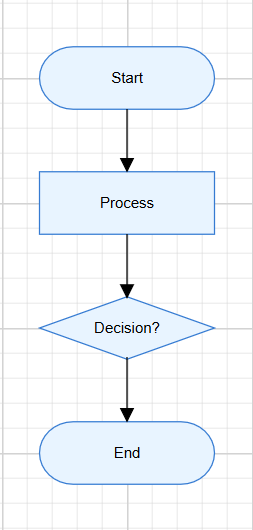
The following example creates a flowchart with four nodes: Start, Process, Decision, and End. It also applies common node and connector settings through the getNodeDefaults and getConnectorDefaults callback bindings.
Replace the entire contents of my-diagram-app/index.js with the following code:
// Node defaults function
function nodeDefaults(node) {
    node.width = 140;
    node.height = 50;
    node.style = { fill: '#E8F4FF', strokeColor: '#357BD2' };
    return node;
}

// Connector defaults function
function connectorDefaults(connector) {
    connector.type = 'Orthogonal';
    connector.targetDecorator = { shape: 'Arrow', width: 10, height: 10 };
    return connector;
}

// Initialize the JavaScript Diagram control
let diagram = new ej.diagrams.Diagram({
    width: '100%',
    height: '580px',
    getNodeDefaults: nodeDefaults,
    getConnectorDefaults: connectorDefaults,
    nodes: [
        {
            id: 'node1',
            offsetX: 300,
            offsetY: 100,
            shape: { type: 'Flow', shape: 'Terminator' },
            annotations: [{ content: 'Start' }]
        },
        {
            id: 'node2',
            offsetX: 300,
            offsetY: 200,
            shape: { type: 'Flow', shape: 'Process' },
            annotations: [{ content: 'Process' }]
        },
        {
            id: 'node3',
            offsetX: 300,
            offsetY: 300,
            shape: { type: 'Flow', shape: 'Decision' },
            annotations: [{ content: 'Decision?' }]
        },
        {
            id: 'node4',
            offsetX: 300,
            offsetY: 400,
            shape: { type: 'Flow', shape: 'Terminator' },
            annotations: [{ content: 'End' }]
        }
    ],
    connectors: [
        {
            id: 'connector1',
            sourceID: 'node1',
            targetID: 'node2'
        },
        {
            id: 'connector2',
            sourceID: 'node2',
            targetID: 'node3'
        },
        {
            id: 'connector3',
            sourceID: 'node3',
            targetID: 'node4'
        }
    ]
});

// Render initialized Diagram
diagram.appendTo('#diagram');
Replace the entire contents of my-diagram-app/index.html with the following code (using CDN references; for the local-script setup, replace the CDN URLs with your local resources/ paths):
<!DOCTYPE html>
<html xmlns="http://www.w3.org/1999/xhtml">

<head>
    <title>Essential JS 2 Diagram</title>

    <!-- Essential JS 2 Diagram's dependent tailwind3 theme -->
    <link href="https://cdn.syncfusion.com/ej2/33.2.3/ej2-base/styles/tailwind3.css" rel="stylesheet">
    <link href="https://cdn.syncfusion.com/ej2/33.2.3/ej2-popups/styles/tailwind3.css" rel="stylesheet">
    <link href="https://cdn.syncfusion.com/ej2/33.2.3/ej2-navigations/styles/tailwind3.css" rel="stylesheet">
    <link href="https://cdn.syncfusion.com/ej2/33.2.3/ej2-diagrams/styles/tailwind3.css" rel="stylesheet">

    <!-- Essential JS 2 Diagram's global script -->
    <script src="https://cdn.syncfusion.com/ej2/33.2.3/dist/ej2.min.js" type="text/javascript"></script>
</head>

<body>
    <!-- Add the HTML <div> element for diagram  -->
    <div id="diagram"></div>
    <script src="index.js" type="text/javascript"></script>
</body>

</html>
Run the application
Now, run the index.html in a web browser. It will render the Essential® JS 2 Diagram control.
For the local-script setup, serve the application via a local HTTP server (e.g., npx http-server or the Code Studio Live Server extension) instead of opening the HTML file directly with the file:/ protocol, to avoid browser security restrictions.