Getting Started with React Maps
This section explains the steps required to create a basic Maps component.
You can explore some useful features in the Maps component using the following video.
Prerequisites
Before getting started, ensure that your development environment meets the system requirements for Syncfusion® React UI components. That page documents the supported React, Node.js, and npm versions, and includes the React-version compatibility table for Syncfusion React components.
Before You Begin
This guide uses the React application structure generated by Vite with the TypeScript template.
The main files used in this guide are:
-
src/App.tsx— Defines the root React component that hosts the Maps component. -
src/main.tsx— Application entry point that rendersAppinto the#rootelement defined inindex.html. -
index.html— Root HTML file that contains the#rootcontainer element used to mount the React application.
Note: In a Vite React TypeScript application, the root component is commonly generated as
src/App.tsx. If your application uses JavaScript, the equivalent file is typicallysrc/App.jsx.
Note: This guide uses the TypeScript template because the Maps component exposes strongly typed props, and TypeScript helps catch mistakes in layer configurations (for example,
dataLabelSettingsandshapeData).
Installation and configuration
Note: As an alternative, you can create a React application using
create-react-appFor detailed instructions, refer to this documentation.
Step 1: Set up the React environment
Use Vite to create and manage React applications. Vite provides a fast development environment and optimized builds for modern React applications. Syncfusion® React documentation also recommends Vite for setting up React applications.
Start by opening a terminal on your system (Command Prompt, PowerShell, or Terminal). You may work from the default C: drive location or create a new folder and open a terminal there.
Step 2: Create a React application
Create a new React application using the following command.
npm create vite@latest my-maps-app -- --template react-tsNote: If you prefer JavaScript instead of TypeScript, create the application using
npm create vite@latest my-maps-app -- --template react.
If Vite prompts you to install dependencies and start the project immediately, choose No. The Syncfusion package is installed in a later step.
Then complete the following sub-steps in the same terminal session to finish the project setup:
-
Navigate to the project folder so subsequent commands run inside the new project:
cd my-maps-app -
Install the application dependencies declared by the Vite template:
npm install
Step 3: Install the Syncfusion® React Map package
All Syncfusion Essential® JS 2 packages are available in the npmjs.com registry.
Install the React Maps package using the following command:
npm install @syncfusion/ej2-react-mapsInstalling
@syncfusion/ej2-react-mapsautomatically installs the required dependency packages and adds the Maps package to the dependencies section of thepackage.jsonfile.
Step 4: Download the world map shape data
Download the world_map.ts file from the Syncfusion Downloads page and place it in your project’s src folder (for example, src/world_map.ts).
The file is a TypeScript module that performs a named export of a world_map constant. The value is a GeoJSON FeatureCollection, and each Feature.properties object includes a name field (for example, "India", "United States of America") that is used later for data labels. You should import it as a named import:
import { world_map } from './world_map';Note: If the file from the download link is a
.jsmodule with adefaultexport, change the import toimport world_map from './world_map';and pass it asshapeData={world_map}accordingly.
Step 5: Add Map to the project
Add the Maps component to src/App.tsx using the following code.
import { world_map } from './world_map';
import { MapsComponent, LayersDirective, LayerDirective } from '@syncfusion/ej2-react-maps';

function App() {
    return (
        <div className="App">
            <MapsComponent id="maps">
                <LayersDirective>
                    <LayerDirective shapeData={world_map}>
                    </LayerDirective>
                </LayersDirective>
            </MapsComponent>
        </div>
    );
}

export default App;
Note: At this stage, only the basic map is rendered, without any additional features applied.
Step 6: Module Injection
The Maps component is divided into feature-specific modules. To use a feature, you must inject its module via the Inject component — only the modules you actually use need to be injected.
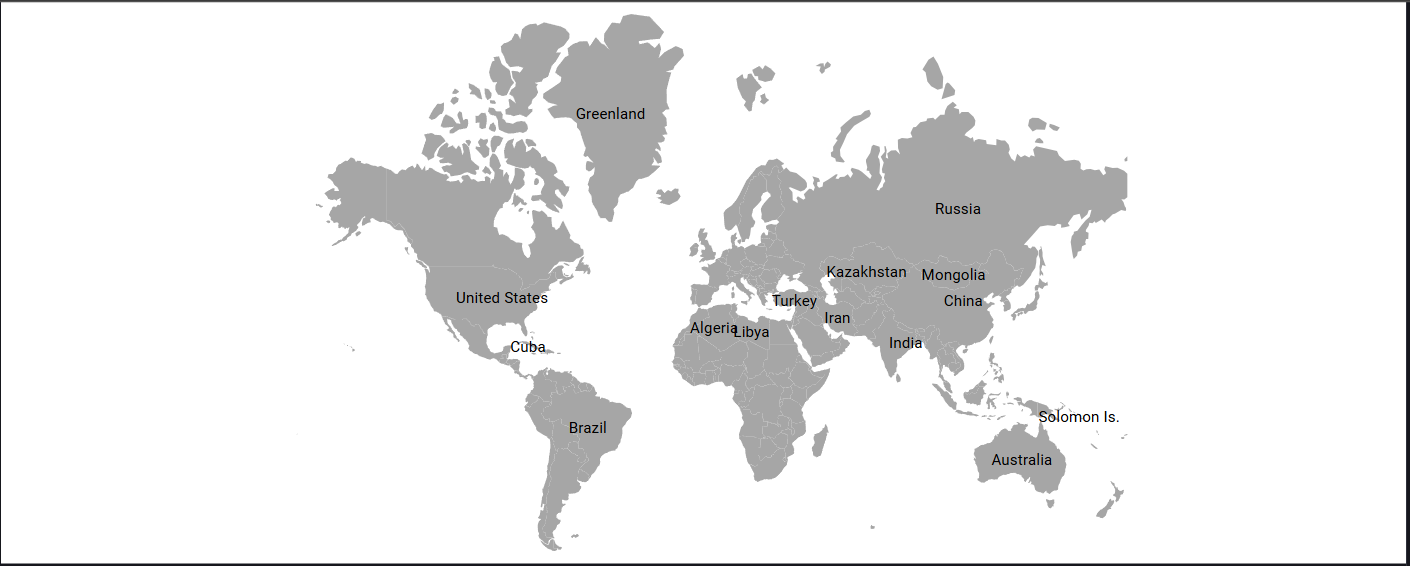
In this step, you inject a single module — DataLabel — so that country names are displayed on the map:
DataLabel – enables data labels (in this guide, country names) on the map.
For projects that need other features (such as Tooltip, Legend, Zoom, or Highlight), add the corresponding import and include it in the services array.
Update src/App.tsx to inject DataLabel and configure the data labels on the layer:
import { world_map } from './world_map';
import { MapsComponent, Inject, DataLabel, LayerDirective, LayersDirective } from '@syncfusion/ej2-react-maps';

function App() {
    return (
        const dataLabelSettings = {
            visible: true,
            labelPath: 'name',
            smartLabelMode: 'Hide'
        };
        <div className="App">
            <MapsComponent id="maps">
                <Inject services={[DataLabel]} />
                <LayersDirective>
                    <LayerDirective shapeData={world_map} dataLabelSettings={dataLabelSettings}>
                    </LayerDirective>
                </LayersDirective>
            </MapsComponent>
        </div>
    );
}

export default App;
dataLabelSettings options used in this example
| Property | Value | Description |
|---|---|---|
visible |
true |
Turns on the data labels so they are rendered on the map. |
labelPath |
'name' |
The name of the property on each shape’s Feature.properties object whose value is shown as the label. Here, name is the country name field in the world_map GeoJSON (for example, "India", "Brazil"). |
smartLabelMode |
'Hide' |
Hides labels that would overlap with neighbouring labels to keep the map readable. See DataLabelSettings for the full set of options (Intersect, Trim, etc.). |
Step 7: Run the application
Run the application using the following command:
npm run devOpen the URL shown in the terminal (for example, http://localhost:5173/) in your browser. The application displays the basic map as shown below:
Troubleshooting
If the map does not appear as expected, work through the following common issues:
-
Blank canvas or zero-height map: The
MapsComponentfills its container, so a missing height on the parent element is the most common cause. Wrap the component in a container with a CSS class, such as<div className="map-container">, and define.map-container { height: 600px; }. -
“Cannot find module ‘./world_map’” / shape data not rendered — Make sure
world_map.tsis saved insrc/and that the import path matches the file location and the file’s export style (named vs default export). -
Data labels do not show up — Confirm that the
DataLabelservice is injected via<Inject services={[DataLabel]} />and thatdataLabelSettings.visibleistrue. Also confirm thelabelPathvalue (for example,'name') matches a key in the GeoJSON’sFeature.properties. -
'Inject' is not exportedor module not found — Update@syncfusion/ej2-react-mapsto a supported version and restart the dev server. -
Port
5173already in use — Vite will pick the next free port automatically; use the URL it prints in the terminal. -
TypeScript errors on
world_map— Addsrc/world_map.tsto theincludearray intsconfig.json(the default Vite TS config already includessrc, so this is usually unnecessary).
See also
- Layers in React Maps — Learn how to add and configure multiple layers and sublayers in the Maps component.
- Data label in React Maps — Configure data labels to display information about map shapes.
- Populate data in React Maps — Bind data sources to the Maps component and visualize statistical data.
- Map providers in React Maps — Integrate map providers such as Bing and OpenStreetMap as main layers.
- Markers in React Maps — Add markers to highlight specific locations on the map.
- Legend in React Maps — Display a legend that maps colors to data values.
- Customization in React Maps — Customize the appearance of the Maps component, including background, borders, and titles.