Getting Started
2 Nov 201611 minutes to read
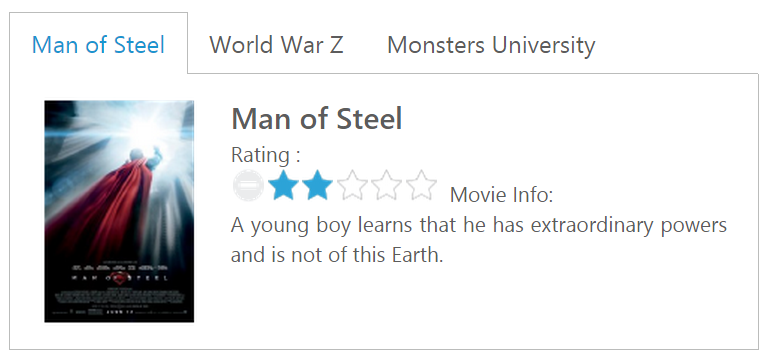
This section explains briefly about how to create a Rating control in your application with JavaScript. Essential JavaScript Rating helps to select the number of stars that represent Rating. Here, you can learn how to create Rating control in a real-time movie download application and also learn how to rate the application.
The following screenshot illustrates the functionality of a Rating widget with a Rating range of 0 to 5.

##Create a Rating Widget
- To create Syncfusion Aurelia application refer [Aurelia Getting Started documentation](https://help.syncfusion.com/aurelia/overview#getting-started “”).
- Create
Ratingfolder insidesrc/sampleslocation. - Create
Rating.htmlfile insidesrc/samples/ratingfolder and use the below code for rendering RichTextEditor component
<template>
    <require from="./default-functionalities.css"></require>
    <div>
       <ej-tab id="moviesTab" style="width: 500px">
					<ul>
						<li><a href="#steelman">Man of Steel</a></li>
						<li><a href="#woldwar">World War Z</a></li>
						<li><a href="#unive">Monsters University</a></li>
					</ul>
					<div id="steelman">
							<table>
								<tr>
									<td class="movies-img" valign="top">
										<img src="images/rating/mos.png" alt="mos" />
									</td>
									<td valign="top">
										<div>
											<span class="movie-header">Man of Steel</span><br />
											Rating :
													<br />
											<input id="mosRating" type="text" class="rating" ej-rating="e-value.bind:mosRatingValue" />
											<span>Movie Info:</span>
											<p>
												A young boy learns that he has extraordinary powers and is not of this Earth.
											</p>
										</div>
									</td>
								</tr>
							</table>
					</div>
					<div id="woldwar">
						<table>
							<tr>
								<td class="movies-img" valign="top">
									<img src="images/rating/wwz.png" alt="mos" />
								</td>
								<td valign="top">
									<div>
										<span class="movie-header">World War Z</span><br />
										Rating :
												<br />
										<input id="wwzRating" type="text" class="rating" ej-rating="e-value.bind:wwwzRatingValue" />
										<span>Movie Info:</span>
										<p>
											The story revolves around United Nations employee Gerry Lane (Pitt).
										</p>
									</div>
								</td>
							</tr>
						</table>
					</div>
					<div id="unive">
						<table>
							<tr>
								<td class="movies-img" valign="top">
									<img src="images/rating/mu.png" alt="mos" />
								</td>
								<td valign="top">
									<div>
										<span class="movie-header">Monsters University</span><br />
										Rating :
												<br />
										<input id="univRating" type="text" class="rating" ej-rating="e-value.bind:univRatingValue" />
										<span>Movie Info:</span>
										<p>
											Mike Wazowski and James P. Sullivan are an inseparable pair, but that wasn't always the case.
										</p>
									</div>
								</td>
							</tr>
						</table>
					</div>
                </ej-tab>
    </div>
</template>- Create
rating.jsfile insidesrc/samples/ratingfolder with below code snippet.
export class DefaultFunctionalities {
  constructor() {
    this.mosRatingValue = 3;
    this.wwwzRatingValue = 4;
    this.univRatingValue = 4;
  }
}
Apply the following styles to show the Rating widget in the horizontal order.
.movies-img {
    width: 125px;
}

.movie-header {
    font-size: 20px;
    font-weight: 600;
}
The following screenshot displays a Rating widget.
##Set the Min and Max Value
In a real-time scenario, you can extend the range by using the properties minValue and maxValue in the Rating widget.
<template>
    <div class="rating-minvalue-frame">
                    <table>
                        <tr>
                            <td valign="top">Full Precision :
                            </td>
                            <td>
                                <input id="rating" type="text" class="rating" ej-rating="e-value.bind:ratingValue;e-minvalue.bind:minValue;e-maxvalue.bind:maxValue" />
                            </td>
                        </tr>
                    </table>
                </div>
</template>export class PrecisionRating {
constructor() {
this.ratingValue = 4;
this.minValue = 2;
this.maxValue = 10;
}
}The above code example displays the following output.

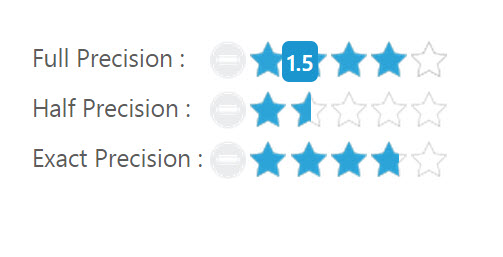
##Set Precision
In a real-time movie Rating scenario, you can set precision in between two whole numbers, such as 2.5 or 3.7 and it is done using the property precision by changing the value to ej.Rating.Precision.Half or ej.Rating.Precision.Exact.
<template>
    <div class="rating-precision-frame">
                    <table>
                        <tr>
                            <td valign="top">Full Precision :
                            </td>
                            <td>
                                <input id="fullRating" type="text" class="rating" ej-rating="e-value.bind:fullRatingValue" />
                            </td>
                        </tr>
                        <tr>
                            <td valign="top">Half Precision :
                            </td>
                            <td>
                                <input id="halfRating" type="text" class="rating" ej-rating="e-value.bind:halfRatingValue;e-precision.bind:half" />
                            </td>
                        </tr>
                        <tr>
                            <td valign="top">Exact Precision :
                            </td>
                            <td>
                                <input id="exactRating" type="text" class="rating" ej-rating="e-value.bind:exactRatingValue;e-precision.bind:exact" />
                            </td>
                        </tr>
                    </table>
                </div>
</template>export class PrecisionRating {
constructor() {
this.fullRatingValue = 4;
this.halfRatingValue = 3.5;
this.exactRatingValue = 3.7;
this.half = ej.Rating.Precision.Half;
this.exact = ej.Rating.Precision.Exact;
}
}The above code example displays the following output.
You can also add additional functionalities such as orientation, event tracer and API’s to the Rating.