How can I help you?
Getting Started
Creating your first RadialMenu in MVC application
-
Create an MVC Project and add necessary assemblies, scripts and CSS files given in MVC-Getting Started Documentation.
-
Add RadialMenu control using the helper from EJ namespace.
@Html.EJ().RadialMenu("RadialMenu1")- Execute the code and get a empty RadialMenu control as below

Create a Simple RadialMenu with RTE content
RadialMenu can be rendered using ul li element or div element.
Create a simple Radial Menu
The following steps guide you to add a Radial Menu control.
Create a MVC Project and add the necessary DLL and scripts with the help of the given MVC Getting Started documentation.
Add the following code snippet in corresponding View page to render the RadialMenu.
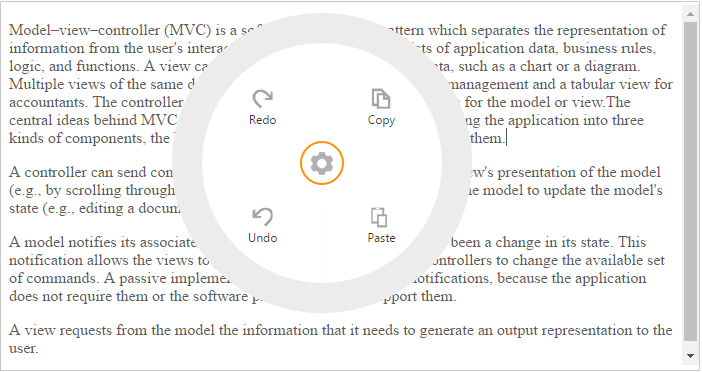
You can set the images for each item by giving the image url with the ImageURL attribute in the RadialMenuItems and text with Text attribute. Refer the following code example.Initialize Radial Menu control and set its target content as follows.
@Html.EJ().RadialMenu("defaultRadialMenu").ImageClass("e-radial").TargetElementId("radialtarget1").Items(items
    =>
    {
        items.Add().ImageURL(Url.Content("mvc.syncfusion.com/demos/web/Images/RadialMenu/copy.png")).Text("Copy");
        items.Add().ImageURL(Url.Content("mvc.syncfusion.com/demos/web/Images/RadialMenu/paste.png")).Text("Paste");
        items.Add().ImageURL(Url.Content("mvc.syncfusion.com/demos/web/Images/RadialMenu/redo.png")).Text("Redo");
        items.Add().ImageURL(Url.Content("mvc.syncfusion.com/demos/web/Images/RadialMenu/undo.png")).Text("Undo");
    })
Refer to the following code example to add target content to the Radial Menu.
<div id="contentDiv">
            <div id="radialtarget1" class="content-container-fluid">
                <div class="row">
                    <div class="cols-sample-area">
                        <textarea id="rteSample1" rows="10" cols="70" style="height: 440px">
                            <p>Model–view–controller (MVC) is a software architecture pattern which separates the representation of information from the user's interaction with it.
                            The model consists of application data, business rules, logic, and functions. A view can be any output representation of data, such as a chart or a diagram.
                            Multiple views of the same data are possible, such as a bar chart for management and a tabular view for accountants.
                            The controller mediates input, converting it to commands for the model or view.The central ideas behind MVC are code reusable and in addition to dividing the application into three kinds of components, the MVC design defines the interactions between them.</p>
                            <p>A controller can send commands to its associated view to change the view's presentation of the model (e.g., by scrolling through a document). It can also send commands to the model to update the model's state (e.g., editing a document).</p>

                            <p>A model notifies its associated views and controllers when there has been a change in its state. This notification allows the views to produce updated output, and the controllers to change the available set of commands. A passive implementation of MVC omits these notifications, because the application does not require them or the software platform does not support them.</p>

                            <p>A view requests from the model the information that it needs to generate an output representation to the user.</p>
                        </textarea>
                        @{
                            Html.EJ().RTE("rteSample1").Width("100%").MinWidth("10px").ShowContextMenu(false).ClientSideEvents(clientSideEvent => clientSideEvent.Create("rteCreate").Change("rteChange").Select("radialShow")).ShowToolbar(false).Render();
                        }
                    </div>
                </div>
                </div>
                </div>
Add the following styles in your code.
<style type="text/css" class="cssStyles">
       .e-radialmenu .e-radial
        {
            background-image: url("mvc.syncfusion.com/demos/web/Images/RadialMenu/settings.png");
        }

        #rteSample1
        {
            width: 100%;
        }
    </style>
You can display the Radial Menu by performing desired action on the target content while selecting the text inside the target. Therefore, call the radialShow method in the select action of the content. Refer the following code example and add it to the script.
function radialShow(e) {
            var target = $("#radialRarget1"), radialRadius = 150, radialDiameter = 2 * radialRadius,
            // To get Iframe positions
                iframeY = target.offset().top + e.event.clientY, iframeX = target.offset().left + e.event.clientX,
            // To set Radial Menu position within target
                x = iframeX > target.width() - radialRadius ? target.width() - radialDiameter : (iframeX > radialRadius ? iframeX - radialRadius : 0),
                y = iframeY > target.height() - radialRadius ? target.height() - radialDiameter : (iframeY > radialRadius ? iframeY - radialRadius : 0);
                radialElement.ejRadialMenu("setPosition", x, y);
            }
Run the above code and select any text inside the target. The settings icon is displayed. Click that icon to render the following output.
