Tooltip Support
10 Aug 20173 minutes to read
The following steps explains you the configuration of Tooltip properties in ListBox.
-
Add the below code in your page to render the ListBox with tooltip
 // Add the following code in View page to configure ListBox widget
 <div id="control">
     <h5 class="ctrllabel">
         Select a skill
     </h5>
     @Html.EJ().ListBox("listBoxSample").Datasource((IEnumerable<SkillSet>)ViewBag.datasource).ListBoxFields(df =>
     df.Text("text").TooltipText("tooltip"))
 </div>
// Add the following code to add list items in the controller page public class SkillSet { public string text { get; set; } public string tooltip { get; set; } } public ActionResult Index() { List<SkillSet> skill = new List<SkillSet>(); skill.Add(new SkillSet { text = "ASP.NET", tooltip = "ASP.NET" }); skill.Add(new SkillSet { text = "ActionScript", tooltip = "ActionScript"}); skill.Add(new SkillSet { text = "Basic", tooltip = "Basic" }); skill.Add(new SkillSet { text = "C++", tooltip = "C++" }); skill.Add(new SkillSet { text = "C#", tooltip = "C#" }); skill.Add(new SkillSet { text = "dBase", tooltip = "dBase" }); skill.Add(new SkillSet { text = "Delphi", tooltip = "Delphi" }); skill.Add(new SkillSet { text = "ESPOL", tooltip = "ESPOL" }); skill.Add(new SkillSet { text = "F#", tooltip = "F#" }); skill.Add(new SkillSet { text = "FoxPro", tooltip = "FoxPro" }); skill.Add(new SkillSet { text = "Java", tooltip = "Java" }); skill.Add(new SkillSet { text = "J#", tooltip = "J#" }); skill.Add(new SkillSet { text = "Lisp", tooltip = "Lisp" }); skill.Add(new SkillSet { text = "Logo", tooltip = "Logo" }); skill.Add(new SkillSet { text = "PHP", tooltip = "PHP" }); ViewBag.datasource = skill; return View(); } -
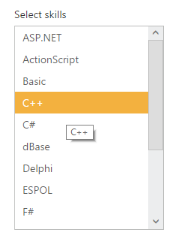
Output of the above steps.