How can I help you?
Swim lane
Swim-lane Diagrams are typically used to visualize the relationship between a business process and the department responsible for it by focusing on the logical relationships between activities. Swimlanes may be arranged either horizontally or vertically.
##Initialize the Diagram model
Create a Object for diagram properties model element that can be used to initialize the diagram widget as shown below.
//Initialize the Diagram Model
            DiagramProperties Model = new DiagramProperties();
Create a swimlane
To create a swimlane, you need to use the Swimlane class. By default, the swimlanes are arranged vertically. You can change that with the Orientation property of swimlane.
The following code example illustrates how to define a swimlane object.
//Disables tooltip for any node/connector
            DiagramProperties Model = new DiagramProperties();

            SwimLane Swimlane = new SwimLane();
            Swimlane.Name = "swimlaneNode";
            //Changes the orientation
            Swimlane.Orientation = "horizontal";
            //Sets the position and size
            Swimlane.OffsetX = 400;
            Swimlane.OffsetY = 200;
            Swimlane.Height = 100;
            Swimlane.Width = 700;
            //Sets the type of object as swimlane
            Swimlane.IsSwimlane = true;
Add swimlane into diagram
Adding a swimlane to the Diagram is same as adding a node. You can add either through the Nodes collection or through the client side method add. You can also drag and drop a swimlane from symbol palette.
For more information about adding a node/swimlane to the Diagram, refer to Add Nodes.
The following code example illustrates how to add a swimlane to the Diagram through Nodes collection.
//Add the swimlane in to the Nodes collection
            Model.Nodes.Add(Swimlane);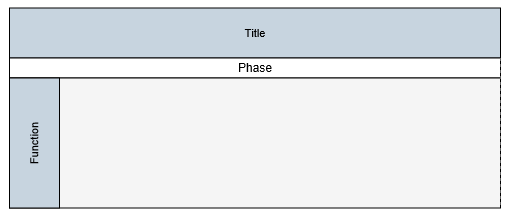
Headers
Swimlane allows to define a header to textually describe it. The Header property of swimlane allows you to define its textual description(Text) and to customize its appearance. The following code example illustrates how to define swimlane header.
//Defines the header and format its text
            Header Header = new Header();
            Header.Text = "Swimlane";
            Header.Height = 50;
            Header.FillColor = "#C7D4DF";
            Header.FontColor = "black";
            Header.FontSize = 11;
            Header.FontFamily = "Arial";
            Header.Italic = true;
            Header.Bold = true;
            Header.TextDecoration = "underline";

            SwimLane Swimlane = new SwimLane();
            Swimlane.Name = "swimlaneNode";
            //Changes the orientation
            Swimlane.Orientation = "horizontal";
            //Sets the position and size
            Swimlane.OffsetX = 400;
            Swimlane.OffsetY = 200;
            Swimlane.Height = 100;
            Swimlane.Width = 700;
            //Sets the type of object as swimlane
            Swimlane.IsSwimlane = true;

            //Sets the swimlane header
            Swimlane.Header = Header;
            //Add the swimlane in to the Nodes collection
Model.Nodes.Add(Swimlane);//Updates the swimlane header at runtime
var diagram = $("#diagram").ejDiagram("instance");
diagram.updateNode("swimlaneName", { header: {fontColor:"white"} })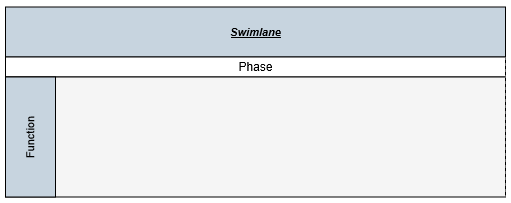
Update Header
Swimlane headers can be updated at runtime with the client side method updateNode. The following code example illustrates how to update a lane’s header at runtime.
var diagram = $("#diagram").ejDiagram("instance");

    //Defines the header and format its text
    var header = {
        text: "swimlane",
        bold: true,
        italic: true
    };

    diagram.updateNode("swimlane", { header: header });
Disable headers
You can hide the swimlane headers. The following code example illustrates how to hide headers.
//Defines the header
            Header Header = new Header();
            //Sets "0" to hide header
            Header.Height = 0;
Lane
Lane is a functional unit or a responsible department of a business process that helps to map a process within the functional unit or in between other functional units.
You can add any number of lanes to a swimlane and the lanes are automatically stacked inside a swimlane based in the order they are added.
Create an empty lane
To create an empty lane, you need to define an object with IsLane property that helps identify the object as a lane. The following example illustrates how to define a swimlane with a lane.
SwimLane Swimlane = new SwimLane();
            Swimlane.Name = "swimlaneNode";
            //Changes the orientation
            Swimlane.Orientation = "horizontal";
            //Sets the position and size
            Swimlane.OffsetX = 400;
            Swimlane.OffsetY = 200;
            Swimlane.Height = 100;
            Swimlane.Width = 700;
            Swimlane.Header = Header;
            //Sets the type of object as swimlane
            Swimlane.Type = "swimlane";

            //Defines an empty lanes Collection
            Collection Lanes = new Collection();
            Lane Lane = new Lane();
            Lane.Name = "lane1";
            Lane.FillColor = "#f5f5f5";
            Lane.Height = 120;
            //Sets the object as Lane
            Lane.IsLane = true;
            Lanes.Add(Lane);
            Swimlane.Lanes = Lanes;

            //Add the swimlane in to the Nodes collection
            Model.Nodes.Add(Swimlane);
Create a lane with header
The Header property of the lane allows you to textually describe the lane(text) and to customize the appearance of the description. The following code example illustrates how to define a lane header.
You can limit the size of a lane with its MinWidth, MinHeight, MaxWidth, and MaxHeight properties.
//Defines the header and format its text
            Header Header = new Header();
            Header.Text = "Swimlane";
            Header.Height = 50;
            Header.FillColor = "#C7D4DF";
            Header.FontColor = "black";
            Header.FontSize = 11;
            Header.FontFamily = "Arial";

            Header LaneHeader = new Header();
            LaneHeader.Text = "Lane";
            LaneHeader.Width = 50;
            LaneHeader.FillColor = "#C7D4DF";
            LaneHeader.FontColor = "black";
            LaneHeader.FontSize = 11;
            LaneHeader.FontFamily = "Arial";

            //Defines an empty lanes Collection
            Collection Lanes = new Collection();
            Lane Lane = new Lane();
            Lane.Name = "lane1";
            Lane.FillColor = "#f5f5f5";
            Lane.Height = 120;
            //Sets the object as Lane
            Lane.IsLane = true;
            //Sets the object as Lane
            Lane.Header = LaneHeader;
            //Specifies the minimum and maximum size of the lane
            Lane.MinWidth = 500;
            Lane.MaxWidth = 700;
            Lane.MinHeight = 120;
            Lane.MaxHeight = 200;
            Lanes.Add(Lane);

            SwimLane Swimlane = new SwimLane();
            Swimlane.Name = "swimlaneNode";
            //Changes the orientation
            Swimlane.Orientation = "horizontal";
            //Sets the position and size
            Swimlane.OffsetX = 400;
            Swimlane.OffsetY = 200;
            Swimlane.Height = 100;
            Swimlane.Width = 700;
            Swimlane.Header = Header;
            //Sets the type of object as swimlane
            Swimlane.Type = "swimlane";
            Swimlane.Lanes = Lanes;

            //Add the swimlane in to the Nodes collection
            Model.Nodes.Add(Swimlane);
Disable/Update header
You can disable/update the lane header at runtime with the client side method, updateNode. The following code example illustrates how to disable the lane header at run time.
var diagram = $("#diagram").ejDiagram("instance");

        //Sets "0" to hide header
        diagram.updateNode("laneName", { header: {height: 0} })
Add nodes to a lane
To add nodes to a lane, You need to add them to the Children collection of lane. The following code example illustrates how to add nodes to a lane.
Label Label = new Label() { Text = "Node" };
            Node Child = new Node()
            {
                Name = "node",
                Width = 70,
                Height = 30,
                MarginLeft = 70,
                MarginTop = 1
            };

            //Defines an empty lanes Collection
            Collection Lanes = new Collection();
            //Defines an empty Children Collection
            Collection Children = new Collection();
            Lane Lane = new Lane();
            Lane.Name = "lane1";
            Lane.FillColor = "#f5f5f5";
            Lane.Height = 120;
            //Sets the object as Lane
            Lane.IsLane = true;
            //Sets the object as Lane
            Lane.Header = LaneHeader;

            //Add the Child to the children of the lane
            Children.Add(Child);
            Lane.Children = Children;
            Lanes.Add(Lane);

            SwimLane Swimlane = new SwimLane();
            Swimlane.Name = "swimlaneNode";
            //Changes the orientation
            Swimlane.Orientation = "horizontal";
            //Sets the position and size
            Swimlane.OffsetX = 400;
            Swimlane.OffsetY = 200;
            Swimlane.Height = 100;
            Swimlane.Width = 700;
            Swimlane.Header = Header;
            Swimlane.Lanes = Lanes;

            //Add the swimlane in to the Nodes collection
            Model.Nodes.Add(Swimlane);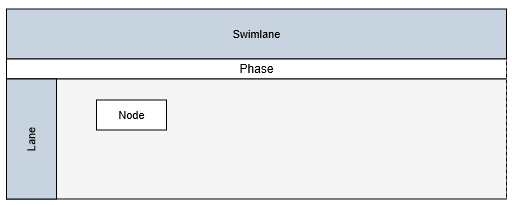
Phase
Phases are the sub-processes that are used to break the swimlane into multiple smaller regions.
Add phase
To define a phase, you have to set the length of the region to the Offset property of phase. Every region can be textually described with the Label property of phase.
The following code example illustrates how to add a phase on initializing swimlane.
Label PhaseLabel = new Label() { Text = "Phase1" };
            //Defines an empty Children Collection
            Collection Phases = new Collection();
            //Creates a phase
            Phase Phase1 = new Phase()
            {
                Name = "Phase1",
                //Length of the first region
                Offset = 300,
                //Initializes labels for phases
                Label = PhaseLabel,
                //Specifies the appearance of separator
                LineWidth = 1,
                LineDashArray = "3,3",
                LineColor = "#606060"
            };
            PhaseLabel = new Label() { Text = "Phase2" };
            Phase Phase2 = new Phase()
            {
                Name = "Phase2",
                Label = PhaseLabel,
            };
            Phases.Add(Phase1);
            Phases.Add(Phase2);

            SwimLane Swimlane = new SwimLane();
            Swimlane.Name = "swimlaneNode";
            //Changes the orientation
            Swimlane.Orientation = "horizontal";
            //Sets the position and size
            Swimlane.OffsetX = 400;
            Swimlane.OffsetY = 200;
            Swimlane.Height = 100;
            Swimlane.Width = 700;
            Swimlane.Header = Header;
            //Sets the type of object as swimlane
            Swimlane.Type = "swimlane";

            //Sets the Lanes Collection
            Swimlane.Lanes = Lanes;

            //Sets the Phase Collection
            Swimlane.Phases = Phases;
            //Add the swimlane in to the Nodes collection
            Model.Nodes.Add(Swimlane);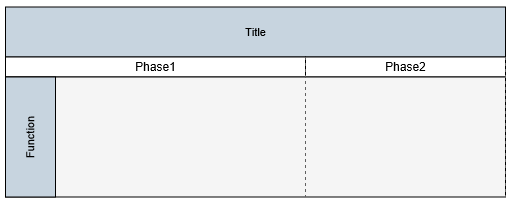
Add phase at runtime
You can add a region at runtime with the client side method, addPhase. The following code example illustrates how to add a phase at runtime.
var phase = {
        name: "Phase3",
        label: { text: "Phase3" }
    };

    var diagram = $("#diagram").ejDiagram("instance");
    diagram.addPhase("swimlaneName", phase);
A phase can be updated at runtime with the client side API updateNode. The following code example illustrates how to a update phase at runtime.
var diagram = $("#diagram").ejDiagram("instance");
    var options = {
        //Specifies the style of the phase to be updated
        lineDashArray: "3,3",
        lineColor: "#C7D4DF",
        lineWidth: 2
    }
    diagram.updateNode("phaseName", options);
NOTE
A default phase is added, when the phase collection of the swimlane is empty. When the phase collection is initialized, a default phase is appended at the end of swimlane.
Limitations
- You cannot add connectors as the children of lanes.