How To section in ASP.NET MVC ComboBox
18 Nov 201820 minutes to read
Configure the Cascading ComboBox
The cascading ComboBox is a series of ComboBox, where the value of one ComboBox depends upon the another value. This can be configured by using the change event of the parent ComboBox. Within that change event handler, data has to be loaded to the child ComboBox based on the selected value of the parent ComboBox.
The following example shows the cascade behavior of the country, state, and city
ComboBox. Here, the dataBind method is used to reflect the property changes immediately
to the ComboBox.
<div class="frame">
       <div class="row">
                    <div class="col-xs-8 col-sm-4">
            <span class="txt">Select Group</span>
            @Html.EJ().ComboBox("groupsList").Datasource((IEnumerable<groups>)ViewBag.datasource).ComboBoxFields(f => f.Value("parentId").Text("text")).ClientSideEvents(e => e.Change("onChange")).Placeholder("Select")
         </div>
                    <div class="col-xs-8 col-sm-4" >
            <span class="txt">Select Country</span>
            @Html.EJ().ComboBox("countryList").Datasource((IEnumerable<Countries>)ViewBag.datasource1).ComboBoxFields(f=>f.Text("text")).Enabled(false)
        </div>
        </div>
    </div>


    <script type="text/javascript">
        function onChange(e) {
            var country = $('#countryList').data("ejComboBox");
            if (e.model.value == null) country.option({ enabled: false });
            else country.option({ enabled: true, query: new ej.Query().where('parentId', 'equal', e.model.value), value: null });
        }
</script>List<groups> group = new List<groups>();
List<Countries> country = new List<Countries>();
public ActionResult Cascading()
{
group.Add(new groups { parentId = "a", text = "Group A" });
group.Add(new groups { parentId = "b", text = "Group B" });
group.Add(new groups { parentId = "c", text = "Group C" });
group.Add(new groups { parentId = "d", text = "Group D" });
group.Add(new groups { parentId = "e", text = "Group E" });
ViewBag.datasource = group;
country.Add(new Countries { value = 11, parentId = "a", text = "Algeria" });
country.Add(new Countries { value = 12, parentId = "a", text = "Armenia"});
country.Add(new Countries { value = 13, parentId = "a", text = "Bangladesh" });
country.Add(new Countries { value = 14, parentId = "a", text = "Cuba"});
country.Add(new Countries { value = 15, parentId = "b", text = "Denmark"});
country.Add(new Countries { value = 16, parentId = "b", text = "Egypt" });
country.Add(new Countries { value = 17, parentId = "c", text = "Finland" });
country.Add(new Countries { value = 18, parentId = "c", text = "India" });
country.Add(new Countries { value = 19, parentId = "c", text = "Malaysia" });
country.Add(new Countries { value = 20, parentId = "d", text = "New Zealand" });
country.Add(new Countries { value = 21, parentId = "d", text = "Norway" });
country.Add(new Countries { value = 22, parentId = "d", text = "Romania" });
country.Add(new Countries { value = 23, parentId = "e", text = "Singapore" });
country.Add(new Countries { value = 24, parentId = "e", text = "Thailand" });
country.Add(new Countries { value = 25, parentId = "e", text = "Ukraine"});
ViewBag.datasource1 = country;
return View();
}
}
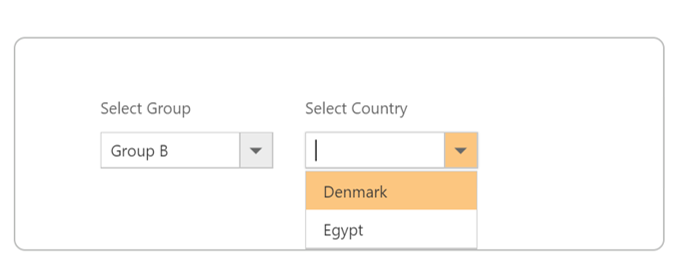
}Output for ComboBox control is as follows.

Show the list items with icons
You can render icons to the list items by mapping the
IconCss field. This IconCss field create a span in the list item with mapped class name to allow styling as per your need.
In the following sample, icon classes are mapped with IconCss field.
<div class="frame">
        <div class="control">
            @Html.EJ().ComboBox("maillots").Datasource((IEnumerable<IconCss>)ViewBag.datasource).ComboBoxFields(f => f.Text("Name").IconCss("IconClass")).Placeholder("Select a icon").Width("100%")
        </div>
    </div>
    <style>
    .mail {
    display: block;
    background-image: url('../../Images/dropdownlist/iconsapps.png');
    height: 25px;
    width: 25px;
    background-position: center center;
    background-repeat: no-repeat;
}

    .mail.done {
        background-position: 0 0;
    }

    .mail.moveto {
        background-position: 0 -22px;
    }

    .mail.categorize {
        background-position: 0 -46px;
    }

    .mail.flag {
        background-position: 0 -70px;
    }

    .mail.forward {
        background-position: 0 -94px;
    }

    .mail.new {
        background-position: 0 -116px;
    }

    .mail.reply {
        background-position: 0 -140px;
    }

    .mail.meeting {
        background-position: 0 -164px;
    }

.control {
    margin-left: 20px;
}

.ctrllabel {
    padding-bottom: 3px;
}
</style>public string Name { get; set; }
public string IconClass { get; set; }
public static List<IconCss> GetIconList()
{
List<IconCss> icon = new List<IconCss>();
icon.Add(new IconCss { Name = "Categorize and Move", IconClass = "mail categorize" });
icon.Add(new IconCss { IconClass = "mail done", Name = "Done" });
icon.Add(new IconCss { IconClass = "mail flag", Name = "Flag & Move" });
icon.Add(new IconCss { IconClass = "mail forward", Name = "Forward" });
icon.Add(new IconCss { IconClass = "mail moveto", Name = "Move to Folder" });
icon.Add(new IconCss { IconClass = "mail new", Name = "New E-mail" });
icon.Add(new IconCss { IconClass = "mail meeting", Name = "New Meeting" });
icon.Add(new IconCss { IconClass = "mail reply", Name = "Reply & Delete" });
return icon;
}
public ActionResult Icons()
{
ViewBag.datasource = IconCss.GetIconList();
return View();
}
}
}Output for ComboBox control is as follows.
![]()
AutoFill supported with ComboBox
The ComboBox supports the AutoFill behavior with the help of AutoFill property. Whenever you change the input value,
the ComboBox will autocomplete your data by matching the typed character. If no matches found, the ComboBox will not suggest any item.
In the following sample, showcase that how to work autofill with ComboBox.
<div class="frame">
        <div class="control">
            @{
                Html.EJ()
                    .ComboBox("groupingCountry")
                    .Datasource((IEnumerable<Countries>)ViewBag.datasource)
                    .Width("100%")
                    .ComboBoxFields(fields => fields.Text("text"))
                    .Placeholder("Select a country")
                    .AutoFill(true)
                    .Render();
            }
        </div>
</div>public string text { get; set; }
public string category { get; set; }
public static List<Countries> GetCountries()
{
List<Countries> country = new List<Countries>();
country.Add(new Countries { text = "Austria", category = "A" });
country.Add(new Countries { text = "Australia", category = "A" });
country.Add(new Countries { text = "Antarctica", category = "A" });
country.Add(new Countries { text = "Bangladesh", category = "B" });
country.Add(new Countries { text = "Brazil", category = "B" });
country.Add(new Countries { text = "Canada", category = "C" });
country.Add(new Countries { text = "Cuba", category = "C" });
country.Add(new Countries { text = "Denmark", category = "D" });
country.Add(new Countries { text = "Dominica", category = "D" });
return country;
}
}
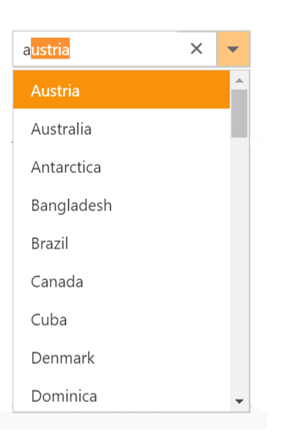
}Output for grouping ComboBox control is as follows.

Validation of ComboBox using jQuery Validator
Validation of ComboBox can be done on form submission using jQuery Validations by adding name attribute for ComboBox through htmlAttributes property. Also, you can remove this error message during item selection through select or change event of ComboBox
NOTE
jquery.validate.min script file should be referred for validation, for more details, refer here.
<form id="form1">
        <div class="frame">
            <div class="row">
                <div class="col-xs-8 col-sm-4">
                    <span class="txt">Select Country</span>
                    @Html.EJ().ComboBox("countryList").Datasource((IEnumerable<CountryList>)ViewBag.datasource1).ComboBoxFields(h => h.Text("text")).AutoFill(true).Placeholder("Select").HtmlAttributes(new Dictionary<string, object> { { "name", "select" } }).ClientSideEvents(e=>e.Select("select"))
                </div>
                <label class="message"></label>
            </div>
            <button type="submit" id="valid" onclick="validate()"> Validate</button>
        </div>
        <script>
          function validate()
          {
            var rules = {};
            $("form[id$=form1] input[name$=select]").each(function () {
                rules[this.name] = "required";
            });
            $('form[id$="form1"]').validate({
                rules: rules,
                errorPlacement: function (error, element) {
                    $(error).insertAfter($(".message"));
                }
            });
          }
         function select(args)
          {
            if(args.value!="")
            {
               $("label.error").css("display", "none")  //hide error message when value is selected.
            }
          }
       </script>

    </form>
Render ComboBox from code behind
ComboBox can be rendered from the code behind by initializing the required properties in controller and passing those properties via ViewData or Model to the client side
The following code illustrates the rendering of ComboBox using ComboBox properties from code behind.
@{Html.EJ().ComboBox("Customer", Model).Render(); }public ActionResult Index()
{
ComboBoxProperties combobox = new ComboBoxProperties();
combobox.DataSource = "http://js.syncfusion.com/ejServices/wcf/NorthWind.svc/";
combobox.Query = "ej.Query().from('Suppliers').select('SupplierID', 'ContactName').take(10)";
combobox.ComboBoxFields.Text = "ContactName";
combobox.ComboBoxFields.Value = "SupplierID";
combobox.Width = "300";
return View(combobox);
}