Rows and Columns
28 Apr 201718 minutes to read
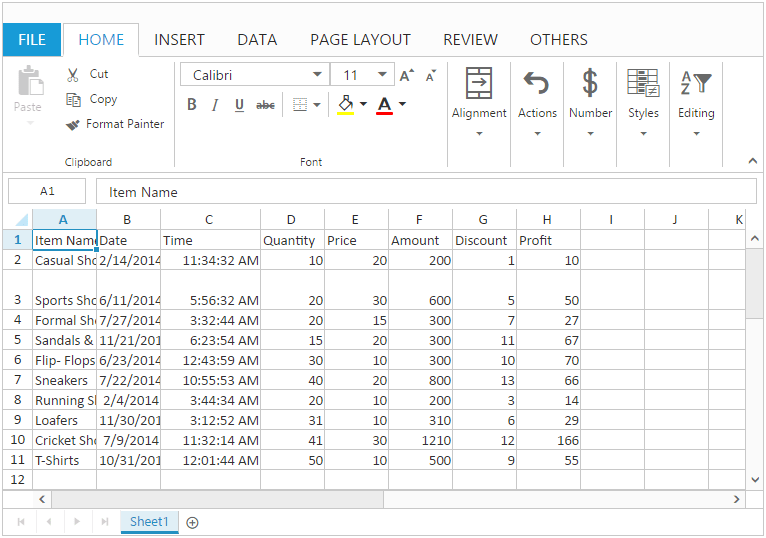
Spreadsheet is a tabular format consisting of rows and columns. Rows and columns are used to represent the editing area in Spreadsheet. The intersection point of rows and columns are called as cells. In that you can perform editing. You have RowCount and ColumnCount in sheets property for defining the rows and columns count. By default Spreadsheet creates 20 rows and 21 columns. Based on this grid content will be created.
Rows
Rows are a collection of cells that run horizontally. Each row is identified by the row number in the row header.
Columns
Columns are a collection of cells that run vertically. Each column is identified by column heading in the column header.
The following code example describes the above behavior.
<ej:Spreadsheet ID="FlatSpreadsheet" RowCount="50" ColumnCount="36"  runat="server">
     <Sheets>
           <ej:Sheet>
            <RangeSettings>
                <ej:RangeSetting StartCell="A1" ShowHeader="true"/>
            </RangeSettings>
        </ej:Sheet>
    </Sheets>
</ej:Spreadsheet>
protected void Page_Load(object sender, EventArgs e)
{
if (!IsPostBack)
{
BindDataSource();
}
}
private void BindDataSource()
{
var dataSource = new OrderItemsDataContext().GetAllItemDetails.ToList();
this.FlatSpreadsheet.Sheets.Add(new Syncfusion.JavaScript.Models.Sheet()
{
Datasource = dataSource
});
}List of operations
You can perform following operations in rows and columns,
- Insert
- Delete
- Show and Hide
- Resizing
Insert
You can insert blank cells, rows or columns based on the selection in a worksheet. You have to enable the AllowInsert property to perform the insert operation.
You can perform insert operation through,
- OTHERS tab in ribbon.
- Context menu
NOTE
In the header context menu you can insert only rows or columns.
Insert Shift Bottom
You can dynamically insert blank cells to the top of the selected range and shift the selected cells to down by following,
- Click Insert in the context menu and select “Shift Cells Down” option in Insert dialog.
- Select Insert Cells option in Insert button of OTHERS tab in Ribbon and select “Shift Cells Down” option in Insert dialog.
You can also perform insert shift bottom using insertShiftBottom method.
Insert Shift Right
You can dynamically insert blank cells to the left of the selected range and shift the selected cells to right by following,
- Click Insert in the context menu and select “Shift Cells Right” option in Insert dialog.
- Select Insert Cells option in Insert button of OTHERS tab in Ribbon and select “Shift Cells Right” option in Insert dialog.
You can also perform insert shift right using insertShiftRight method.
Insert Entire Row
You can dynamically insert the selected number of blank rows to the top of the selected range by following,
- Click Insert in the context menu and select “Entire Row” option in Insert dialog.
- Select Insert Cells option in Insert button of OTHERS tab in Ribbon and select “Entire Row” option in Insert dialog.
- Select Insert Sheet Rows option in Insert button of OTHERS tab in Ribbon.
- Click Insert option in row header context menu.
You can also perform insert entire row using insertEntireRow method.
Insert Entire Column
You can dynamically insert the selected number of blank columns to the left of the selected range by following,
- Click Insert in the context menu and select “Entire Column” option in Insert dialog.
- Select Insert Cells option in Insert button of OTHERS tab in Ribbon and select “Entire Column” option in Insert dialog.
- Select Insert Sheet Columns option in Insert button of OTHERS tab in Ribbon.
- Click Insert option in column header context menu.
You can also perform insert entire column using insertEntireColumn method.
Delete
You can delete a range of cells, rows or columns based on the selection in worksheet. You have to enable the AllowDelete property to perform delete operation.
You can perform delete operation through,
- OTHERS tab in Ribbon
- Context menu
NOTE
In header Context menu you can delete only rows or columns.
Delete Shift Up
You can dynamically delete the selected range of cells and shift the other cells to top by following,
- Click Delete in the context menu and select “Shift Cells Up” option in Delete dialog.
- Select Delete Cells option in Delete button of OTHERS tab in Ribbon and select “Shift Cells Up” option in Delete dialog.
You can also perform delete shift up using deleteShiftUp method.
Delete Shift Left
You can dynamically delete the selected range of cells and shift the other cells to left by following,
- Click Delete in the context menu and select “Shift Cells Left” option in Delete dialog.
- Select Delete Cells in Delete button of OTHERS tab in Ribbon and select “Shift Cells Left” option in Delete dialog.
You can also perform delete shift left using deleteShiftLeft method.
Delete Entire Row
You can dynamically delete the selected rows and shift the other rows to top by following,
- Click Delete in the context menu and select “Entire Row” option in Delete dialog.
- Select Delete Cells option in Delete button of OTHERS tab in Ribbon and select “Entire Row” option in Delete dialog.
- Select Delete Sheet Rows option in Delete button of OTHERS tab in Ribbon.
- Click Delete option in row header context menu.
You can also perform delete entire row using deleteEntireRow method.
Delete Entire Column
You can dynamically delete a selected columns and shift other columns to left by following,
- Click Delete in the context menu and select “Entire Column” option in Delete dialog.
- Select Delete Cells option in Delete button of OTHERS tab in Ribbon and select “Entire Column” option in Delete dialog.
- Select Delete Sheet Columns option in Delete button of OTHERS tab in Ribbon.
- Click Delete option in column header context menu.
You can also perform delete entire column using deleteEntireColumn method.
The following code example describes the above behavior.
<ej:Spreadsheet ID="FlatSpreadsheet" AllowInsert="true" AllowDelete="true" runat="server">
       <ClientSideEvents LoadComplete="loadComplete" />
         <Sheets>
           <ej:Sheet>
            <RangeSettings>
                <ej:RangeSetting StartCell="A1" ShowHeader="true"/>
            </RangeSettings>
        </ej:Sheet>
    </Sheets>
</ej:Spreadsheet>

 <script type="text/javascript">
function loadComplete() {
    if(!this.isImport) {
        this.insertEntireRow(2, 2);
        this.insertEntireColumn(2, 2);
        this.deleteEntireRow(4, 4);
        this.deleteEntireColumn(4, 4);
        this.insertShiftBottom({rowIndex: 4, colIndex: 4}, {rowIndex: 4, colIndex: 4});
        this.insertShiftRight({rowIndex: 3, colIndex: 4}, {rowIndex: 3, colIndex: 4});
        this.deleteShiftUp({rowIndex: 4, colIndex: 6}, {rowIndex: 4, colIndex: 6});
        this.deleteShiftLeft({rowIndex: 3, colIndex: 6}, {rowIndex: 3, colIndex: 6});
    }
}
</script>
protected void Page_Load(object sender, EventArgs e)
{
if (!IsPostBack)
{
BindDataSource();
}
}
private void BindDataSource()
{
var dataSource = new OrderItemsDataContext().GetAllItemDetails.ToList();
this.FlatSpreadsheet.Sheets.Add(new Syncfusion.JavaScript.Models.Sheet()
{
Datasource = dataSource
});
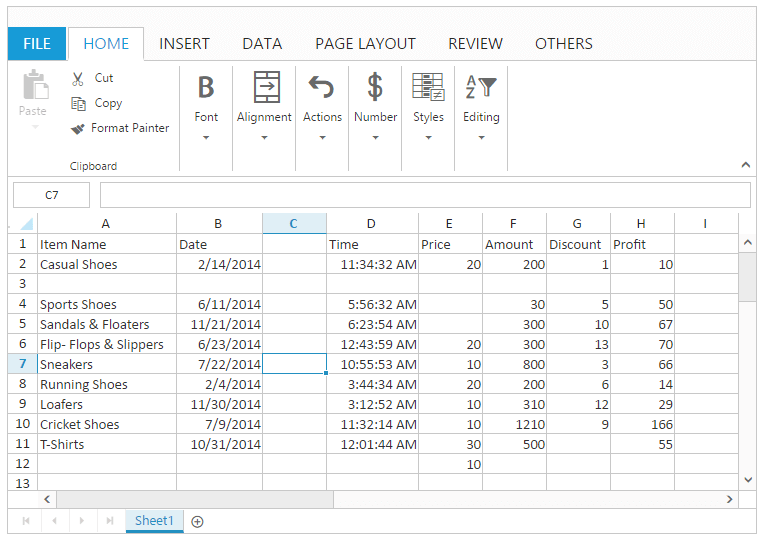
}The following output is displayed as a result of the above code example.
Show and Hide
You can show or hide the rows and columns in Spreadsheet using methods and context menu.
Hide Row
You can hide the rows dynamically by using one of the following ways,
- Click “Hide” option in row header context menu.
- Hide the rows using
hideRowmethod.
Hide Column
You can hide the columns dynamically by using one of the following ways,
- Click “Hide” option in column header context menu.
- Hide the columns using
hideColumnmethod.
The following code example describes the above behavior.
<ej:Spreadsheet ID="FlatSpreadsheet" runat="server">
       <ClientSideEvents LoadComplete="loadComplete" />
           <Sheets>
           <ej:Sheet>
            <RangeSettings>
                <ej:RangeSetting StartCell="A1" ShowHeader="true"/>
            </RangeSettings>
        </ej:Sheet>
    </Sheets>
</ej:Spreadsheet>

 <script type="text/javascript">
function loadComplete(args) {
    this.setWidthToColumns([180, ]);
    if(!this.isImport){
        this.hideRow(2);
        this.hideColumn(2);
    }
}
</script>
protected void Page_Load(object sender, EventArgs e)
{
if (!IsPostBack)
{
BindDataSource();
}
}
private void BindDataSource()
{
var dataSource = new OrderItemsDataContext().GetAllItemDetails.ToList();
this.FlatSpreadsheet.Sheets.Add(new Syncfusion.JavaScript.Models.Sheet()
{
Datasource = dataSource
});
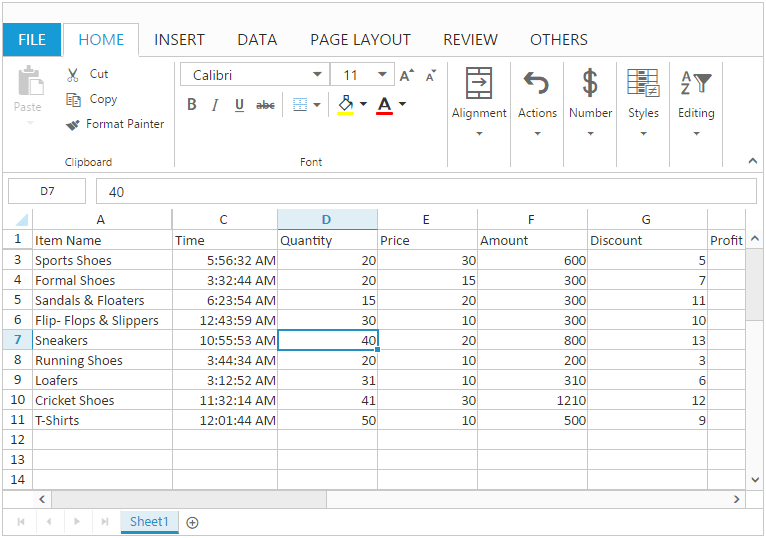
}The following output is displayed as a result of the above code example.
Show Row
You can show the hidden rows dynamically by using one of the following ways,
- Click “Unhide” option in row header context menu.
- Show the hidden rows using
showRowmethod.
Show Column
You can show the hidden columns dynamically by using one of the following ways,
- Click “Unhide” option in column header context menu.
- Show the hidden columns using
showColumnmethod.
The following code example describes the above behavior.
<ej:Spreadsheet ID="FlatSpreadsheet" runat="server">
       <ClientSideEvents LoadComplete="loadComplete" />
        <Sheets>
           <ej:Sheet>
            <RangeSettings>
                <ej:RangeSetting StartCell="A1" ShowHeader="true"/>
            </RangeSettings>
        </ej:Sheet>
    </Sheets>
</ej:Spreadsheet>

 <script type="text/javascript">
function loadComplete(args) {
    if(!this.isImport){
        this.showRow(2);
        this.showColumn(2);
    }
}
</script>
protected void Page_Load(object sender, EventArgs e)
{
if (!IsPostBack)
{
BindDataSource();
}
}
private void BindDataSource()
{
var dataSource = new OrderItemsDataContext().GetAllItemDetails.ToList();
this.FlatSpreadsheet.Sheets.Add(new Syncfusion.JavaScript.Models.Sheet()
{
Datasource = dataSource
});
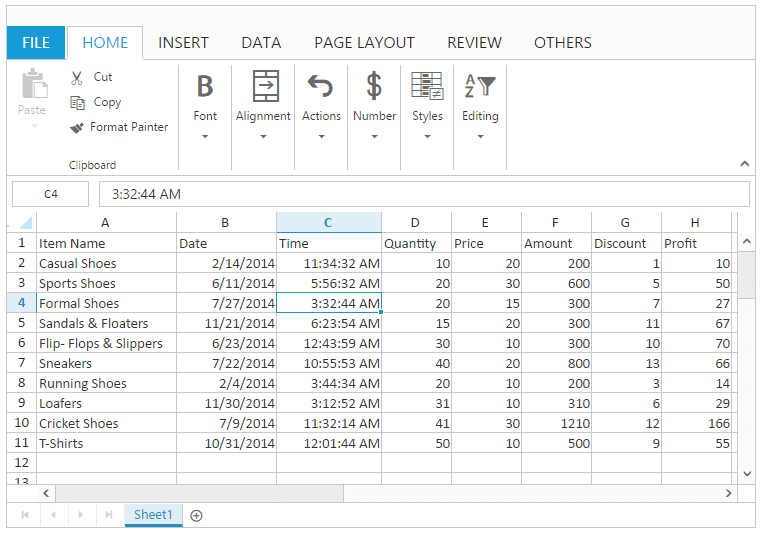
}The following output is displayed as a result of the above code example.
Resizing
You can change ColumnWidth and RowHeight with the specified value. You have to enable AllowResizing to perform resizing.
You can perform resizing using one of the following ways,
- Resize option in column header and row header.
- set the column width by using
setColWidthmethod orColumnWidthproperty. - set the row height by using
setRowHeightmethod orRowHeightproperty.
The following code example describes the above behavior.
<ej:Spreadsheet ID="FlatSpreadsheet" RowHeight="21"  ColumnWidth="64" runat="server">
       <ClientSideEvents LoadComplete="loadComplete" />
          <Sheets>
           <ej:Sheet>
            <RangeSettings>
                <ej:RangeSetting StartCell="A1" ShowHeader="true"/>
            </RangeSettings>
        </ej:Sheet>
    </Sheets>
</ej:Spreadsheet>

 <script type="text/javascript">
function loadComplete(args) {
    if(!this.isImport){
        this.XLResize.setColWidth(2, 100);
        this.XLResize.setRowHeight(2, 40);
    }
}
</script>
protected void Page_Load(object sender, EventArgs e)
{
if (!IsPostBack)
{
BindDataSource();
}
}
private void BindDataSource()
{
var dataSource = new OrderItemsDataContext().GetAllItemDetails.ToList();
this.FlatSpreadsheet.Sheets.Add(new Syncfusion.JavaScript.Models.Sheet()
{
Datasource = dataSource
});
}The following output is displayed as a result of the above code example.