How can I help you?
Editing
The Gantt control provides in-built support to add, insert and update the tasks. The following are the types of editing available in Gantt.
- Cell Editing
- Normal Editing
- Taskbar Editing
- Dependency Editing
Cell Editing
Initialize cell edit mode
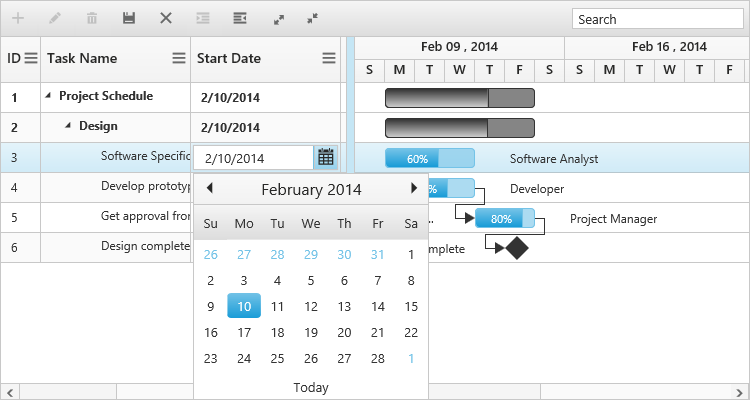
Update the task details through grid cell editing by setting EditSettings.EditMode as cellEditing. The following code example shows you how to enable the cellEditing in Gantt control.
<ej:Gantt ID="GanttContainer" runat="server"
    //...>
    <EditSettings AllowEditing="true" EditMode="cellEditing" />
</ej:Gantt>
The output of Gantt with cell editing is as follows.
Save editing cell
Currently editing cell value can be saved by clicking the save toolbar icon or clicking on any other cell element in the grid and also editing cell can be saved by using saveEdit method, using this method we can save the current editing cell dynamically on any action like external button click, please refer the following code example.
<ej:Gantt ID="GanttContainer" runat="server"
    //...>
    <EditSettings AllowEditing="true" EditMode="cellEditing" />
</ej:Gantt>

<script>

$("#save_button").click(function () {
    $("#GanttContainer").ejGantt("instance").saveEdit();
});

</script>
Cancel editing cell
Currently editing cell value can be restored with old value by using cancel toolbar icon or by pressing Esc key. And also this can be done by using cancelEdit method on any other external actions like button click, please refer the following code example.
<ej:Gantt ID="GanttContainer" runat="server"
    //...>
    <EditSettings AllowEditing="true" EditMode="cellEditing" />
</ej:Gantt>

<script>

$("#cancel_button").click(function () {
    $("#GanttContainer").ejGantt("instance").cancelEdit();
});

</script>
Prevent Cell Editing
In cell editing action BeginEdit and EndEdit client side events are triggered before and after the editing action. Cell editing for particular column or specific cell can be prevented by using BeginEdit client side event, please refer following code example for this.
<ej:Gantt ID="GanttContainer" runat="server"
    BeginEdit="beginEdit"
    //...>
    <EditSettings AllowEditing="true" EditMode="cellEditing" />
</ej:Gantt>

<script>

function beginEdit(args) {
    if (args.columnIndex == 1)
        args.cancel = true;
}

</script>
Normal Editing
Initialize Normal edit mode
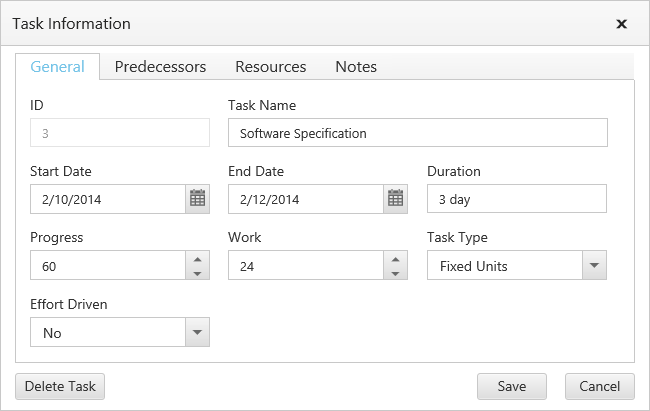
Update the task details through edit dialog by setting EditMode as normal. The following code example shows you how to enable normal editing in Gantt control.
<ej:Gantt ID="GanttContainer" runat="server"
//...>
<EditSettings AllowEditing="true" EditMode="normal" />
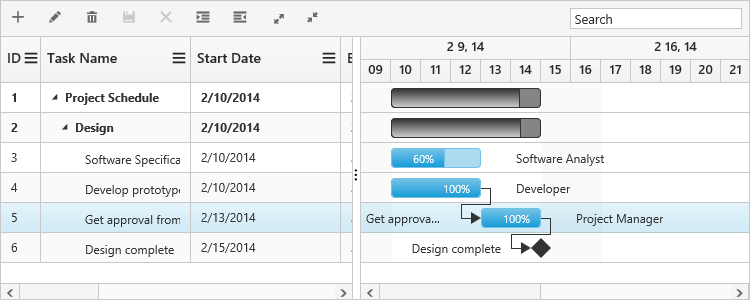
</ej:Gantt>The following screenshot shows the output of normal editing.
Define required fields in add/edit dialog
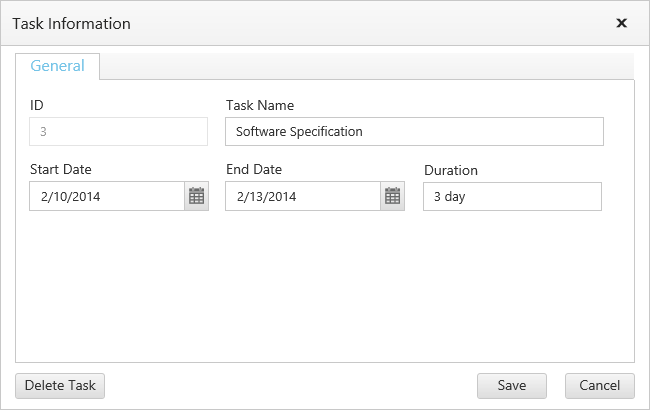
In Gantt we can define the editing fields available in add and edit dialogs by using AddDialogFields and EditDialogFields properties. Each editing fields are defined with Field and EditType properties. The following code example shows how to define EditDialogFields property.
<ej:Gantt ID="GanttContainer" runat="server"
    //...>
    <EditSettings AllowEditing="true" EditMode="normal" />
    <EditDialogFields>
        <ej:EditDialogField Field="TaskID" EditType="stringedit"/>
        <ej:EditDialogField Field="TaskName" EditType="stringedit"/>
        <ej:EditDialogField Field="StartDate" EditType="datepicker"/>
        <ej:EditDialogField Field="EndDate" EditType="datepicker"/>
        <ej:EditDialogField Field="Duration" EditType="stringedit"/>
    </EditDialogFields>
</ej:Gantt>
The following screenshot show the output of above code example.
NOTE
Similarly we can define the required fields in add dialog with
AddDialogFields.FieldandAddDialogFields.EditTypeproperties.
Add custom column fields in General tab
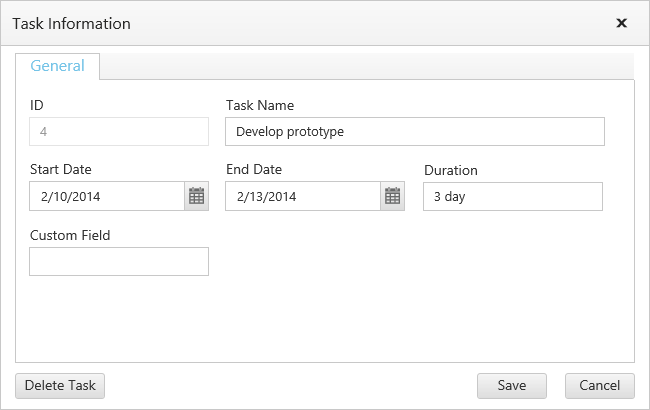
By default custom column fields are included in add/edit dialog’s custom field tab but we can display this column field in General tab by setting DisplayInGeneralTab property as true in AddDialogFields and EditDialogFields properties. The following code example shows how to add custom column field in General tab of edit dialog.
<ej:Gantt ID="GanttContainer" runat="server"
    Load="load"
    //...>
    <EditSettings AllowEditing="true" EditMode="normal" />
    <EditDialogFields>
        <ej:EditDialogField Field="TaskID" EditType="stringedit"/>
        <ej:EditDialogField Field="TaskName" EditType="stringedit"/>
        <ej:EditDialogField Field="StartDate" EditType="datepicker"/>
        <ej:EditDialogField Field="EndDate" EditType="datepicker"/>
        <ej:EditDialogField Field="Duration" EditType="stringedit"/>
        <ej:EditDialogField Field="CustomField" EditType="stringedit" DisplayInGeneralTab="true"/>
    </EditDialogFields>
</ej:Gantt>

<script>

function load(args) {
    var column = { field: "CustomField", mappingName: "CustomField", headerText: "Custom Field" };
    this.getColumns().push(column);
}

</script>
The following screenshot show the output of above code example.
NOTE
Similarly we can include custom fields in add dialog’s General tab by setting
DisplayInGeneralTabastrueinAddDialogFieldscollection.
NOTE
Default columns predecessors, resources and notes are displayed in separate tabs, we can’t include this in General tab of add/edit dialog.
Open add/edit dialog dynamically
Gantt add and edit dialogs can be opened dynamically by using openAddDialog and openEditDialog methods. The following code example shows how to open add and dialog on separate button click actions.
<ej:Gantt ID="GanttContainer" runat="server"
    //...>
    <EditSettings AllowEditing="true" EditMode="normal" />
</ej:Gantt>

<script>
$("#openAddDialog").click(function(){
    $("#GanttContainer").ejGantt("instance").openAddDialog();
});

$("#openEditDialog").click(function(){
    $("#GanttContainer").ejGantt("instance").openEditDialog();
});
</script>
NOTE
We should select any one of the row in Gantt to open the edit dialog.
Taskbar Editing
Update the task details by interactions such as resizing and dragging the taskbar. Taskbar editing can be enabled by setting AllowGanttChartEditing as true. The following code example shows you how to enable taskbar resizing in Gantt control.
<ej:Gantt ID="GanttContainer" runat="server"
    AllowGanttChartEditing="true"
    //...>
</ej:Gantt>
You can also enable or disable the progress bar resizing by using the EnableProgressBarResizing. The following code example shows how to disable this property.
<ej:Gantt ID="GanttContainer" runat="server"
    EnableProgressBarResizing="true"
    //...>
</ej:Gantt>
Prevent taskbar editing for particular task
On taskbar edit action TaskbarEditing and TaskbarEdited client side event will be triggered. We can prevent the taskbar from editing by using TaskbarEditing event and we can revert taskbar edit action by using TaskbarEdited event. The following code example shows how to achieve this.
<ej:Gantt ID="GanttContainer" runat="server"
    TaskbarEditing="taskbarEditing"
    TaskbarEdited="taskbarEdited"
    //...>
</ej:Gantt>

<script>
function taskbarEditing(args) {
    if (args.rowData.taskId == 4) // We can't edit Task Id 4
        args.cancel = true;
}
function taskbarEdited(args) {
    if (args.data.taskId == 5) // We can edit task id 5 task but changes reverted on mouse up action
        args.cancel = true;
}
</script>
Dependency Editing
In Gantt, we can add, edit, update the task dependencies by mouse interactions, edit dialog and public methods. The code example shows how to enable dependency editing in Gantt.
<ej:Gantt ID="GanttContainer" runat="server"
    AllowGanttChartEditing="true"
    PredecessorMapping="Predecessors"
    //...>
</ej:Gantt>
Add Dependency
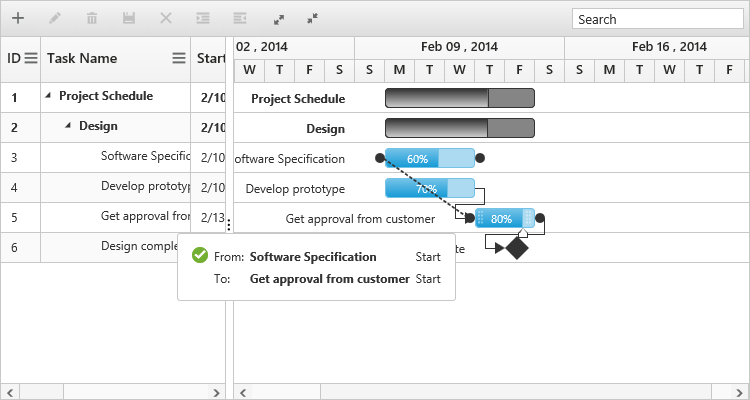
Task dependency can be added by mouse interactions by connecting connector points in predecessor and successor tasks. The following screen shot shows the add dependency action.
Edit Dependency
Task dependency value can be edited by using edit dialog and updateDependency method. Dependency edit dialog can be opened by double clicking on corresponding dependency line.
Client side ActionBegin client event will be triggered twice with different requestType argument values while opening of dependency dialog. First time, event will be triggered with requestType argument values as beforeDependencyEditDialogOpen, in this event we can get the current editing dependency line information, next ActionBegin client side event will be triggered with requestType argument value as afterDependencyEditDialogOpen, in this event we can get the information about current editing dependency line and editing elements in edit dialog. Using this event we can customize the dependency edit dialog elements.
<ej:Gantt ID="GanttContainer" runat="server"
AllowGanttChartEditing="true"
PredecessorMapping="Predecessors"
ActionBegin="actionBegin"
//...>
</ej:Gantt>
<script>
function actionBegin(args) {
if(args.requestType == "beforeDependencyEditDialogOpen") {
}
else if(args.requestType == "afterDependencyEditDialogOpen") {
}
}
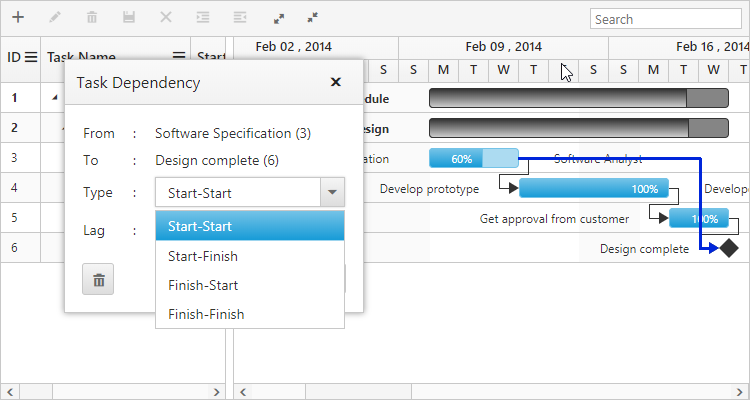
</script>The following screen shot shows the dependency edit dialog.
Delete Dependency
Task dependency can be deleted by using edit dialog and deleteDependency method. The following screen shot shows the dependency edit dialog with delete option.
Click here to view the online demo sample for editing in Gantt.
Update Gantt record value dynamically
Gantt record’s value can be dynamically updated by using updateRecordByTaskId or updateRecordByIndex method. updateRecordByTaskId method used to update the Gantt record by using it’s task id value and updateRecordByIndex method was used to update Gantt record value by row index value. We can invoke this method on any external button click action, the following code example shows how to use this methods.
<ej:Gantt ID="GanttContainer" runat="server"
    //...>
</ej:Gantt>

<script>
$("#updateRecordByTaskId").click(function () {
    var ganttObj = $("#GanttContainer").ejGantt("instance"),
        data = {
                taskID: 4,
                taskName: "Updated by task id",
                startDate: new Date("02/10/2014"),
                endDate: new Date("02/14/2014"),
                duration: 5,
                progress: "80",
                resourceId: [2]
            };
    ganttObj.updateRecordByTaskId(data);
});

$("#updateRecordByRowIndex").click(function () {
    var ganttObj = $("#GanttContainer").ejGantt("instance"),
        data = {
                taskID: 5,
                taskName: "Updated by index value",
                startDate: new Date("02/10/2014"),
                endDate: new Date("02/14/2014"),
                duration: 3, progress: "100",
                predecessor: "4SS",
                resourceId: [2]
        };
    ganttObj.updateRecordByIndex(4, data);
});

</script>
You can find the JS playground sample for this here.
NOTE
Using these methods we can’t update the task id value.
Delete confirmation message
Delete confirmation message is used to get the confirmation from the user before delete the record. This confirmation message can be enabled by setting EditSettings.ShowDeleteConfirmDialog property as true.
The following code snippet explains how to enable delete confirmation message in Gantt.
<ej:Gantt ID="GanttContainer" runat="server"
    //...>
    <EditSettings AllowDeleting="true" ShowDeleteConfirmDialog="true" />
</ej:Gantt>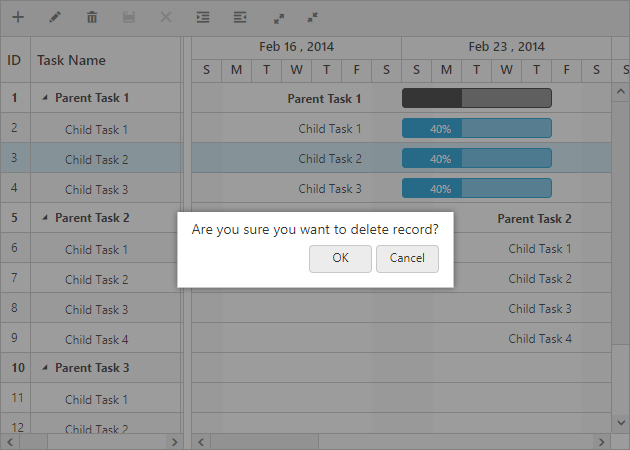
The above screen shot shows the appearance of delete confirmation message in Gantt.
Task Indent
Task indent option in Gantt was enabled by setting EditSettings.AllowIndent as true. Tasks can be indented by clicking on indent toolbar item or by using indentItem method. We can invoke this method dynamically on any action like external button click. The below code example shows how to enable indent option in Gantt.
<ej:Gantt ID="GanttContainer" runat="server"
//...>
<EditSettings AllowIndent="true" />
<ToolbarSettings ShowToolbar="true" ToolbarItems="indent" />
</ej:Gantt>
<script>
$("#indentTask").click(function () {
var ganttObj = $("#GanttContainer").ejGantt("instance");
if (ganttObj.selectedRowIndex() != -1)
ganttObj.indentItem();
});
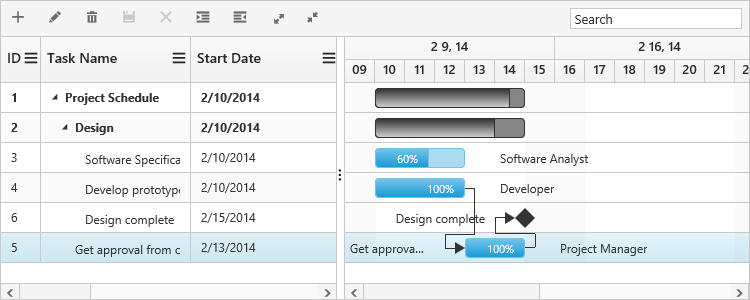
</script>The following screenshots shows the output of above code example.
Before Indent
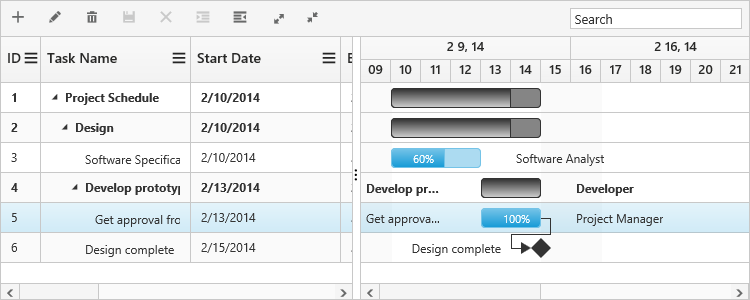
After Indent
NOTE
We should select any one of the row in Gantt to perform task indent action.
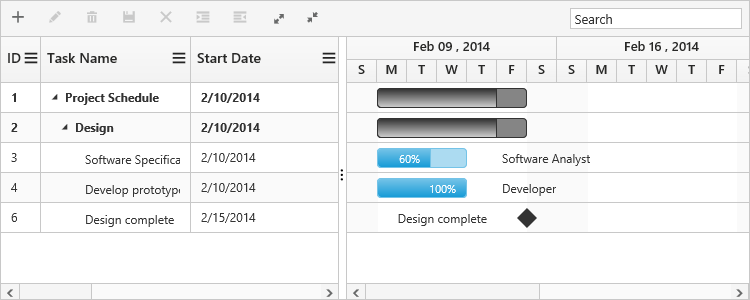
Task Outdent
Task outdent option in Gantt was enabled by setting EditSettings.AllowIndent as true. Tasks can be outdent by clicking on outdent toolbar item or by using outdentItem method. We can invoke this method dynamically on any action like external button click. The below code example shows how to enable outdent option in Gantt.
<ej:Gantt ID="GanttContainer" runat="server"
    //...>
    <EditSettings AllowIndent="true" />
    <ToolbarSettings ShowToolbar="true" ToolbarItems="outdent" />
</ej:Gantt>

<script>

$("#outdentTask").click(function () {
    var ganttObj = $("#GanttContainer").ejGantt("instance");
    if (ganttObj.selectedRowIndex() != -1)
        ganttObj.outdentItem();
});

</script>
The following screenshots shows the output of above code example.
Before Outdent
After Outdent
NOTE
We should select any one of the row in Gantt to perform task outdent action.
Task Delete
Task delete option in Gantt was enabled by setting EditSettings.AllowDeleting as true. Tasks can be delete by clicking on delete toolbar item or by using deleteItem method. We can invoke this method dynamically on any action like external button click. The below code example shows how to enable delete option in Gantt.
<ej:Gantt ID="GanttContainer" runat="server"
    //...>
    <EditSettings AllowDeleting="true" />
    <ToolbarSettings ShowToolbar="true" ToolbarItems="delete" />
</ej:Gantt>

<script>

$("#deleteTask").click(function () {
    var ganttObj = $("#GanttContainer").ejGantt("instance");
    if (ganttObj.selectedRowIndex() != -1)
        ganttObj.deleteItem();
});

</script>
The following screenshots shows the output of above code example.
Before Delete
After Delete
NOTE
We should select any one of the row in Gantt to perform task delete action.
Read-only Gantt
In Gantt, all editing options can be disabled by setting ReadOnly property as true. The following code example shows how to make Gantt control as read-only.
<ej:Gantt ID="GanttContainer" runat="server"
    ReadOnly="true"
    //...>
</ej:Gantt>